Documentation
About Virtofy
Welcome
Welcome to the Virtofy documentation. The documentation is not yet complete, as Virtofy is in BETA .
Platforms
Virtofy is available for Windows, Meta VR and Android devices. Mac and iOS support is on our roadmap .
System Requirements
Android
Android 6.0 ‘Marshmallow’ (API level 23), 250 MB free disk space.
Meta
Quest
Windows
DirectX 11 compatible graphics card, 4GB RAM, 1 GB free disk space, Windows 7 SP1 64 bit.
Versions
The desktop (Windows) version of Virtofy includes the In-App-Editor . Mobile devices (Android, Meta) do not have the In-App-Editor . The app is called Virtofy-Viewer on these devices.
A detailed change log of the latest changes can be seen here .
How to send Feedback
Feedback is very important for us. Please see the video above to check how to send feedback to us within the Virtofy app.
Besides that, you can send us your feedback via email, or use the Forum for further discussions.
Virtofy BETA
Sign up
As Virtofy is currently in BETA you have to sign up for the BETA program first. We will check your request and will inform you once we have you signed up.
Download
Once you are signed up for the BETA program, you can use the BETA download page to get the version you want.
Installation
For Windows, you will get a standard installation program. For Android and Meta devices, we will use the corresponding store backend to make it as easy and secure as possible for you.
Licensing
We are working on this documentation part. Please stay tuned.
Account
Registration
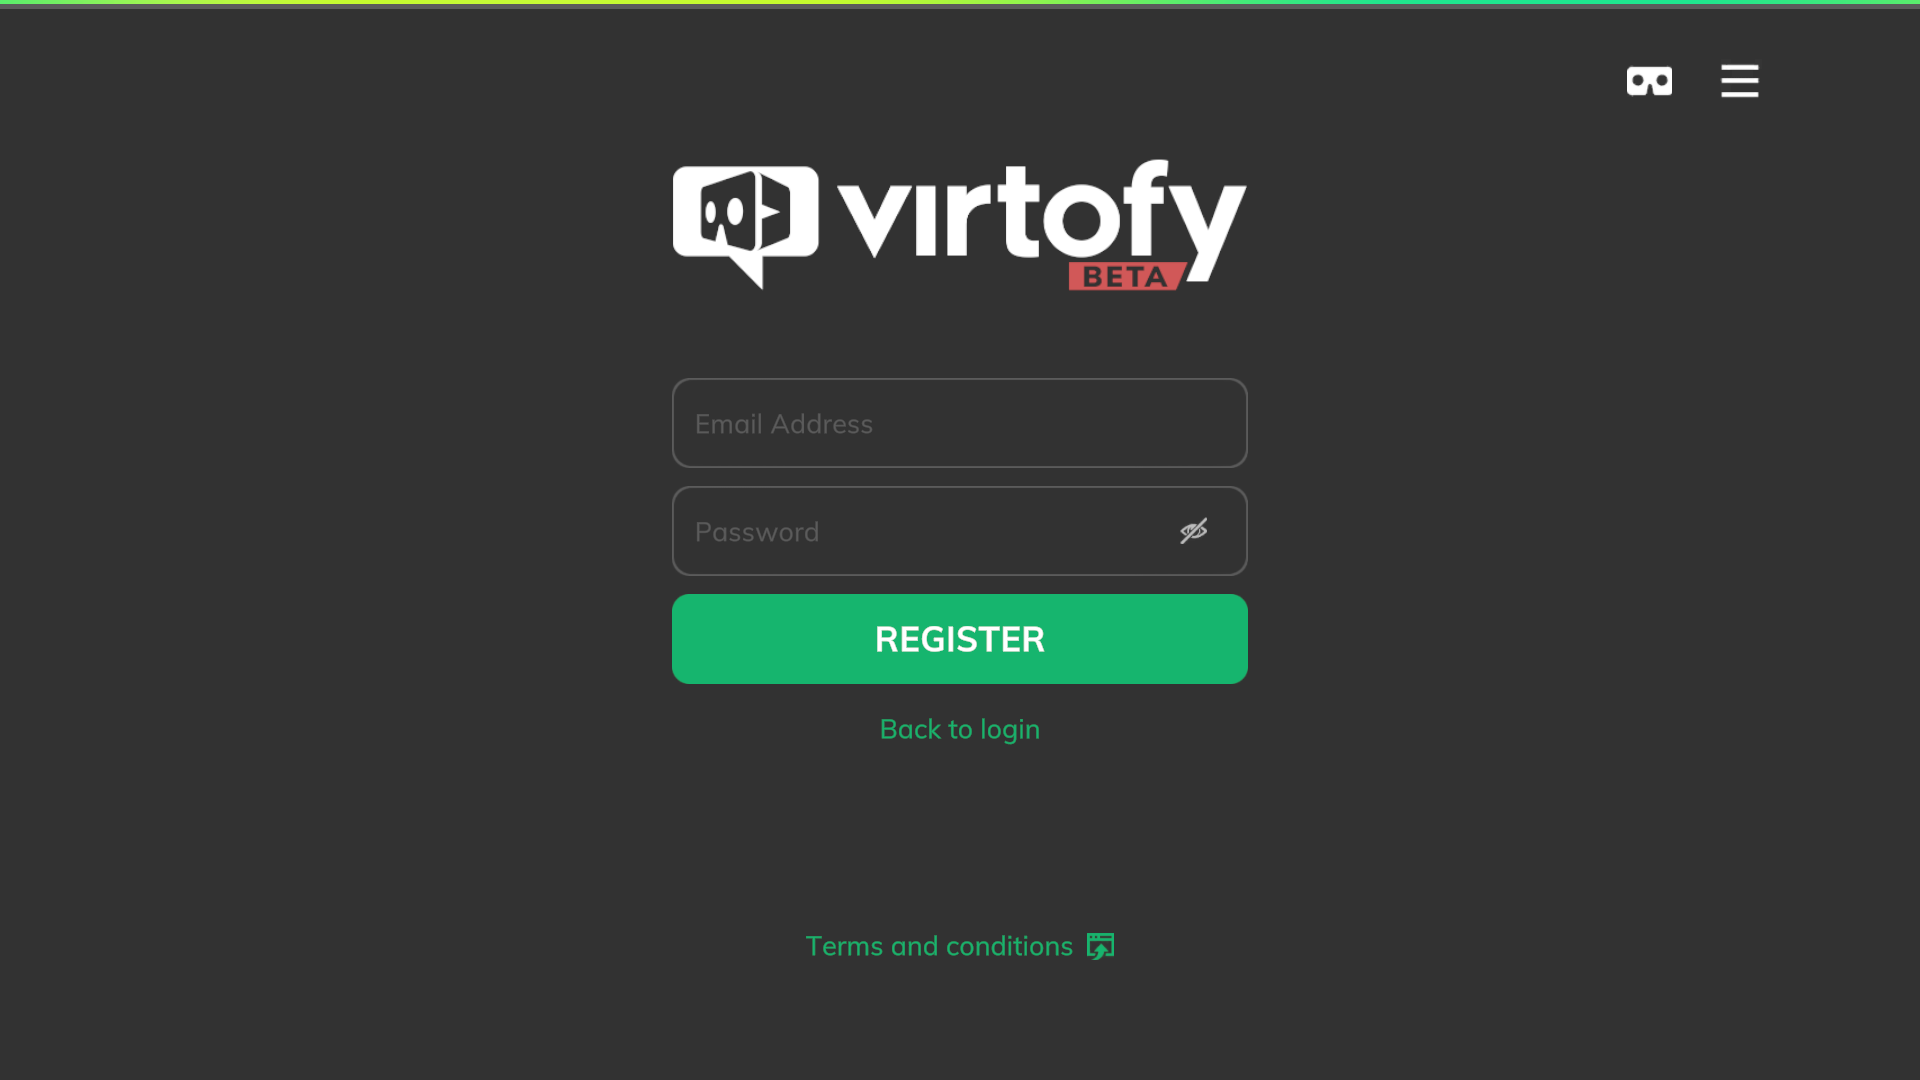
To create a new account, click “Register” on the footer menu on the login screen and, type in your email address and a password with at least 8 characters, one upper and one lower case letter and a number. Click register. After that, you will receive an email with further instructions.
NOTE: If you are using the Virtofy BETA version, you must register your account with the same email address you have signed up for the Virtofy BETA.
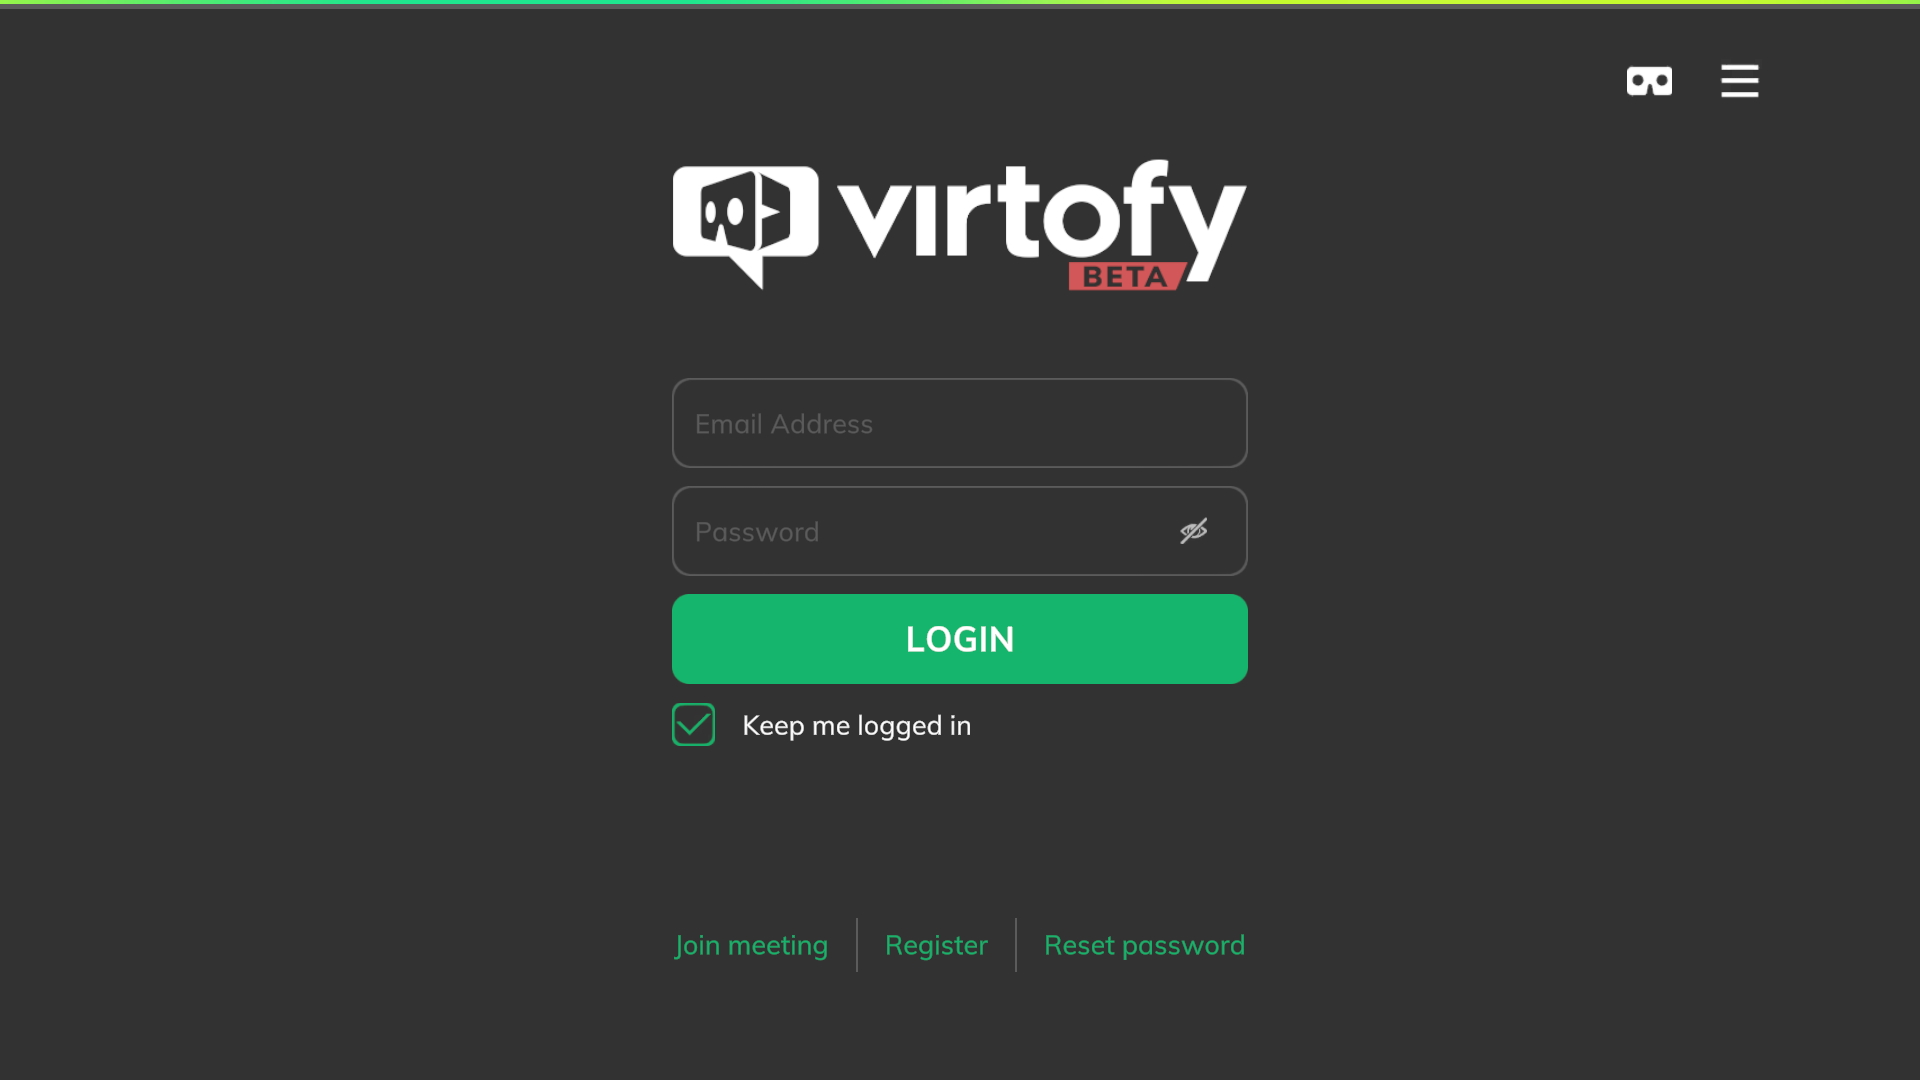
Login
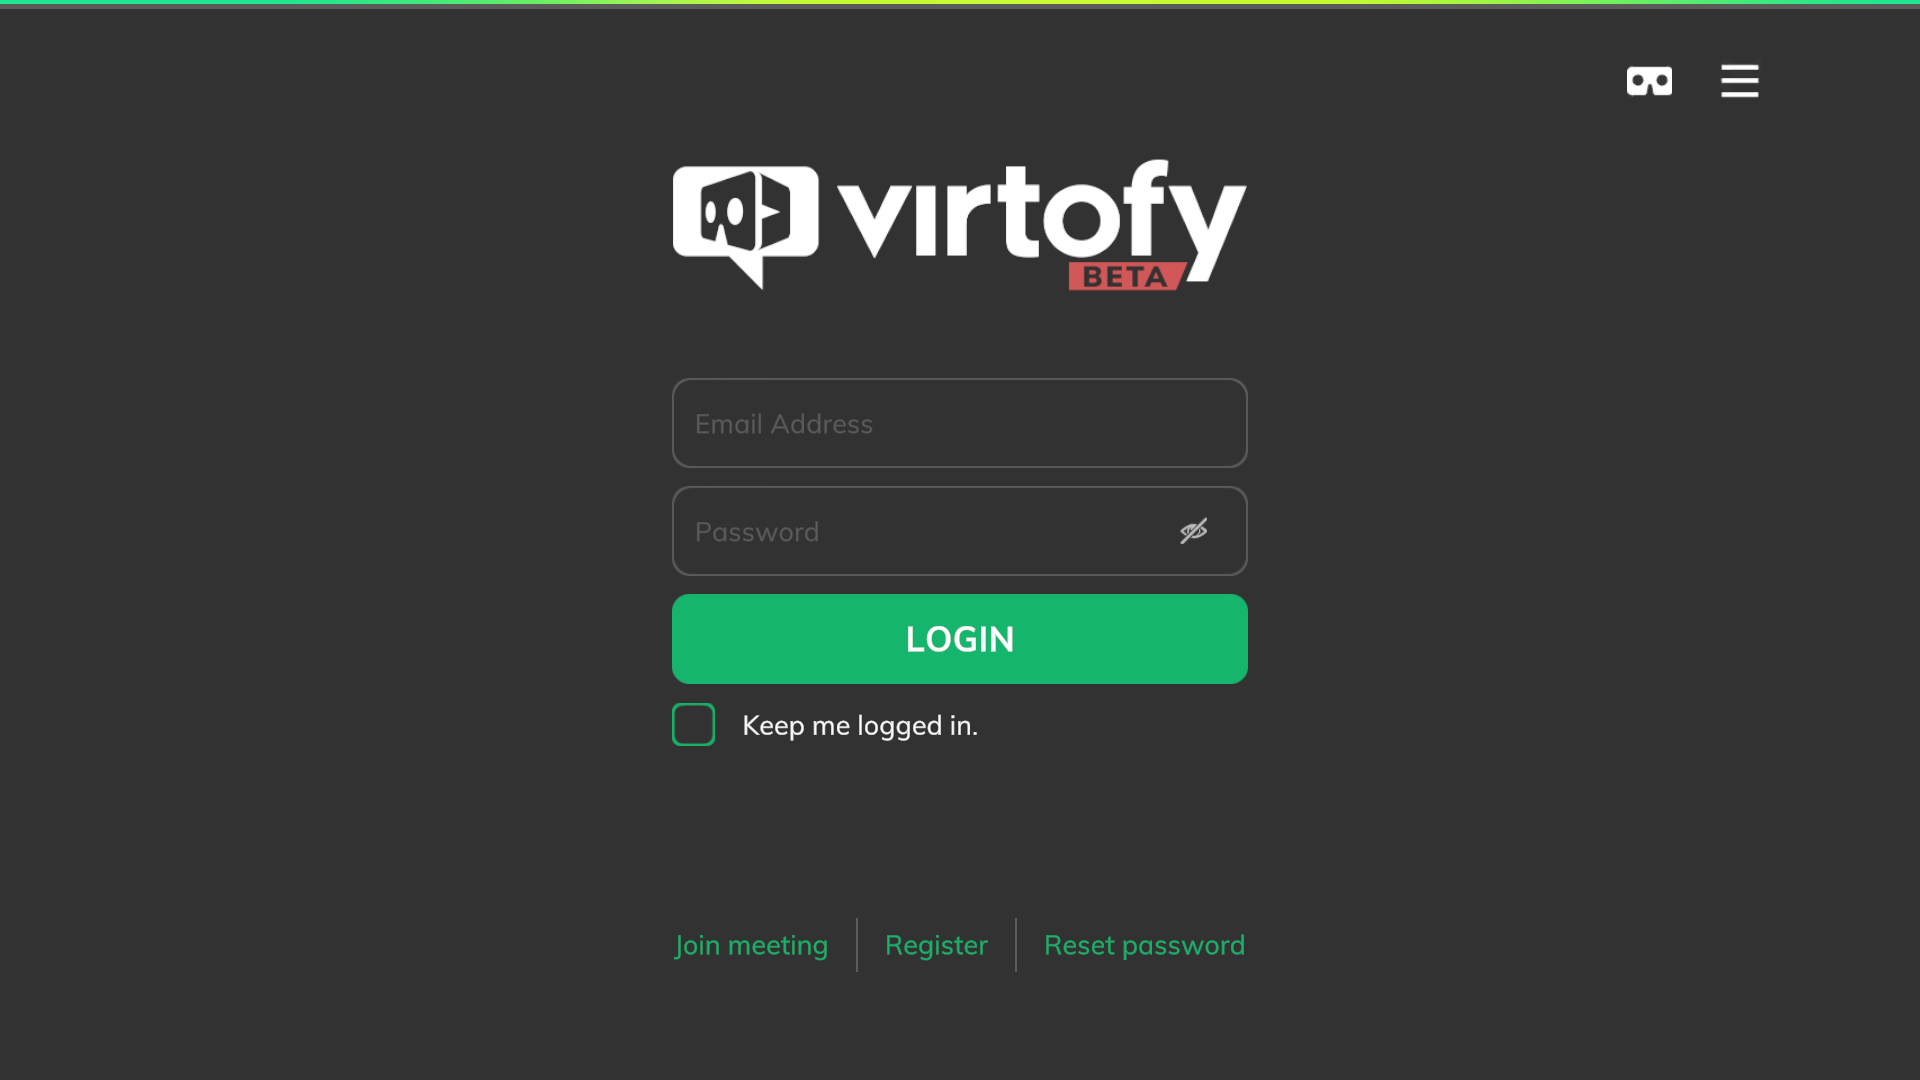
Enter your email address and password you have used in your registration process and click on the login button to login into your account.
Keep me logged in
This will remember your last login data.
SECURITY: You have to enter your password again if you have not logged in for more then 30 days.
Reset password
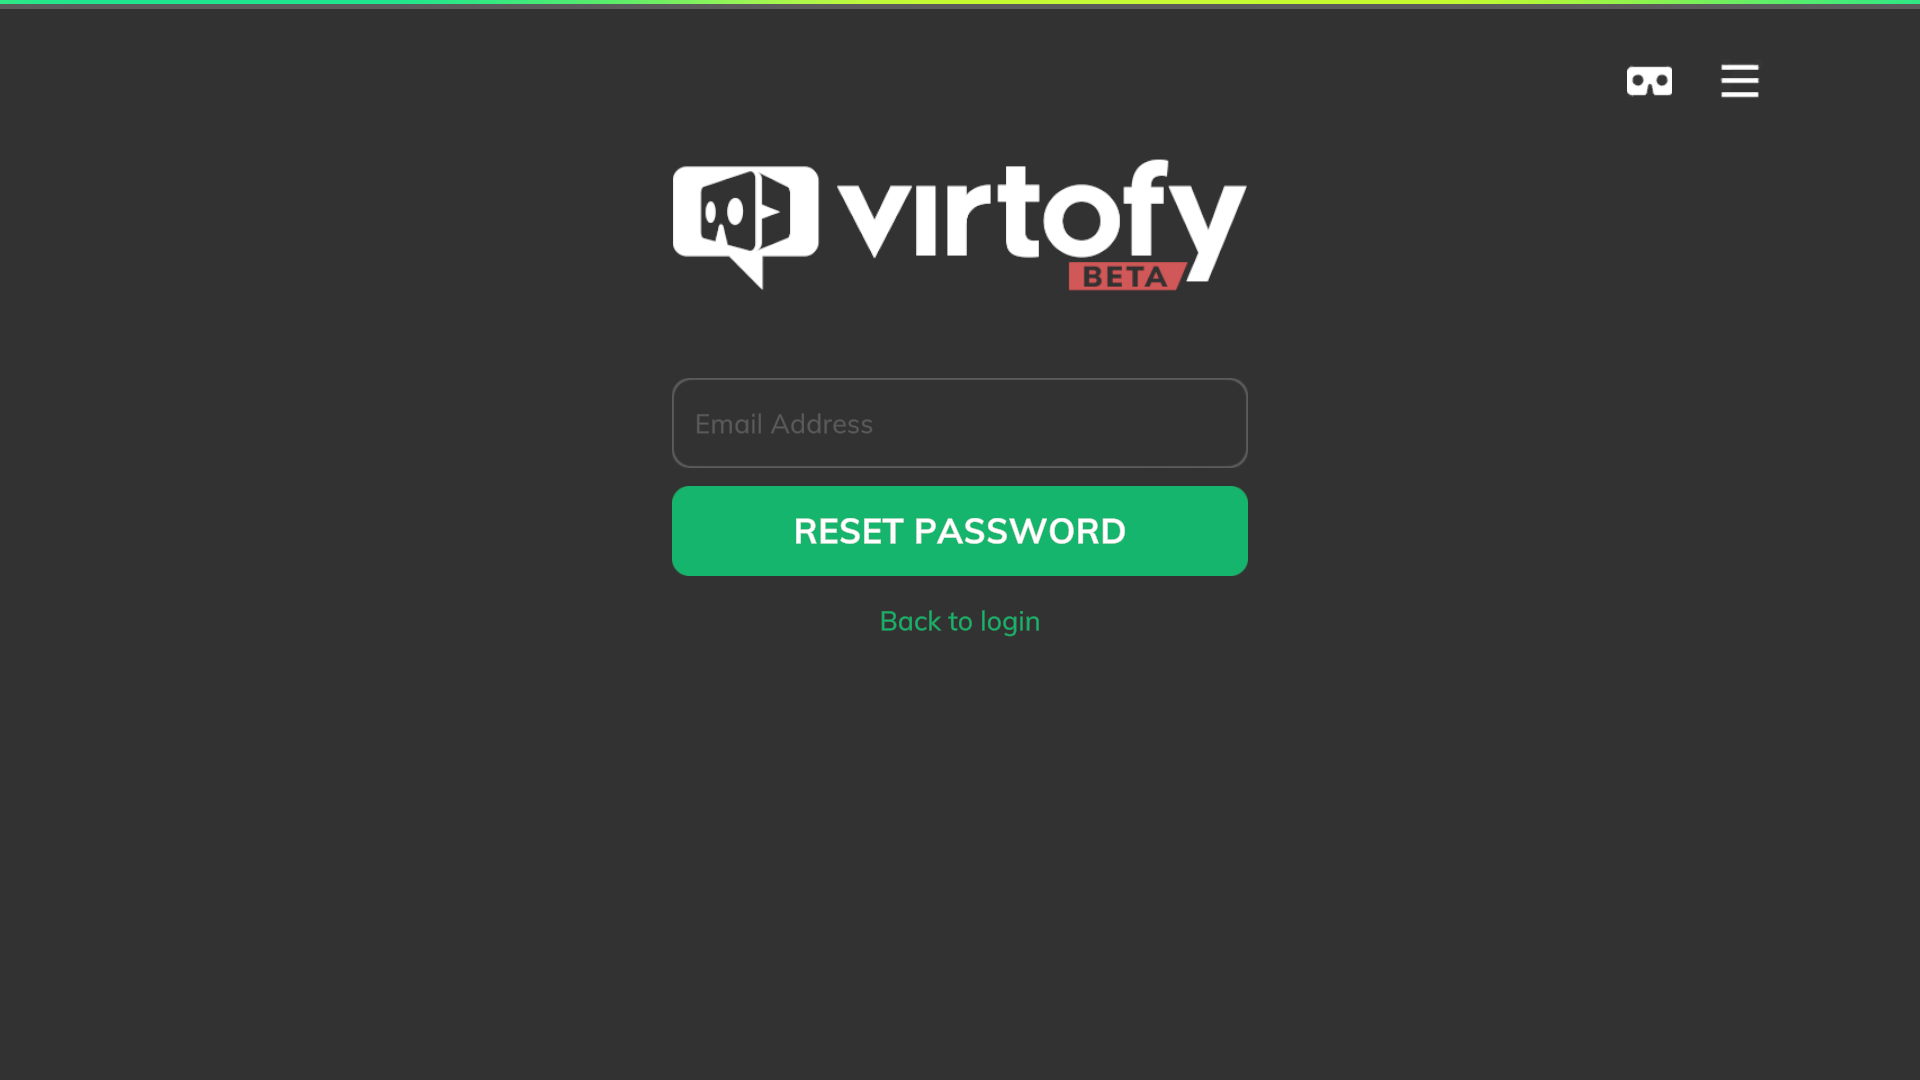
To reset your password if you are not logged in, switch to the “Reset password” panel on the login screen and type in your email address. Click the “Reset password” button to receive an email with further instructions.
Delete account
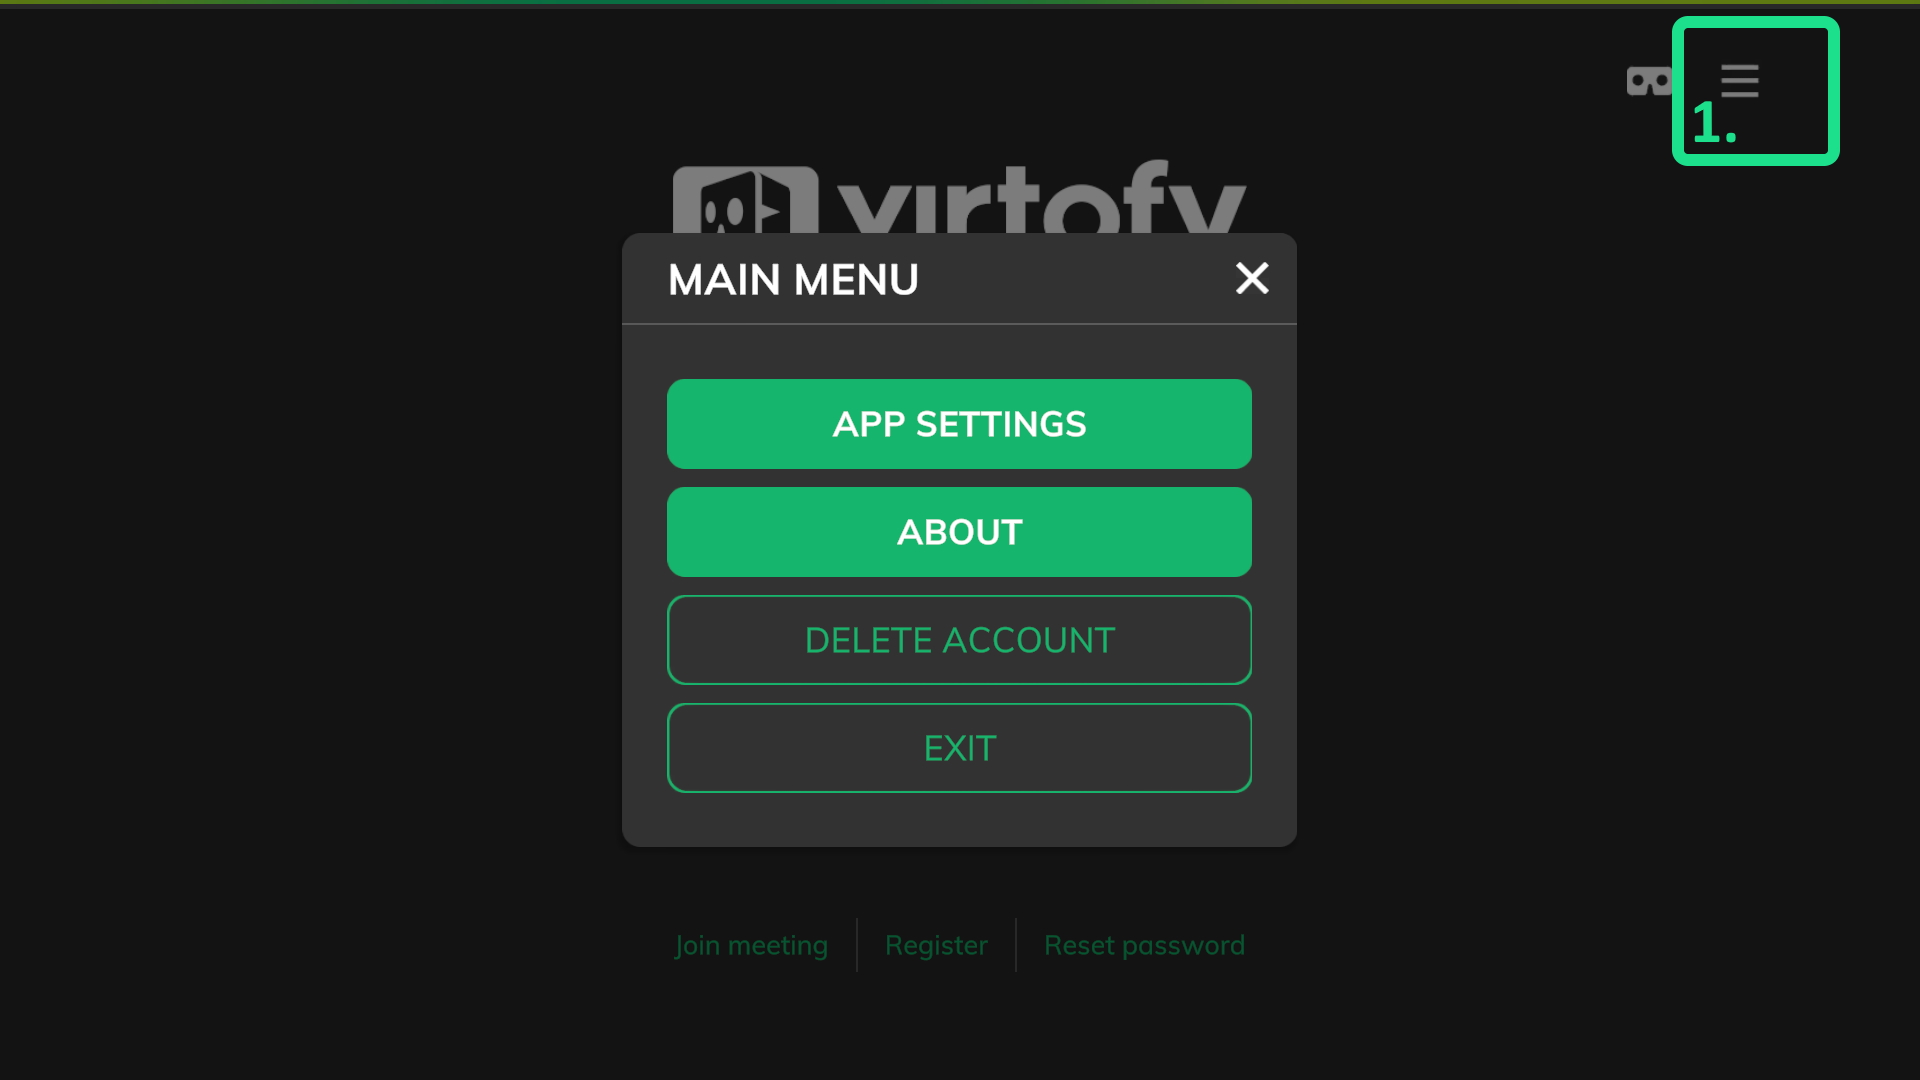
You can delete your account without the need to be logged in. Click on the main menu button (see: 1 in the delete screenshot) and then on “Delete account”. Fill in your email address and password and click on delete to receive an account deletion confirmation email with further instructions.
CAUTION: You will lose all tour data and all paid plan subscriptions if you confirm your account deletion in the received confirmation email. This cannot be undone!
Account settings
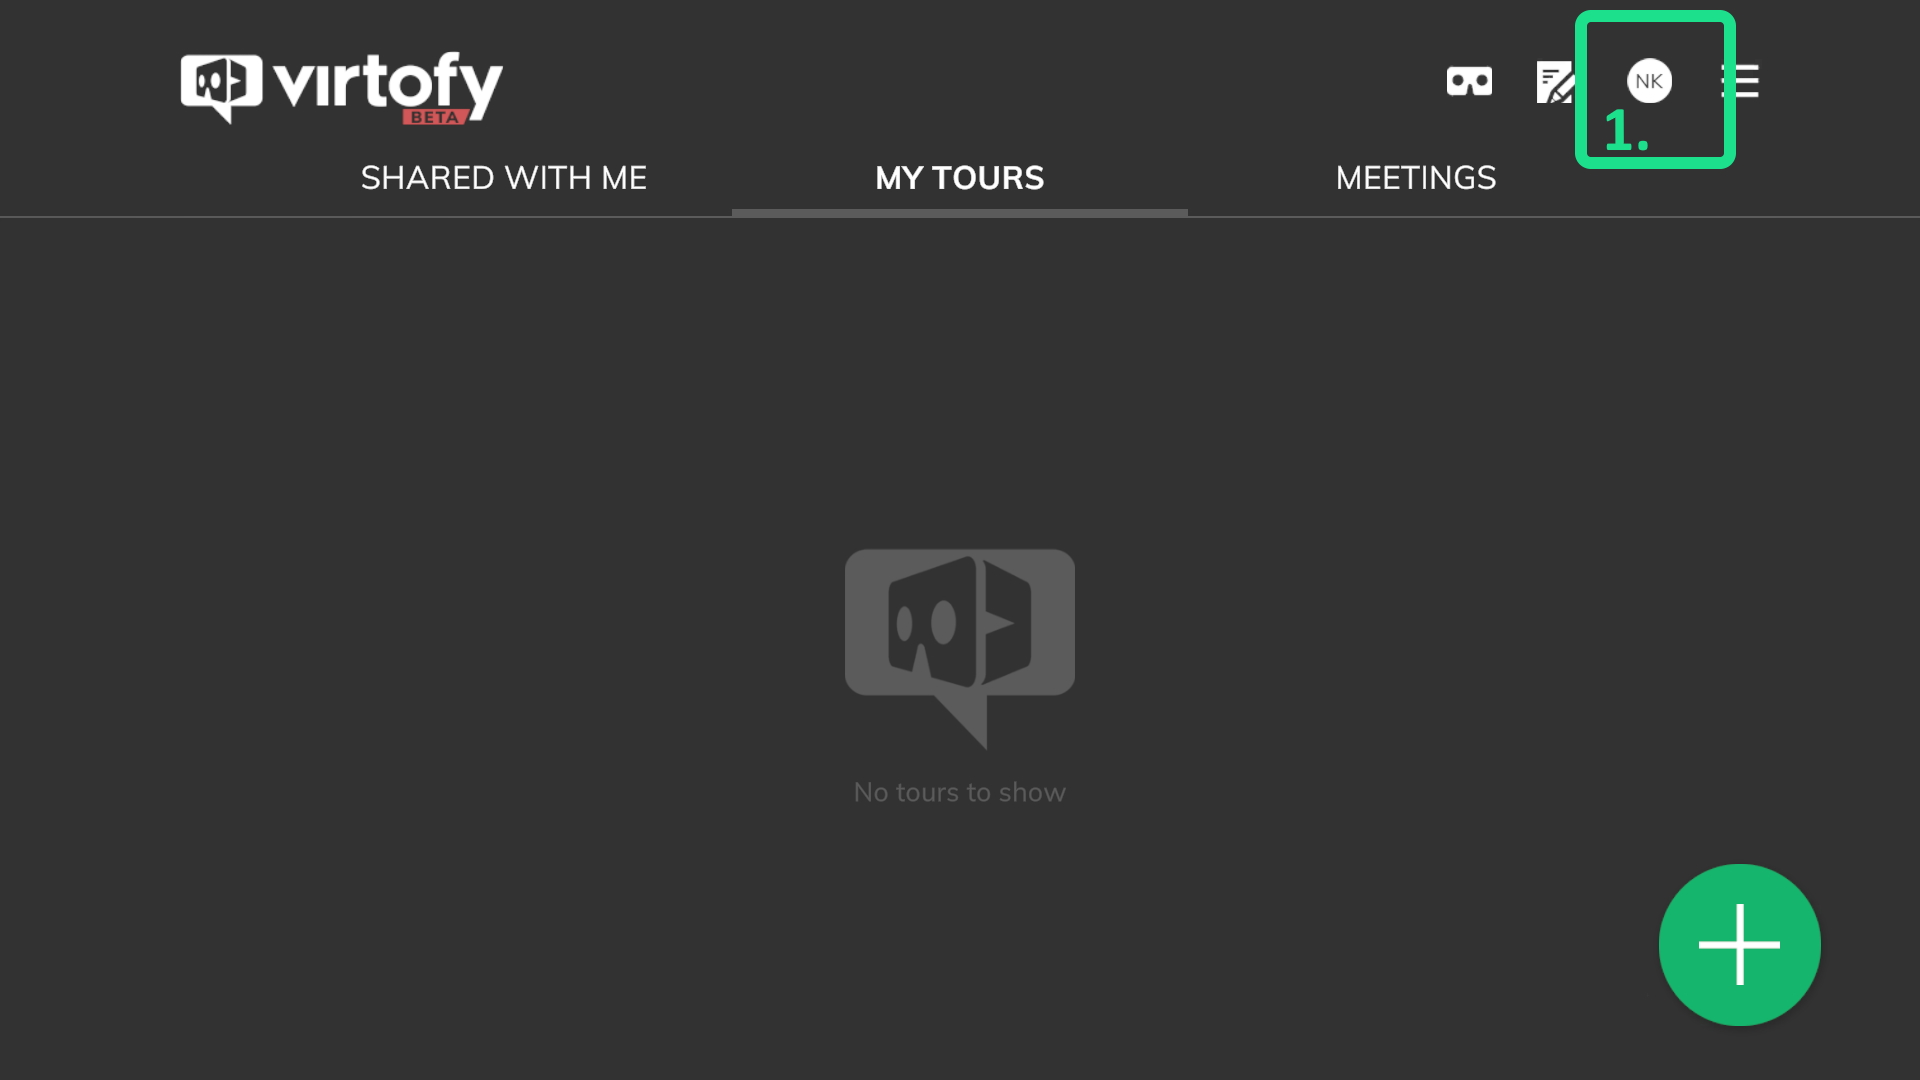
You can open the account settings if you are logged in. Click on the account settings button (the button uses your profile image) to open the account settings panel (see: 1 in the settings screenshot).
Profile
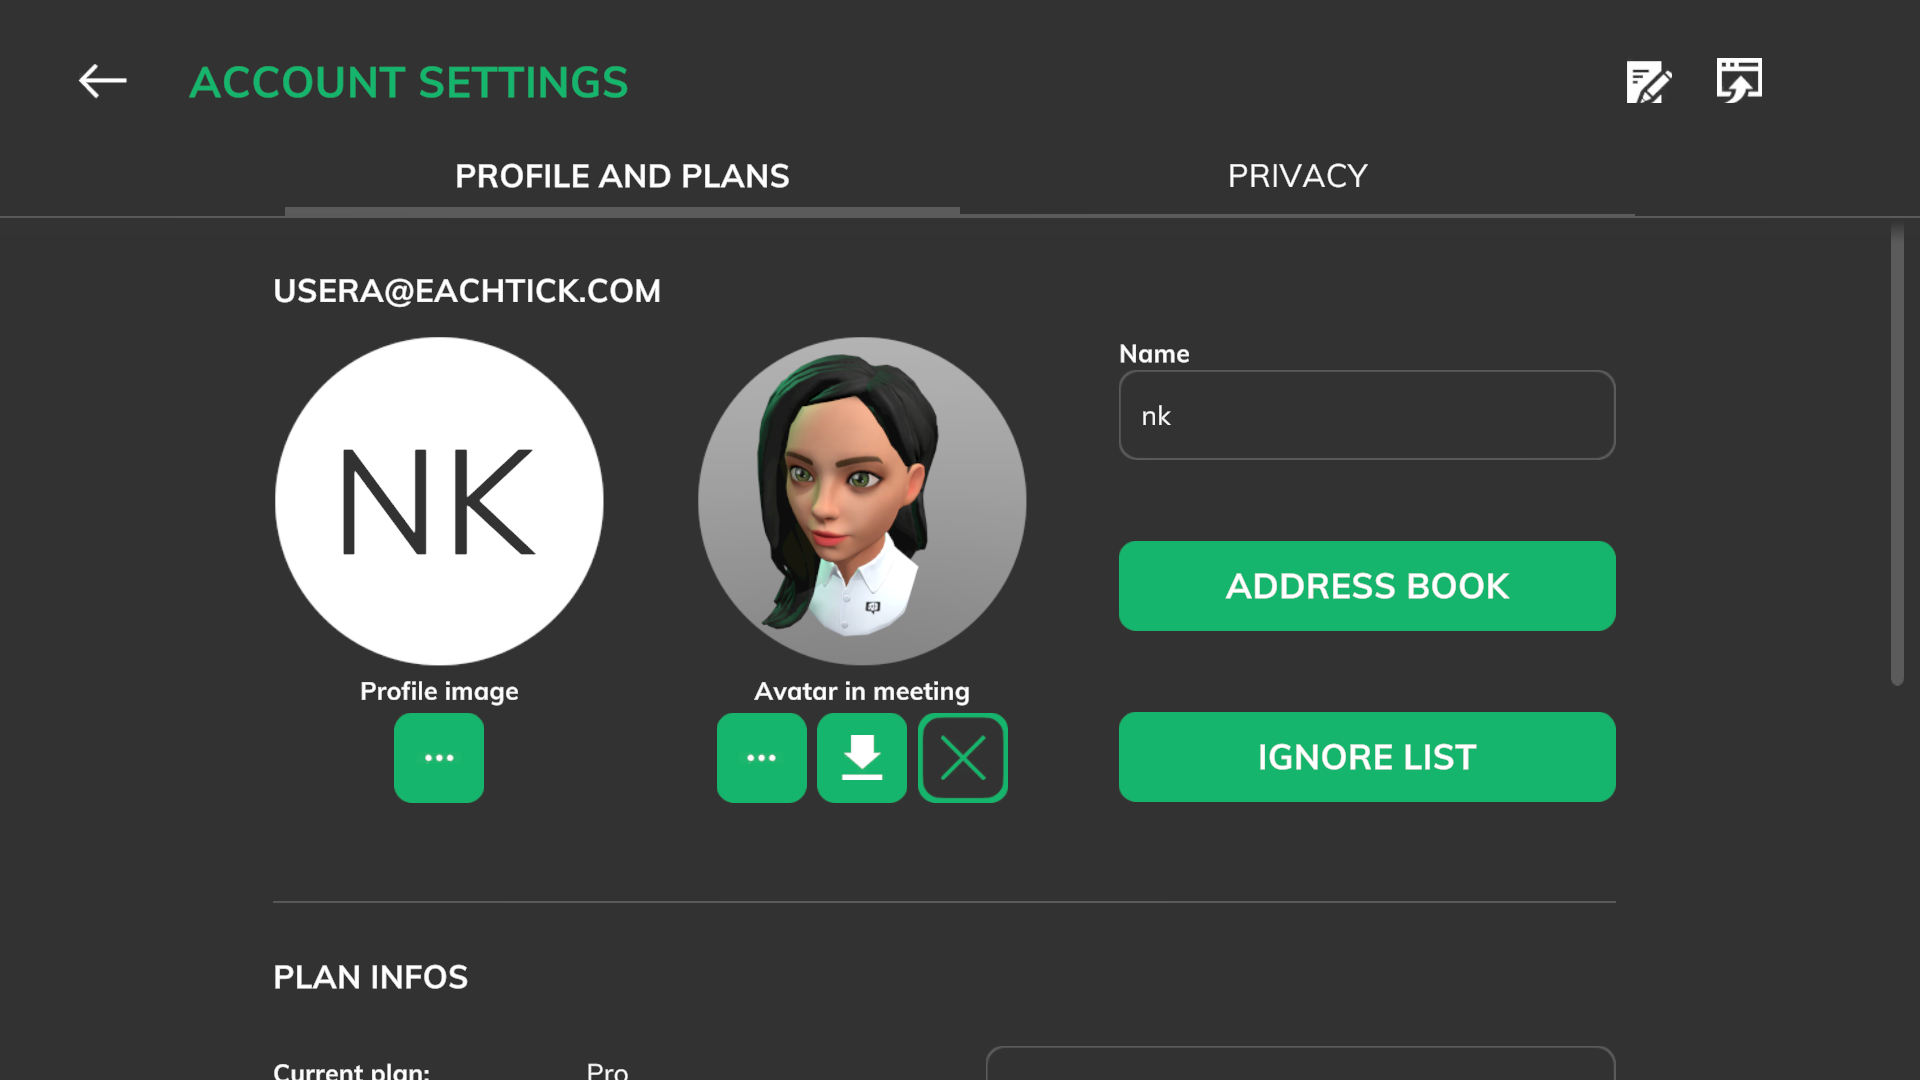
Name, Image and Avatar management
Please check the profile setup section below for more details.
Address book
You can add email addresses (Virtofy account) to your address book. When using the tour sharing or meeting funcs you can select an email address (Virtofy account) to use. The email address of a Virtofy account is automatically added to your address book when this user attends a hosted meeting by you.
Ignore list
All Virtofy accounts on this list will be ignored for shared or invited (meeting) tours. You will no longer see any tour of these users.
Plans
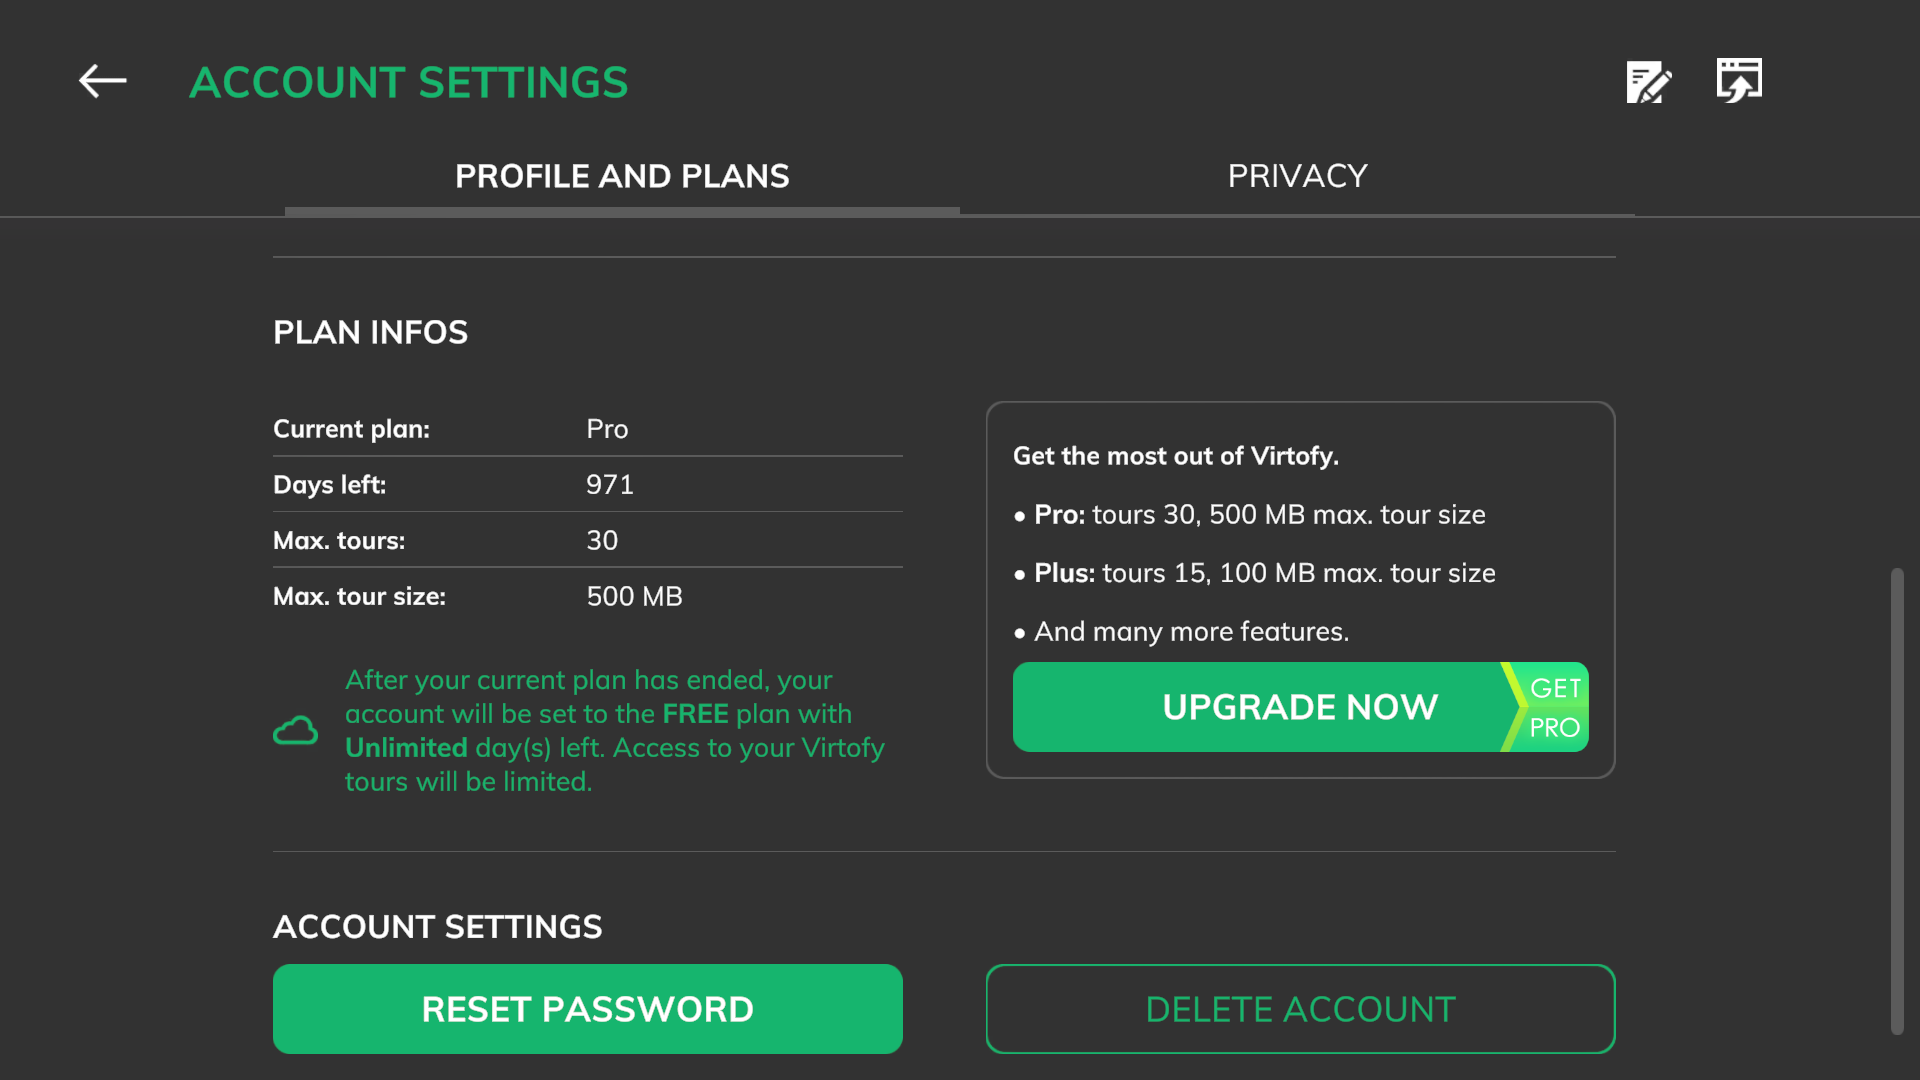
Show all plan and subscription infos of your account. Click here to compare all plan features and prices.
Settings
Reset Password
Send email instructions for resetting the account password.
Delete account
Fill in your email address and password and click on delete to receive an account deletion confirmation email with further instructions.
CAUTION: You will lose all tour data and all paid plan subscriptions if you confirm your account deletion in the received confirmation email. This cannot be undone!
Privacy
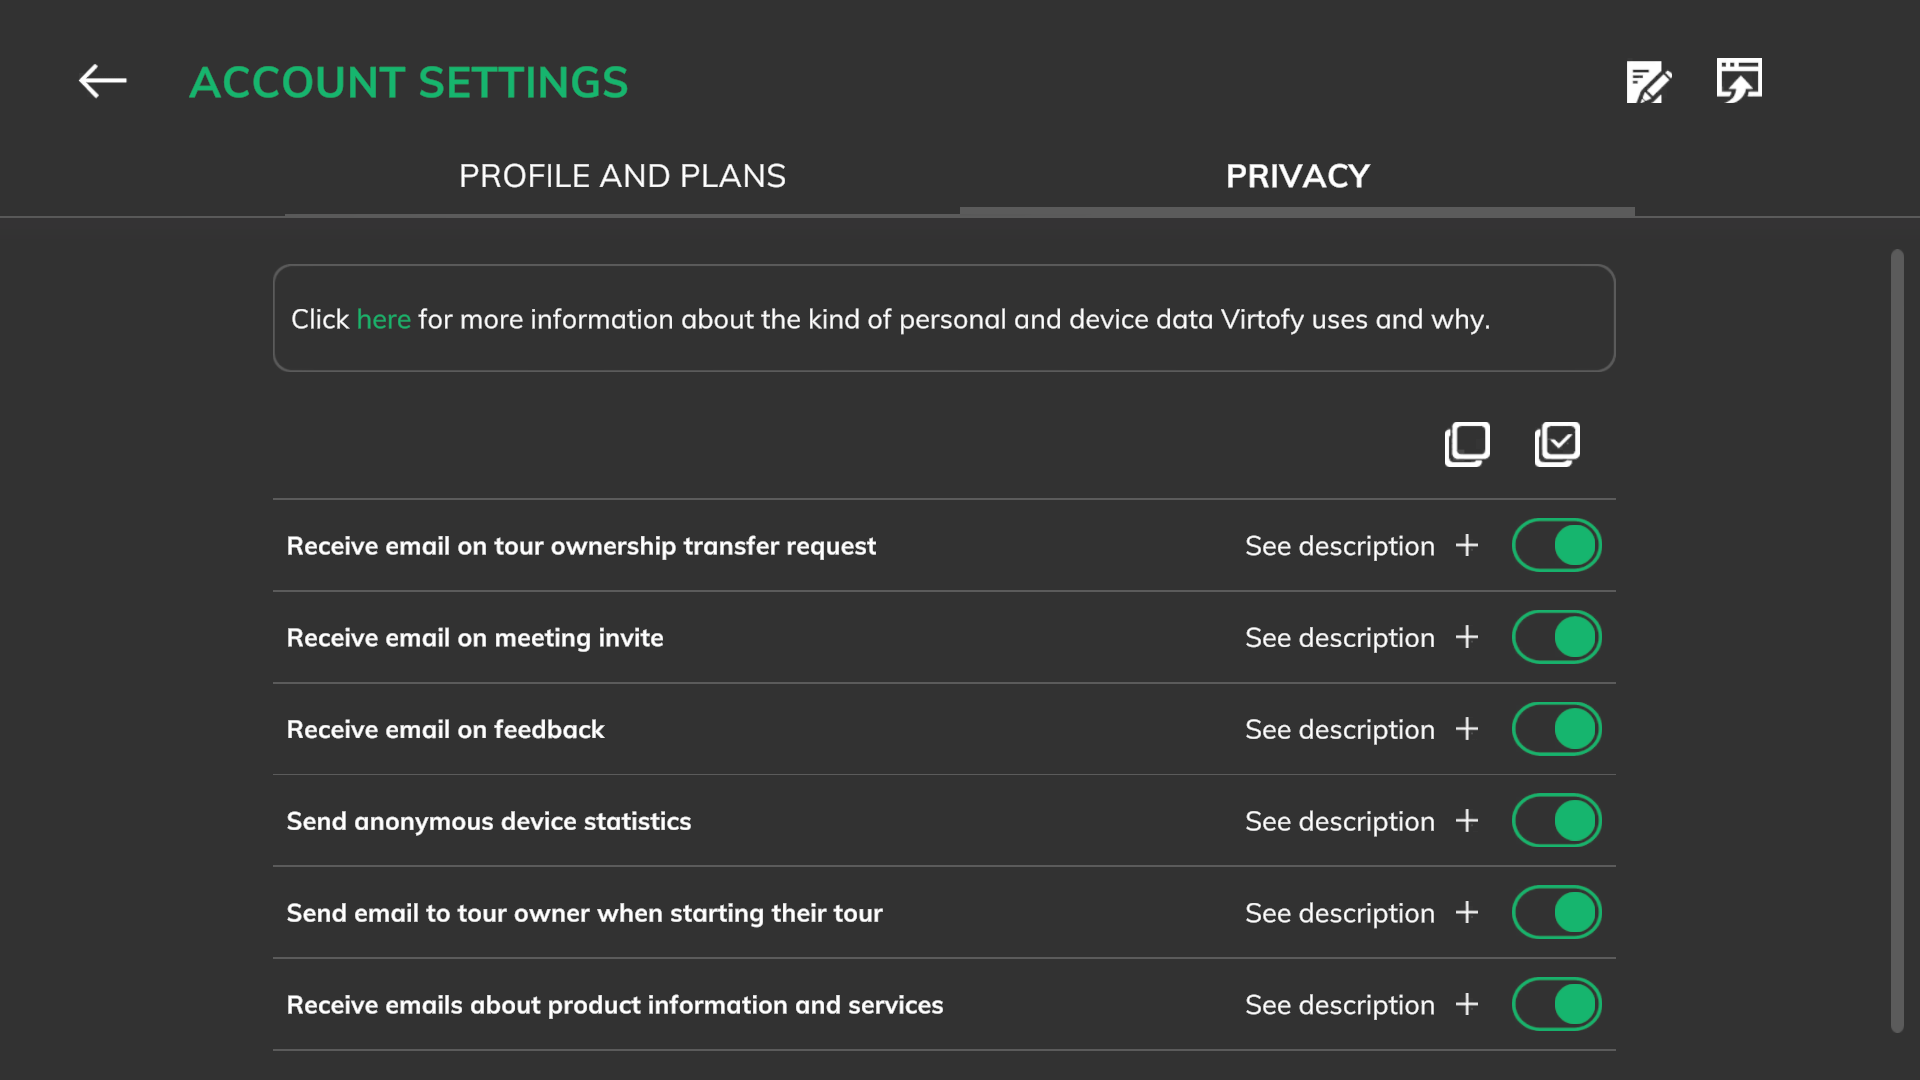
Privacy and GDPR compliance is a very important topic. You can setup your privacy settings on this screen. Please check our GDPR page for more details.
Profile setup
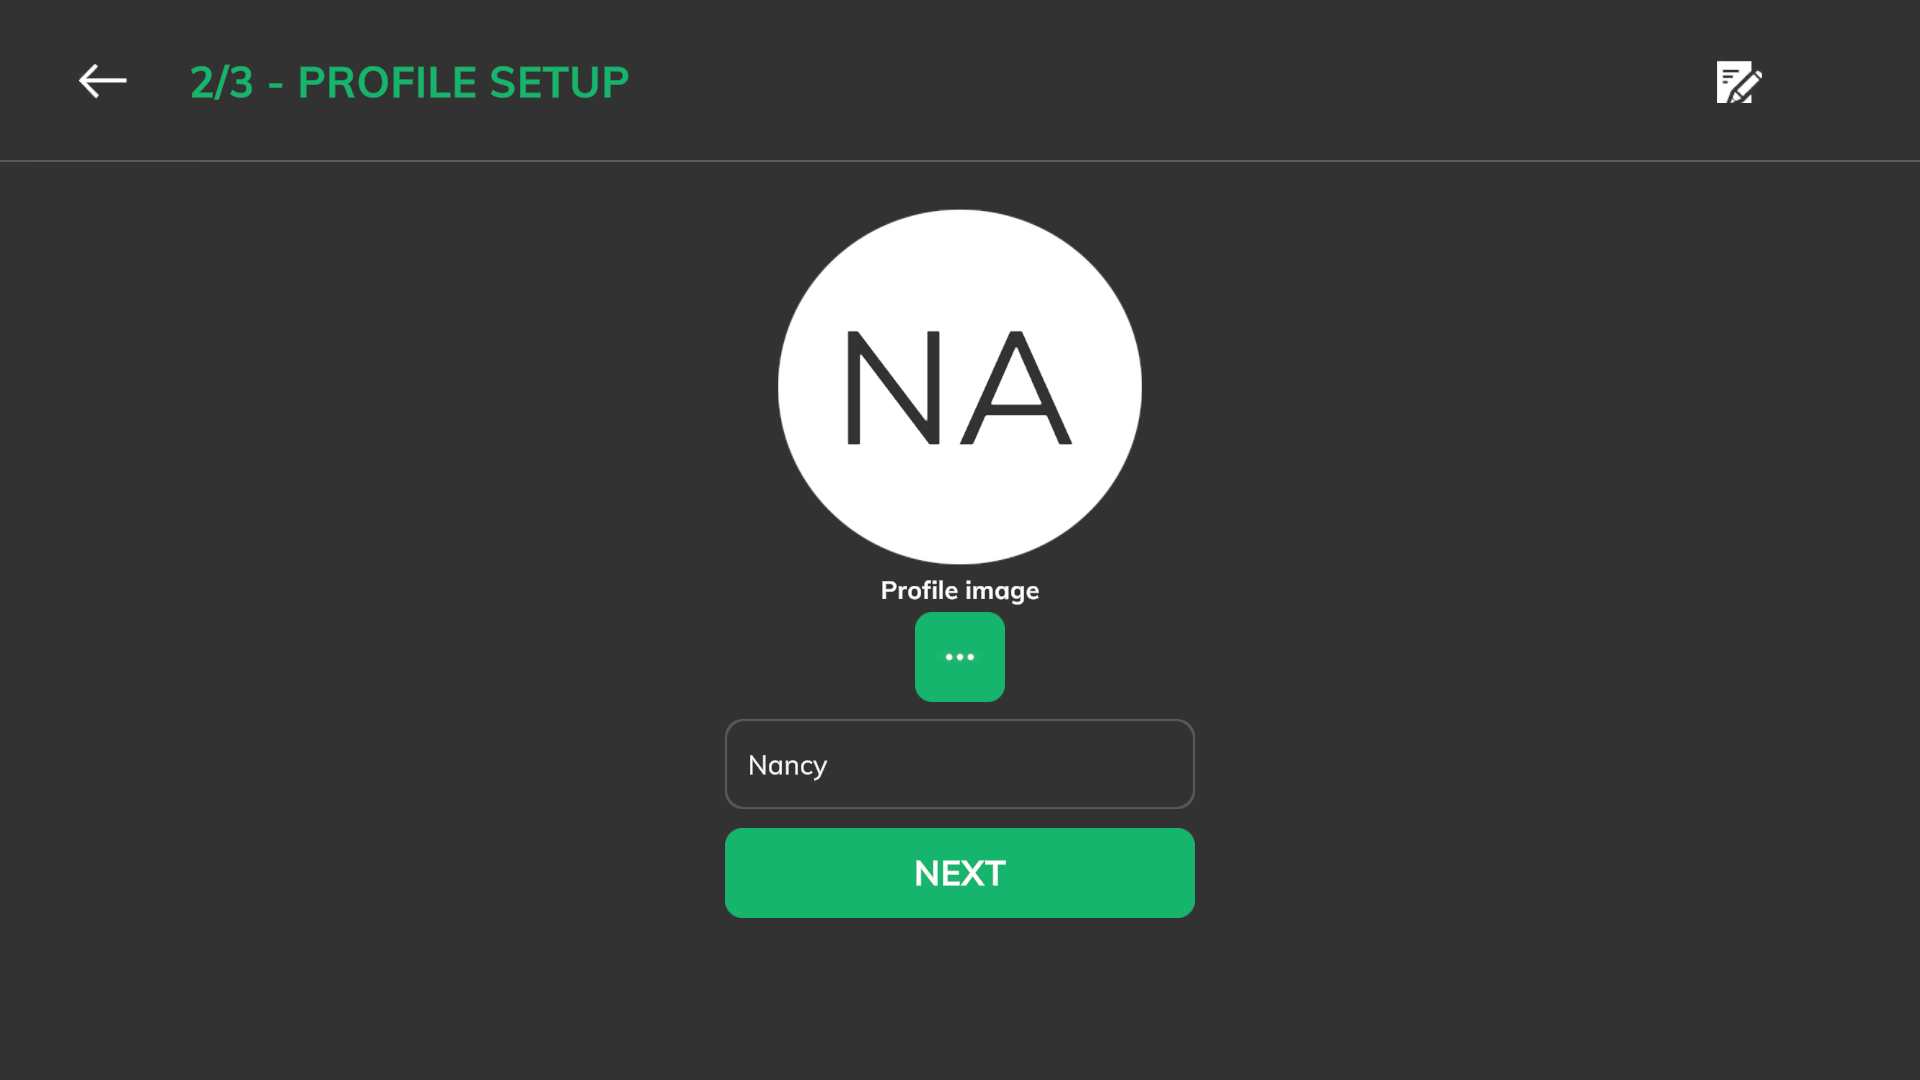
The profile must be setup when logging in for the first time. You can change the propfile all the time in the account settings area.
Name
The name will be shared with other users during a meeting or when sharing a tour.
Profile image
The profile image will be displayed as a small icon for your profile. It will always be used as a 2D representation next to your user name. The initials of your user name will be used if you do not select a custom profile image.
NOTE: Please stick to our terms and conditions when uploading a profile image.
Avatar setup
Whenever you attend a Virtofy meeting, you are represented by an avatar. You can pick one of our predefined avatars, select your own creation or you can use the online configurator (powered by Ready Player Me ).
Use predefined avatars
Click on the browse button to select from some predefined avatars (see: 1 in avatar screenshot).
Custom avatar
Click on the custom button to show the custom selection dialog (see: 2 in avatar screenshot).
NOTE: Please stick to our terms & conditions when uploading an avatar model.
When using a custom avatar, the following specifications do apply:
- Fileformat: .glb
- Maximum triangle count: Mobile devices: 15k, Desktop: 25k
- Blendshape names for lips:
mouthOpenandmouthSmile - Blendshape names for eyes:
eyesClosed - Maximum texture size: 1024
- Maximum unique materials: 3
- Draco Compression is not supported
- Only half body configurations for ready player me avatars are supported
- Scale: Normal proportions should be used based on a 1 meter basis
NOTE: If an avatar is too complex for a certain device, the default avatar will be used instead.
Use default avatars
Click on the reset button to use the default avatar (see: 3 in avatar screenshot).
Tour
A tour includes all the scene data like 3D models, audio, image, or video data. You can experience the tour alone, or with other users in a meeting. A tour can be created with the in-app editor or with the virtofy for unity plugin.
Complexity
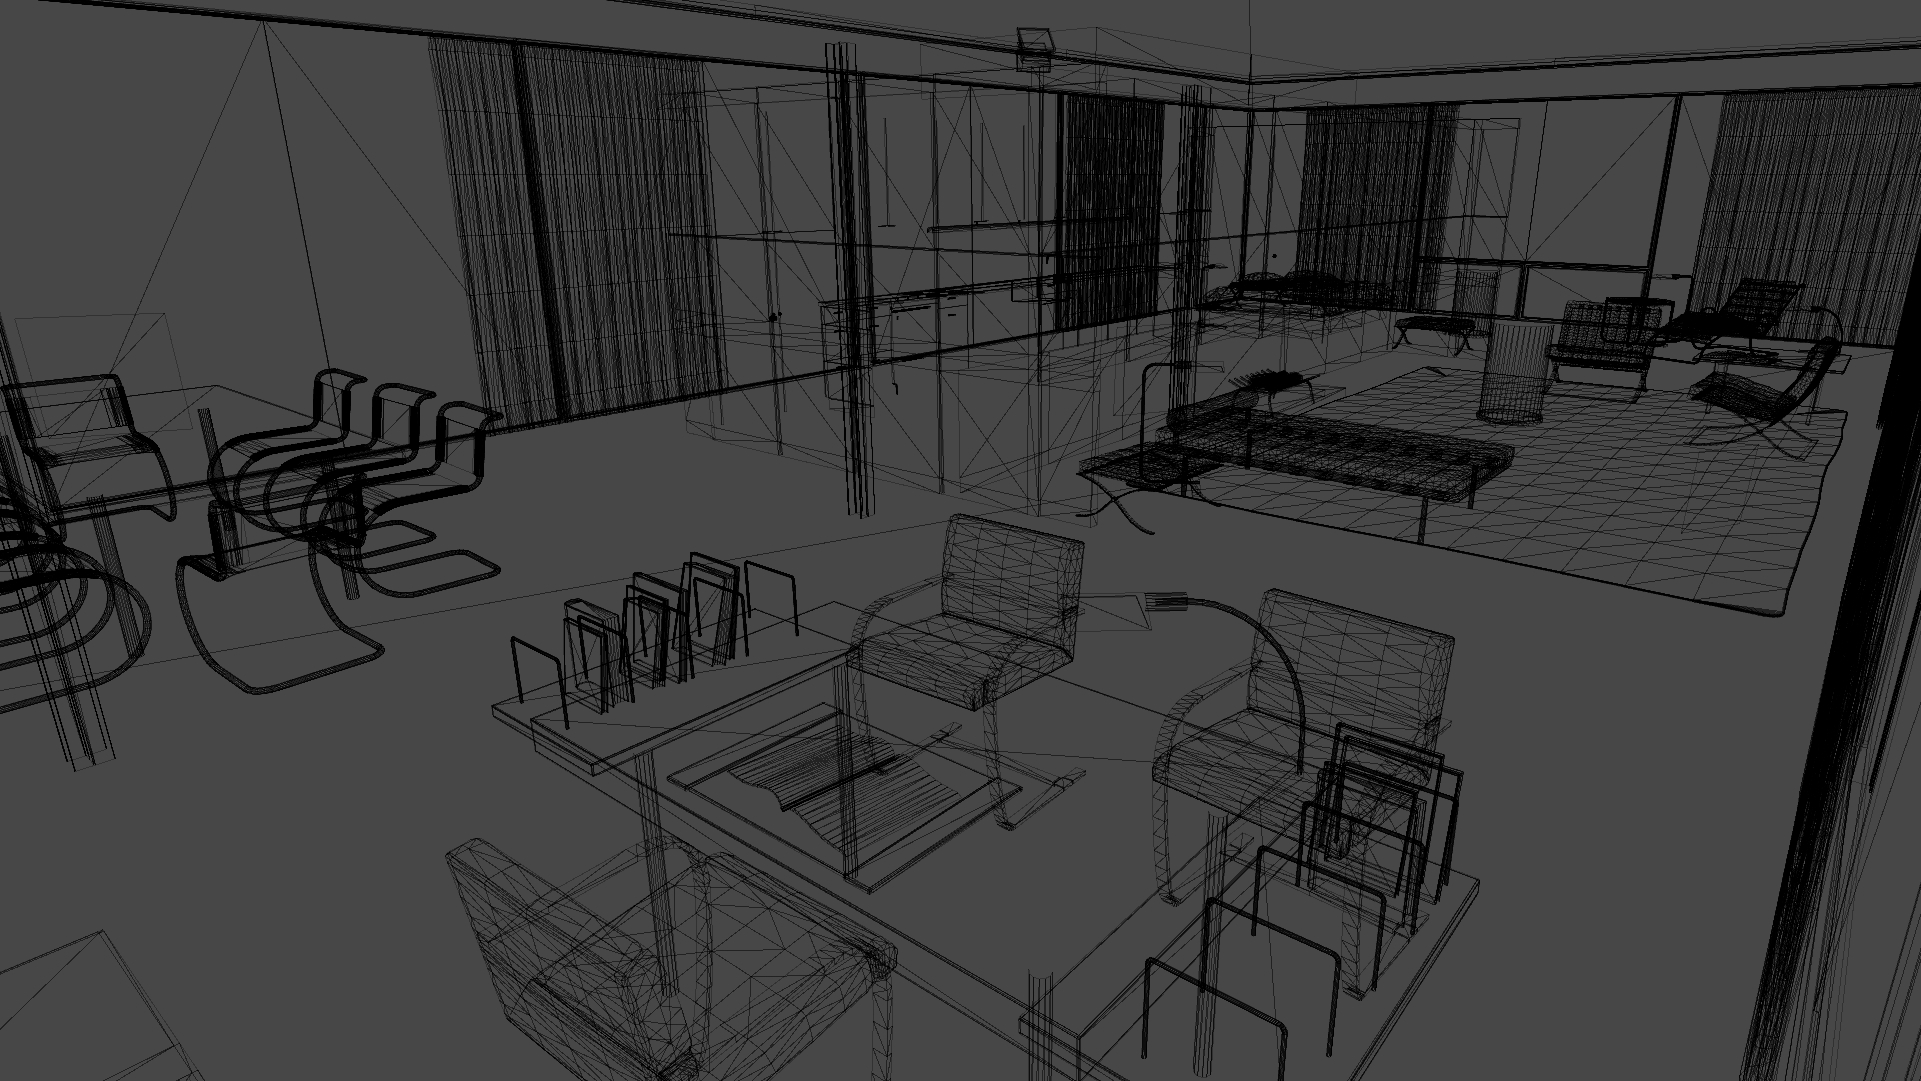
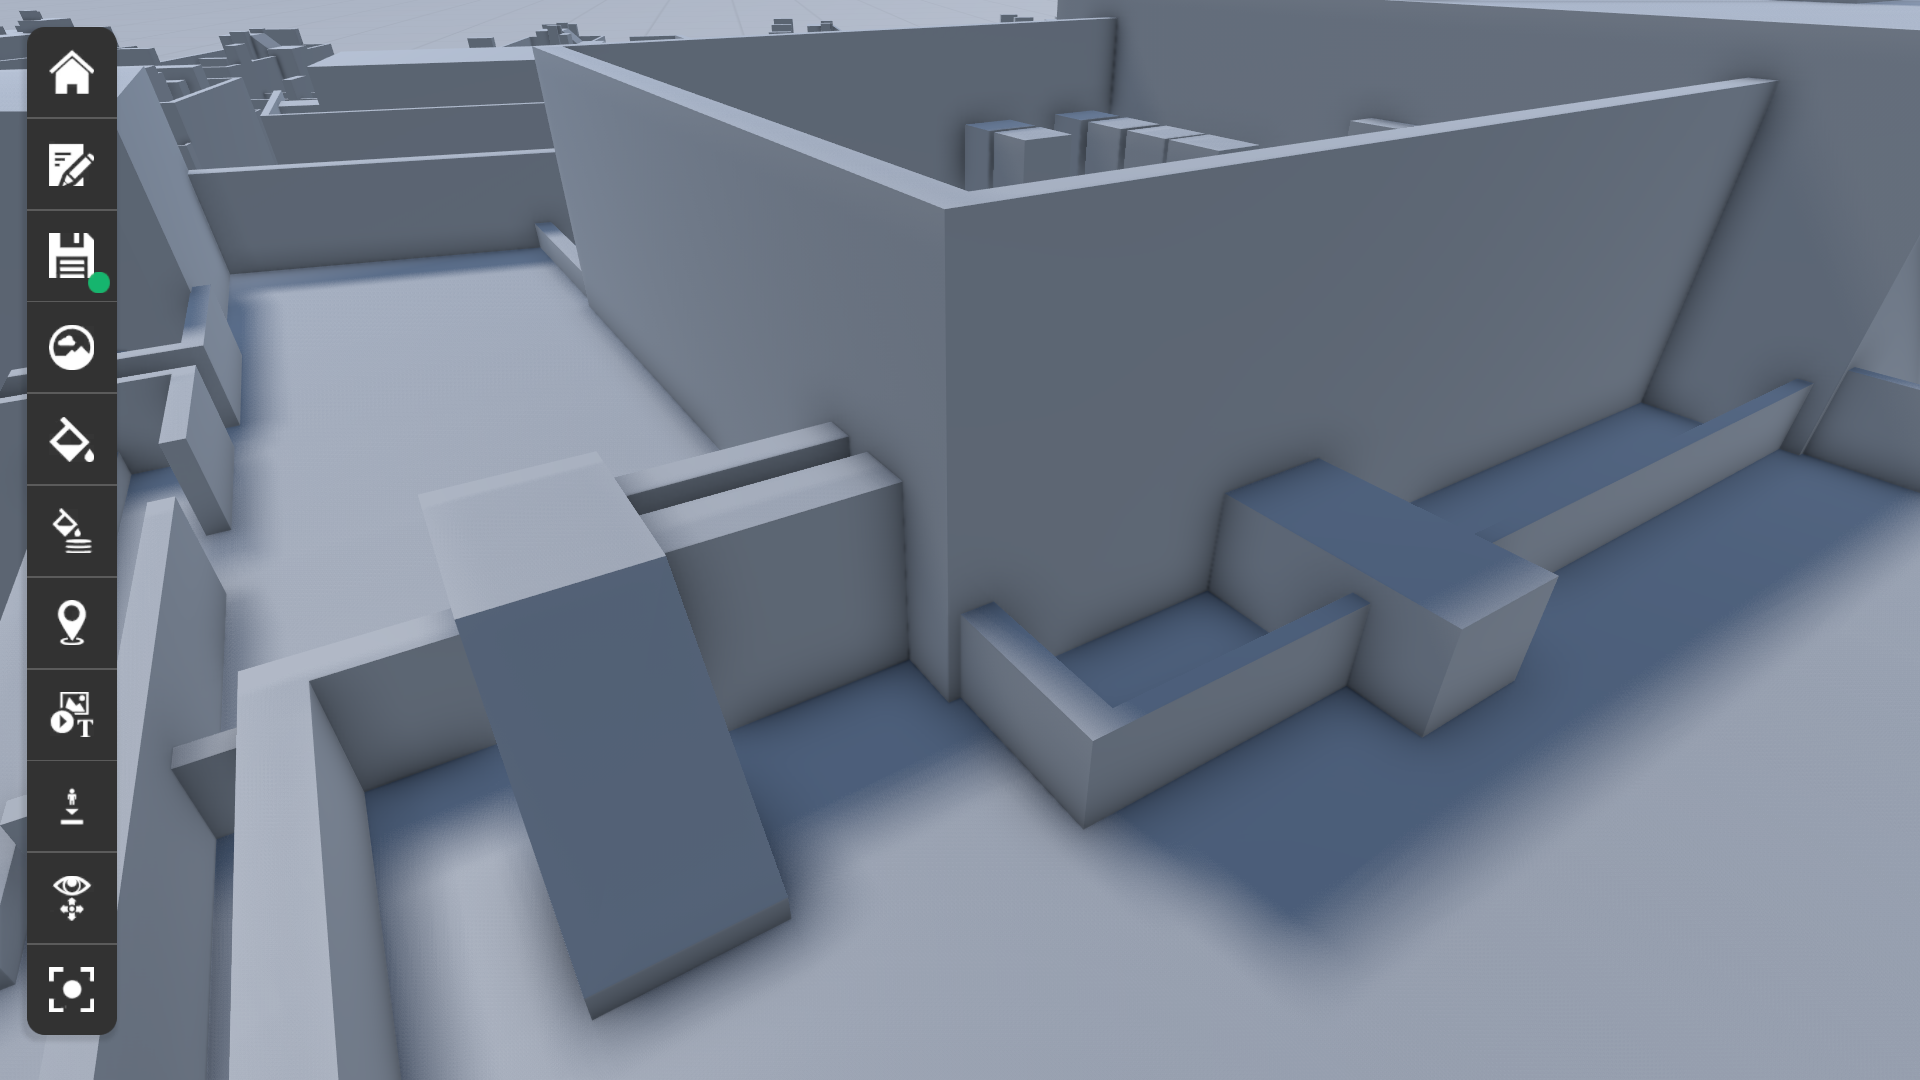
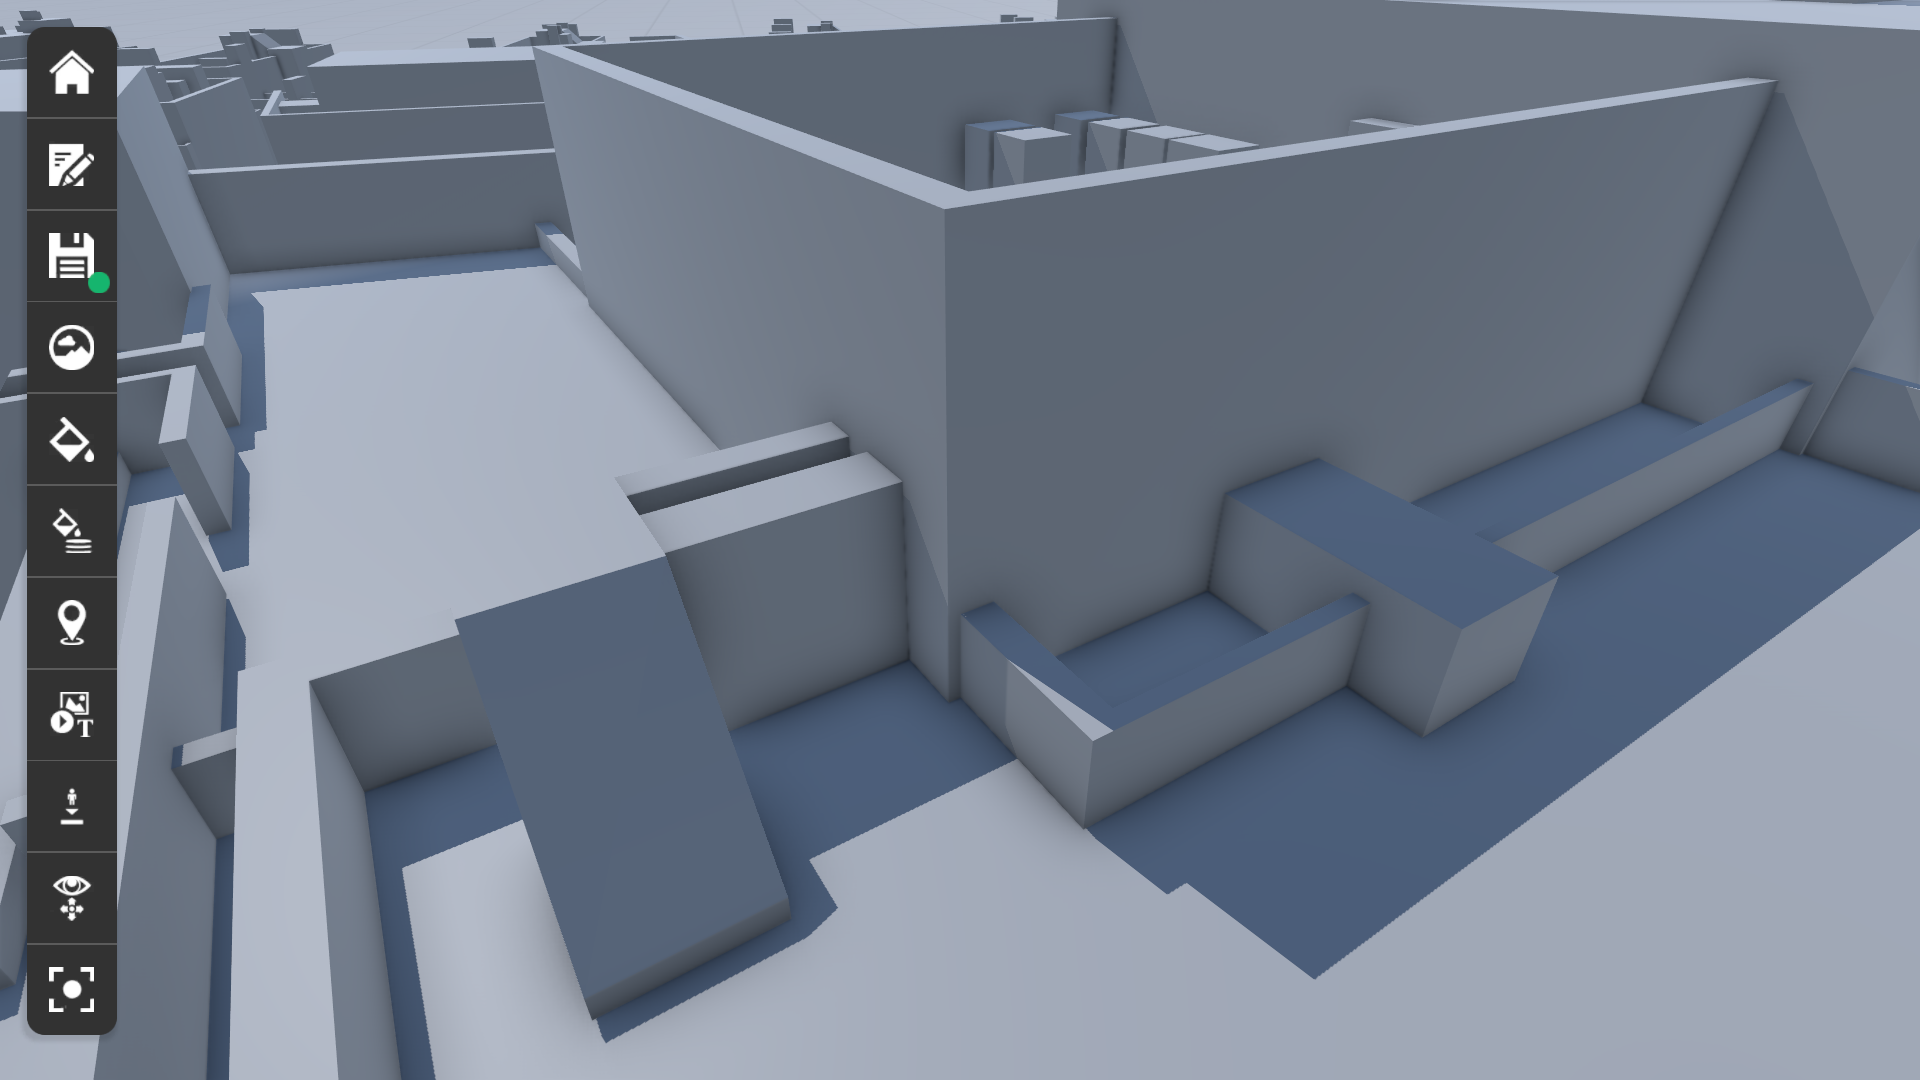
Mobile devices like tablets, smartphones and standalone VR headsets do not have as much computing power as a desktop computer. Due to that, you have to keep an eye on the maximum triangle (polygon) count in the scene (see: wireframe screenshot). If the triangle count is above a certain threshold for a given hardware platform, Virtofy will show a warning that the experience for this tour may be uncomfortable.
| Device | Max. recommended triangles |
|---|---|
| Quest1 | 200k |
| Quest2 | 700k |
| Quest Pro | 900k |
| Pico Neo 4 | 700k |
| Android / iOS | 700k |
| Desktop (Windows, Mac) | 5mio |
Tour management
We are working on this documentation part. Please stay tuned.
Tour details
We are working on this documentation part. Please stay tuned.
Tour start
Import
Export
Ownership transfer
Preview
Tour interactions
We are working on this documentation part. Please stay tuned.
360-screenshot
Input
We are working on this documentation part. Please stay tuned.
VR
Windows Shortcuts
| Key | Function |
|---|---|
| F1 | Open virtofy FAQ in browser |
| F2 | Create screenshot |
| F5 (Tour management) | Reload tour list |
| F5 (In-App Editor) | Toggle play mode |
| F5 + Shift (In-App Editor) | Toggle play mode, and uses current camera position |
| CTRL + F4 | Quit |
| F11 | Toggle fullscreen |
| ESC | Close active dialog or screen, stop VR mode |
Tour navigation
Movement modes
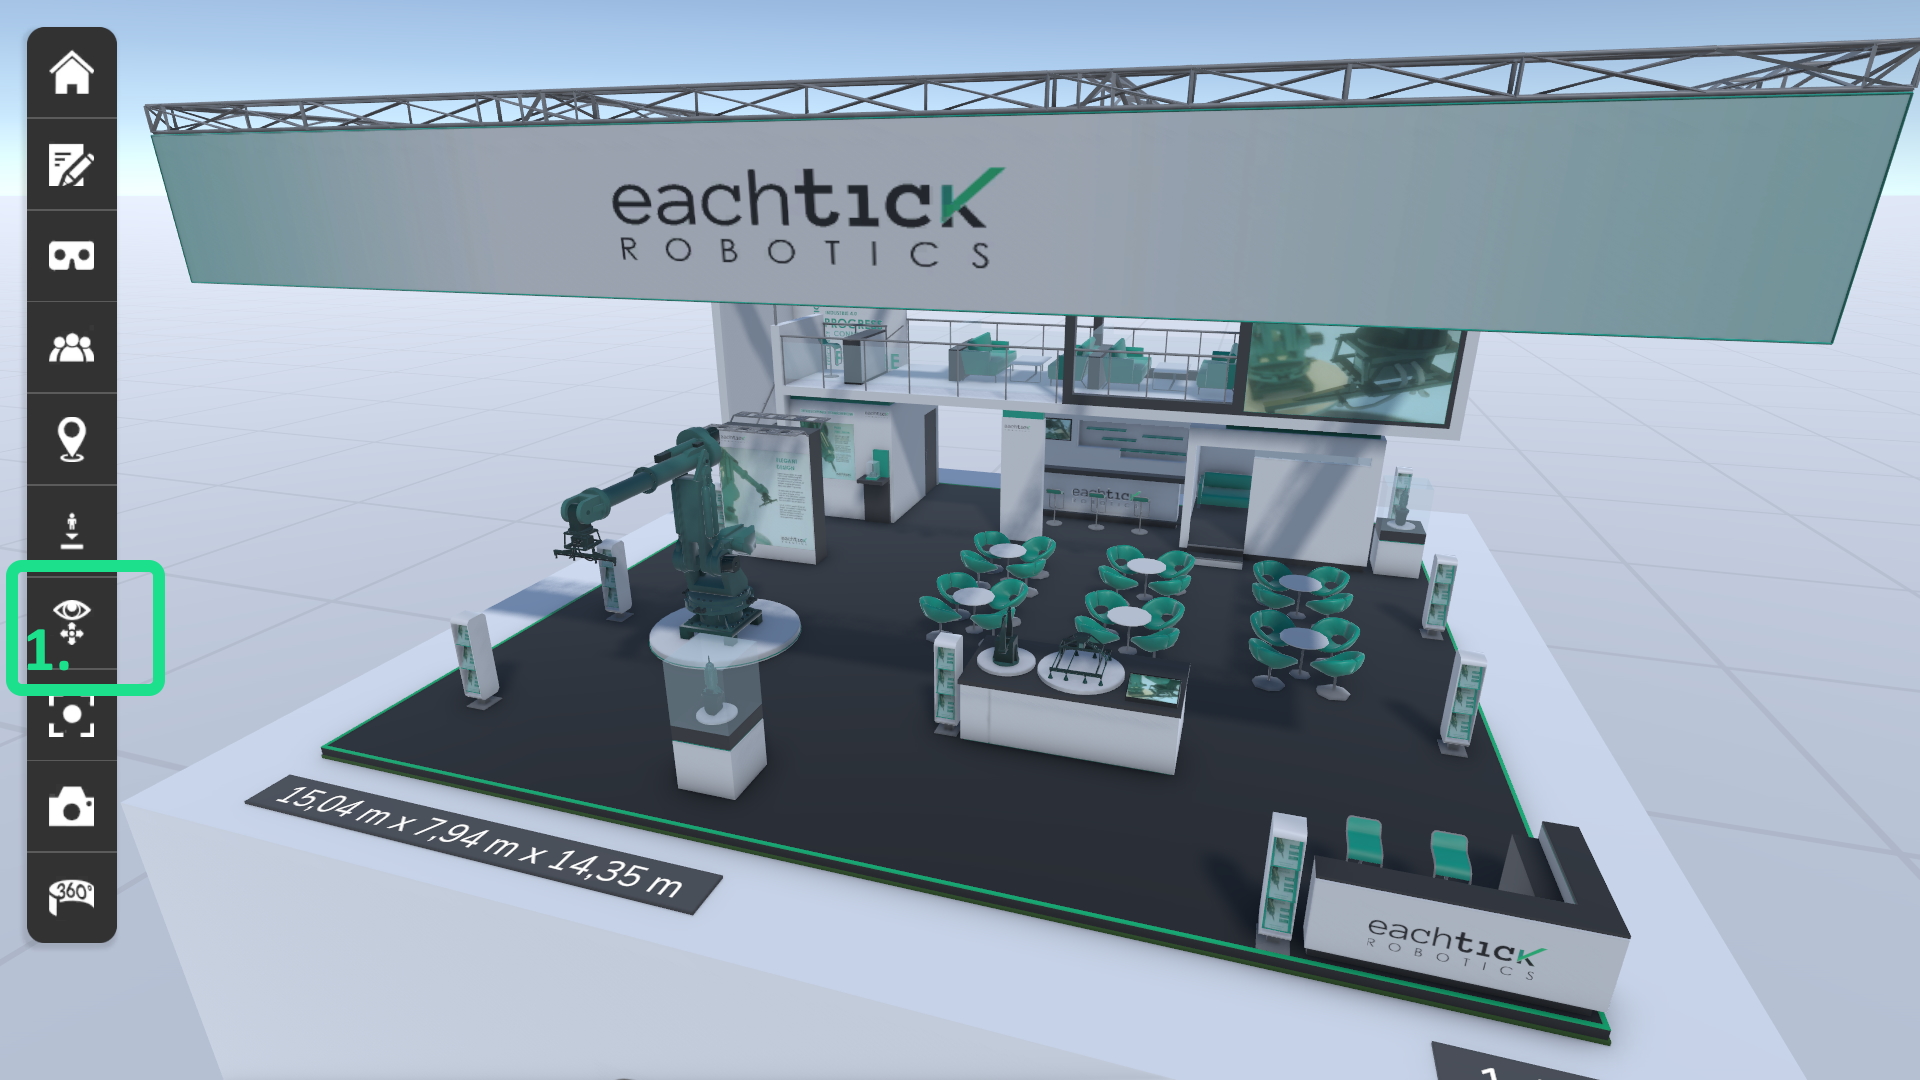
Movement with none VR devices are based on two different camera modes: Orbital Camera and Free Camera. The mode can be switched in the main toolbar (see: 1 in the camera mode screenshot). When using a VR device, no camera mode is available, as the user’s head movement is used.
Movement on desktop
| Input | Orbit Camera | Free Camera |
|---|---|---|
| Hold left, right/ mouse button and move the mouse | Rotates around the | Rotate camera |
| Left mouse button double click | - | Move camera to click position |
| Context menu, move to button | - | Move camera to context menu position |
| Hold middle mouse button and move | Drag the camera | Drag the camera |
| Mouse wheel up, down | Zoom in, out | Move the camera forward, backward |
| WASD, Cursor keys | - | Move the camera |
| Dot, Comma, Page-Up, Page-Down | - | Rotate the camera |
Movement with touch
| Input | Orbit Camera | Free Camera |
|---|---|---|
| Single touch move | Rotates around the | Rotate camera |
| Double touch tab | - | Move camera to click position |
| Context menu, move to button | - | Move camera to context menu position |
| Hold middle mouse button and move | Drag the camera | Drag the camera |
| Pinch/Zoom touch gesture | Zoom in, out | Move the camera forward, backward |
Movement in VR
Virtofy is designed to use just one VR controller.
| Input | Camera |
|---|---|
| Move head | Move camera |
| Hold controller analog stick forward and release (hold 90° up will abort action) | Teleport camera to position |
| Context menu, teleport to button | Teleport camera to context menu position |
| Tick controller analog stick left or right | Rotate camera by 25° |
| Tick controller analog stick back | Step back |
| Hold controller trigger button and move controller | Move camera |
Context menu
The context menu has various options based on the current situation.
How to open the context menu
- Desktop: Right mouse click
- Touch: Hold single touch for 2 seconds at the same point
- VR: Holder trigger button while pointing the laser on a surface
Move or teleport here
If the context menu is opened on a position where the user can be moved to, then this option will be available (see: 1 in the context menu).
Place point of interest (POI) here
If the context menu is opened on a position where a POI can be placed, then this option will be available (see: 2 in the context menu). The POI can be placed in an offline tour, or if the user is the presenter in a meeting.
Remove point of interest (POI)
This option is only available if a POI was placed before. It will remove the POI.
Close
Closes the context menu.
Point of view (POV)
The user can teleport directly to the given POV via the list panel or by clicking on the POV markers in the scene. You can enable soft blending for the POV change in the app settings.
Meeting
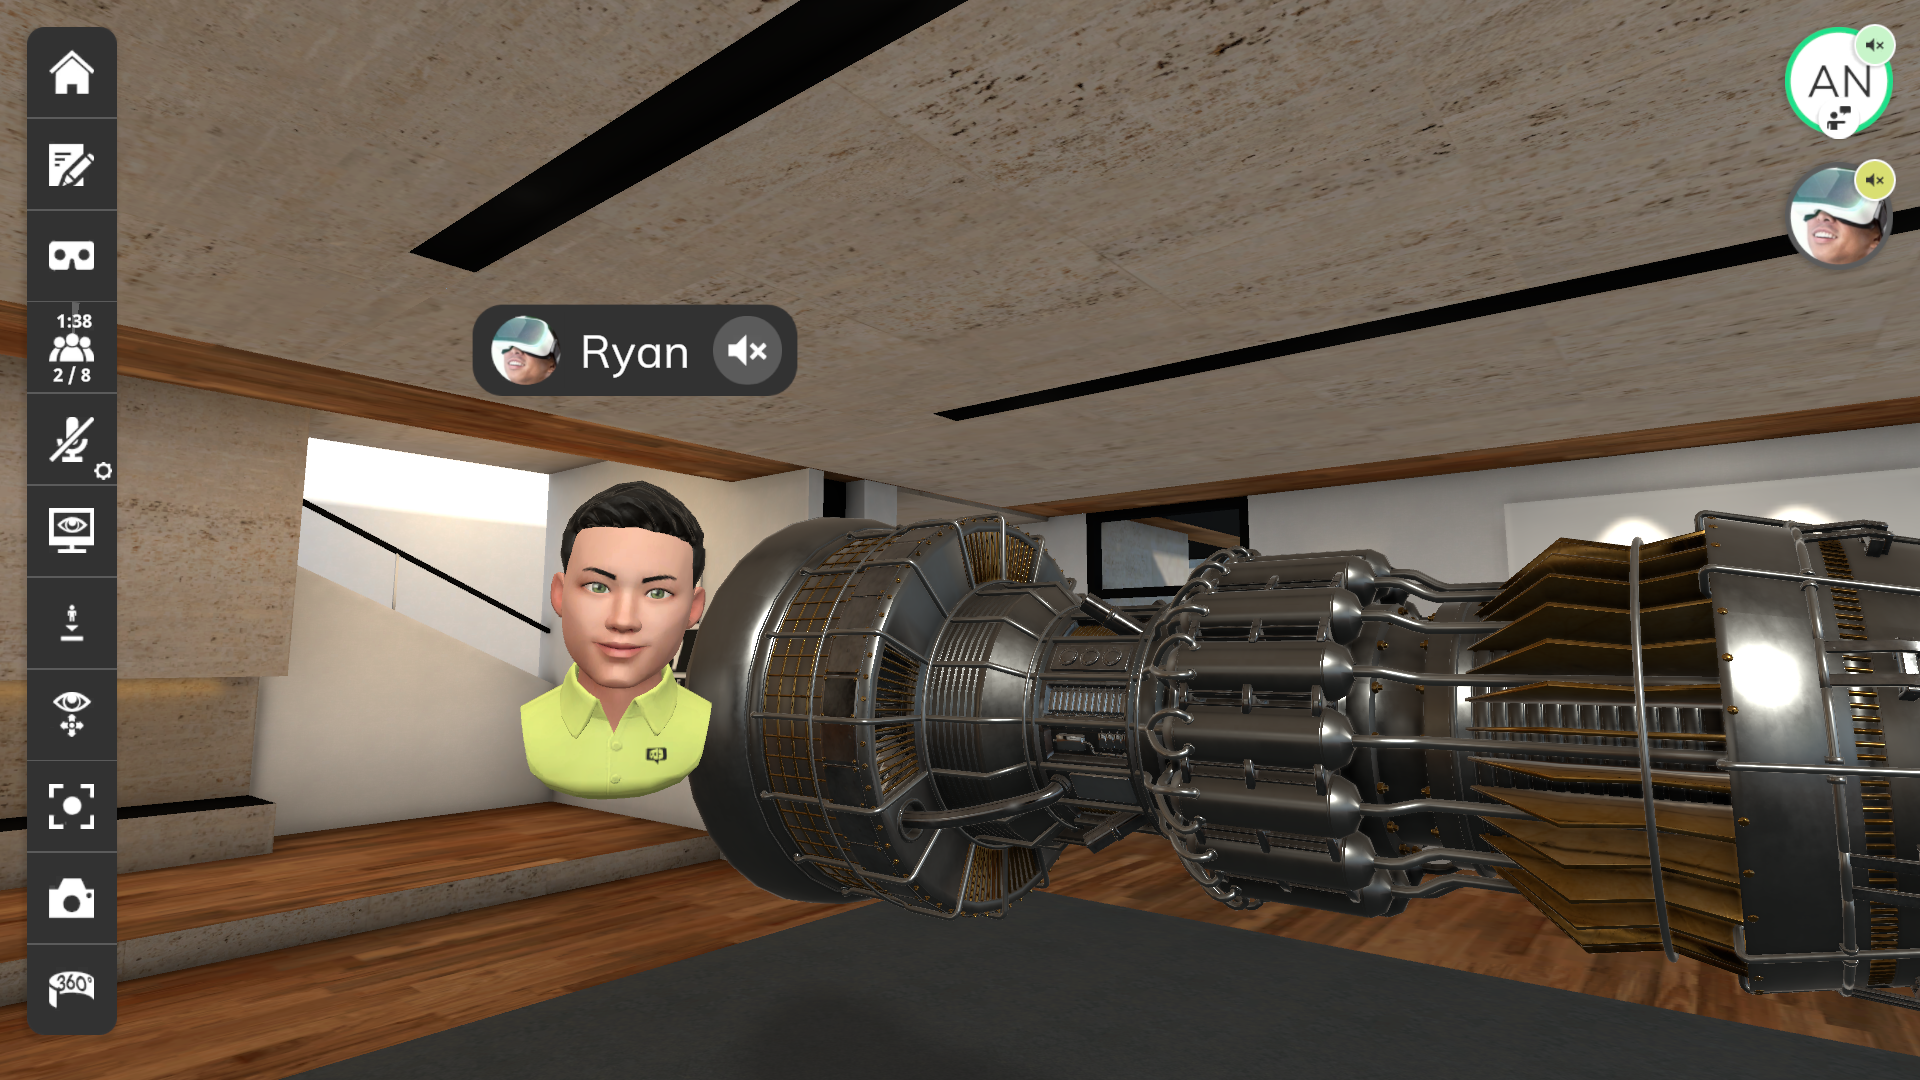
Meetings are an essential part of virtofy as it they are used to present tours to other users. Each user is represented as an avatar in the tour, and as profile image on the UI. You can toggle the 3D avatar visibility in the app settings.
Setup meeting
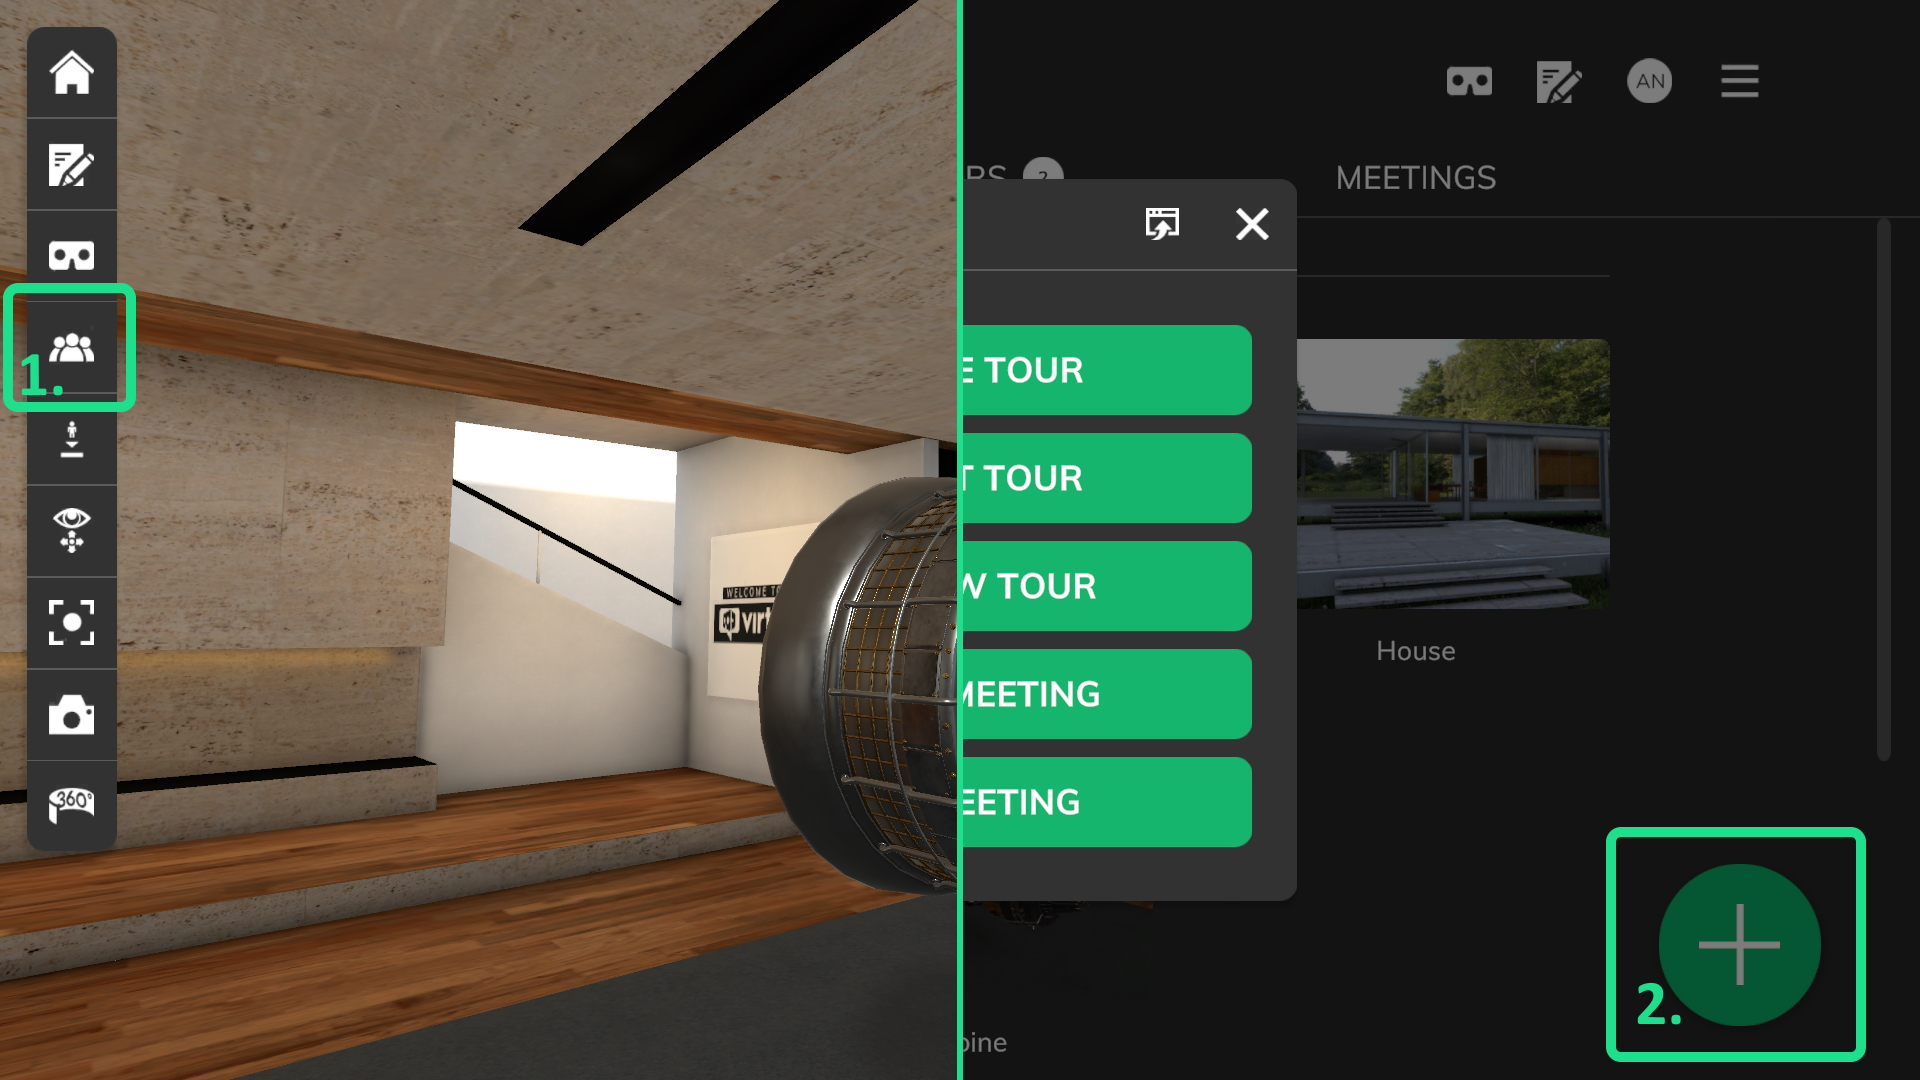
You can setup a meeting when starting a tour and click on the “setup meeting” button (see: 1 in setup meeting screenshot) or by clicking “+” (see: 2 in setup meeting screenshot) and then on the “setup meeting” button in the manage tour screen.
NOTE: The tour owner can decide if other users are allowed to setup a meeting for the given tour.
NOTE: If a user joins a meeting, the user will download all needed tour data to the device. Once the user has left the meeting, the downloaded tour data will be deleted from the device.
There are two different meeting types: virtofy users and invite code.
Private meeting
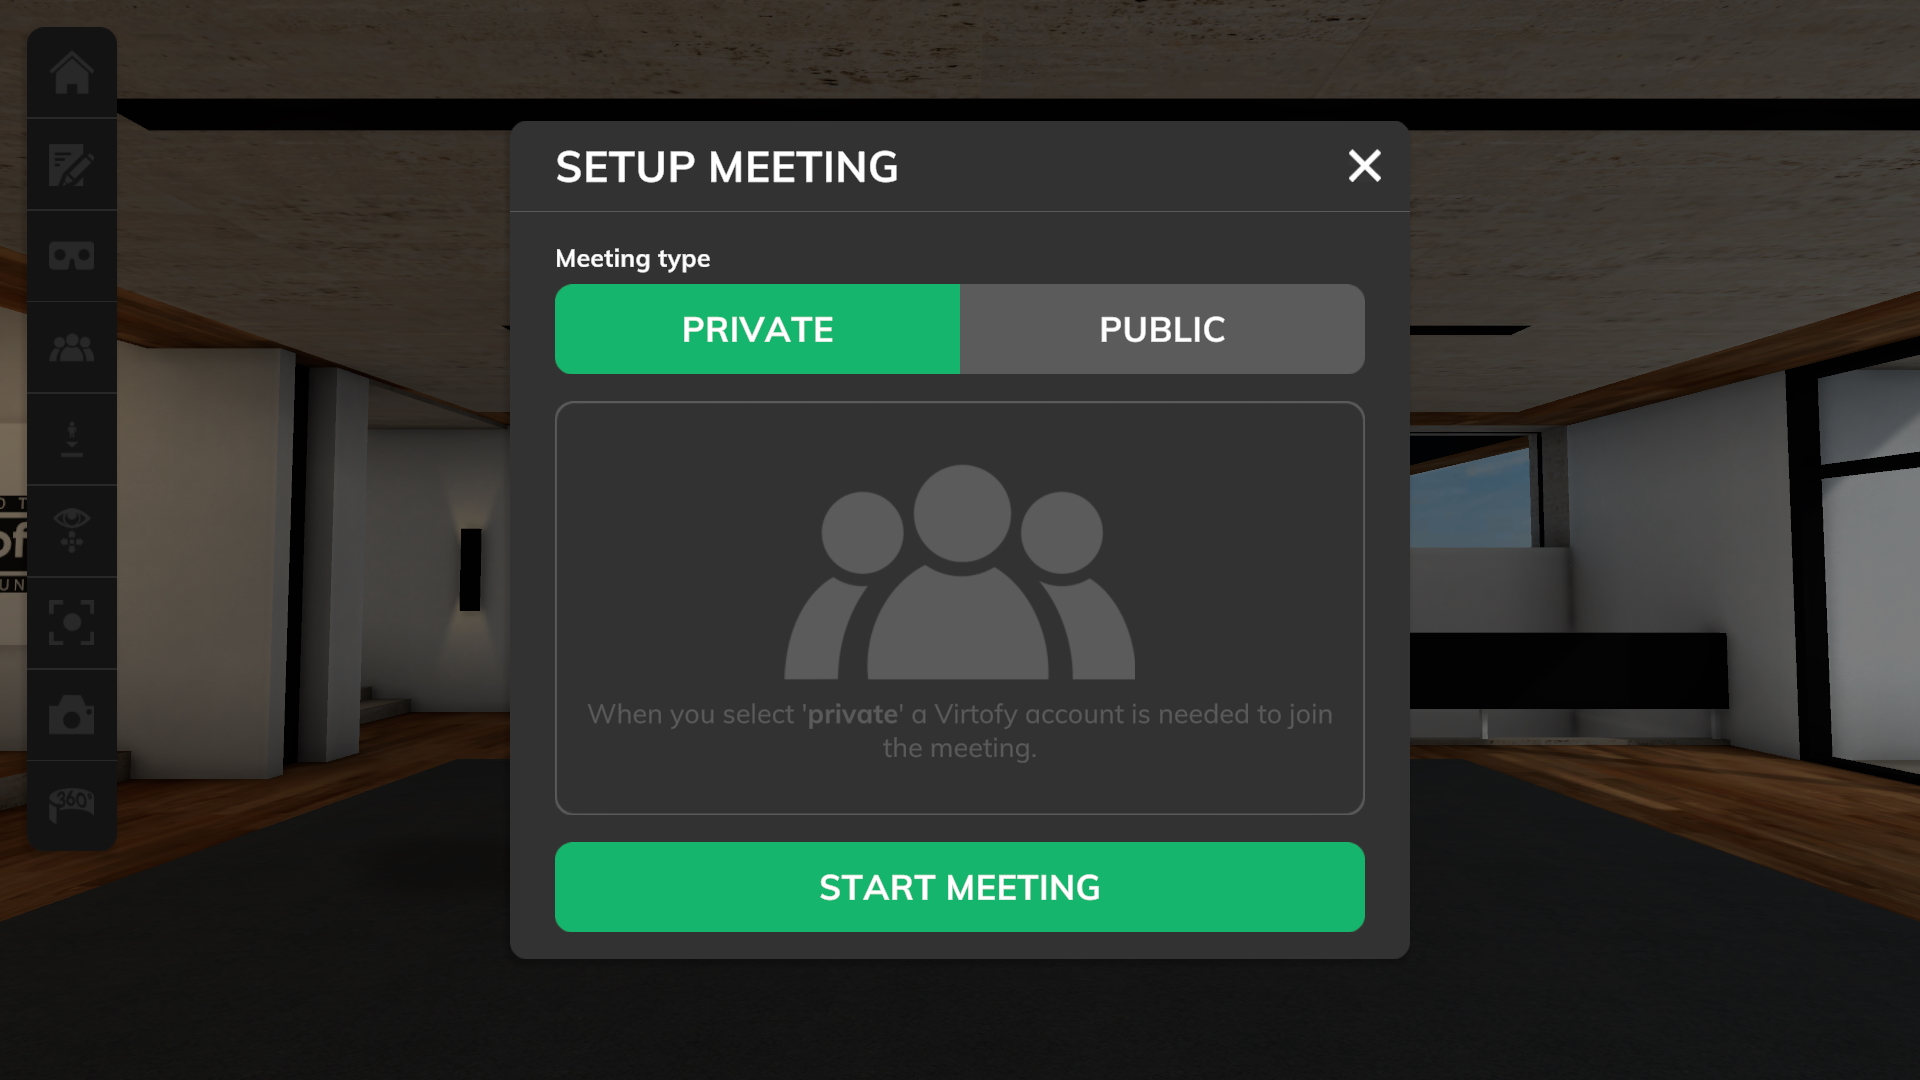
Only users with a Virtofy account can join private meetings. Click on “start meeting” to start the meeting. Please check the trouble shooting section about ports if you encounter any problems.
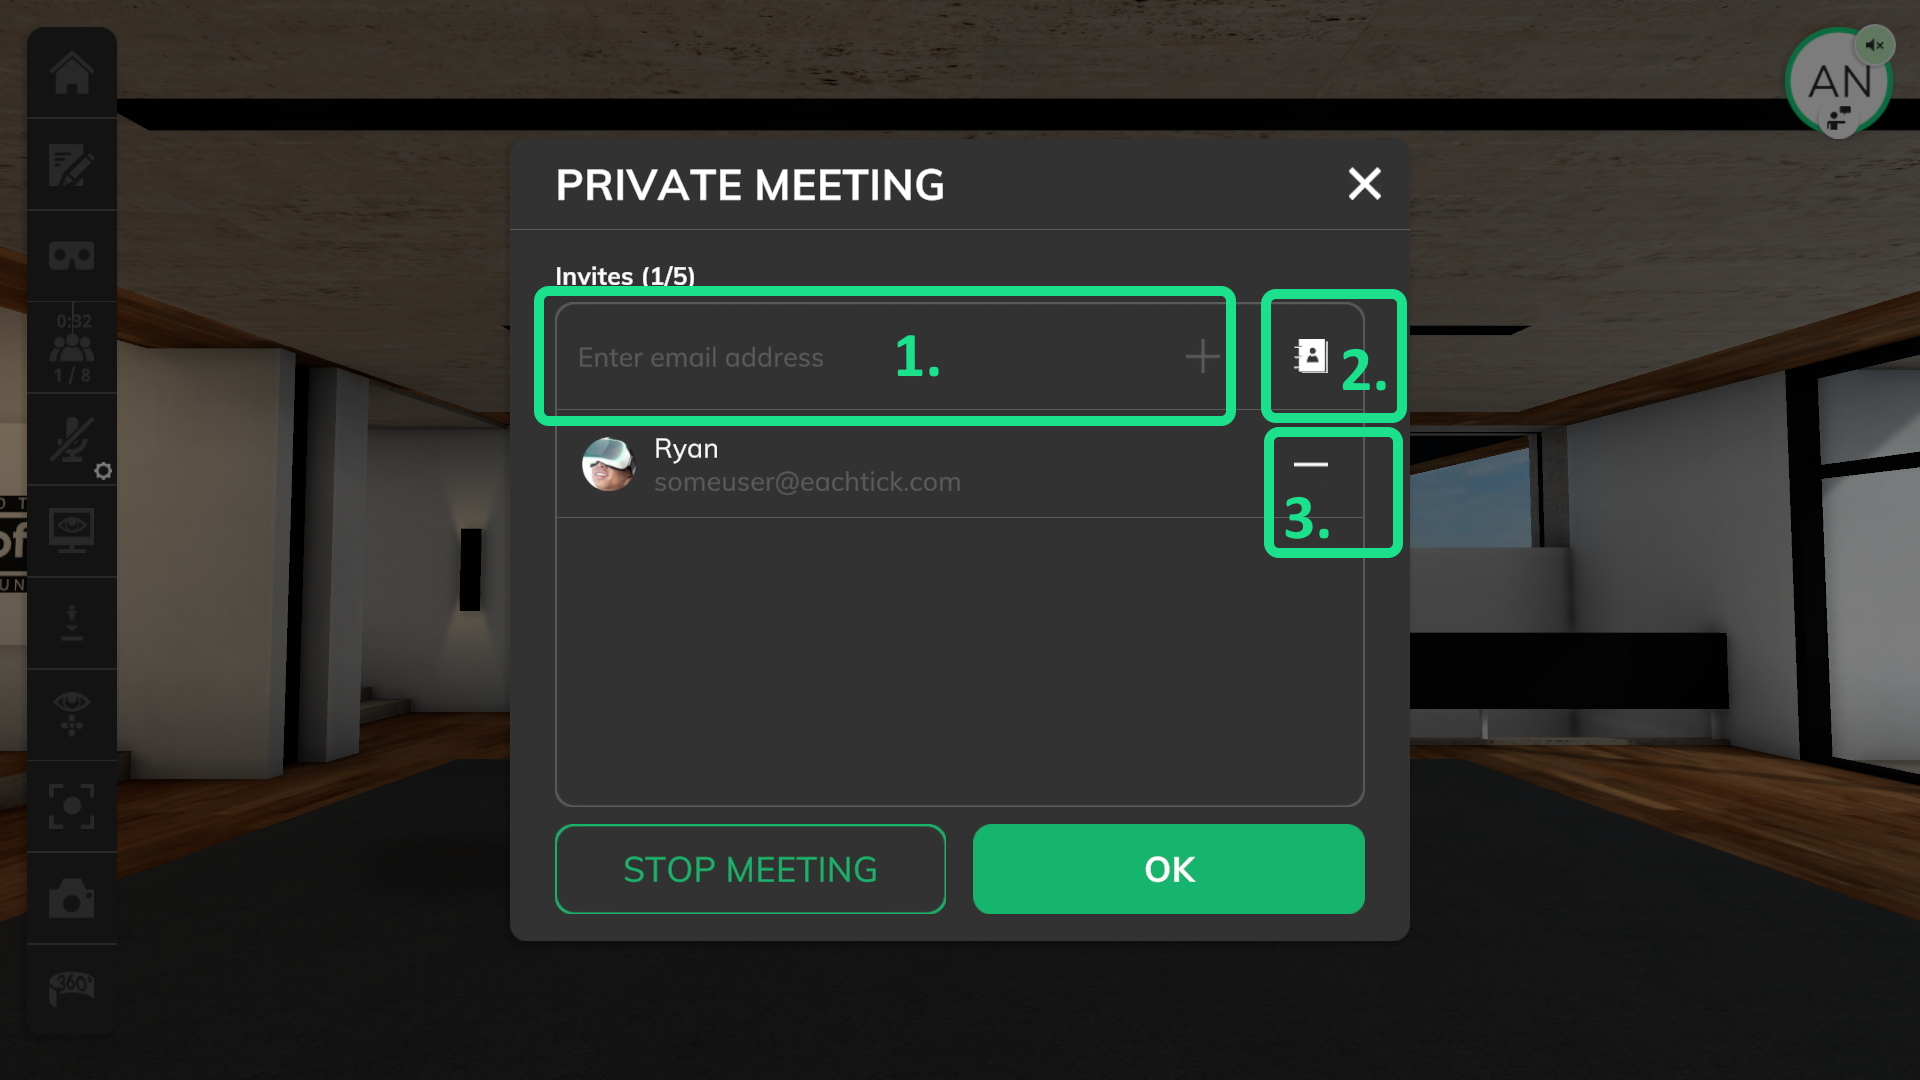
Once the meeting is started you can type in an email address and click on add (see: 1 in Started private meeting) to invite a new user, or you use the address book (see: 2 in Started private meeting). Removing an invited user can be done with the remove button (see: 3 in Started private meeting). Virtofy will send an invitation email including all necessary information to all invited users when clicking on “OK”. You can change the invitation list all the time.
Stop meeting
Stops the meeting.
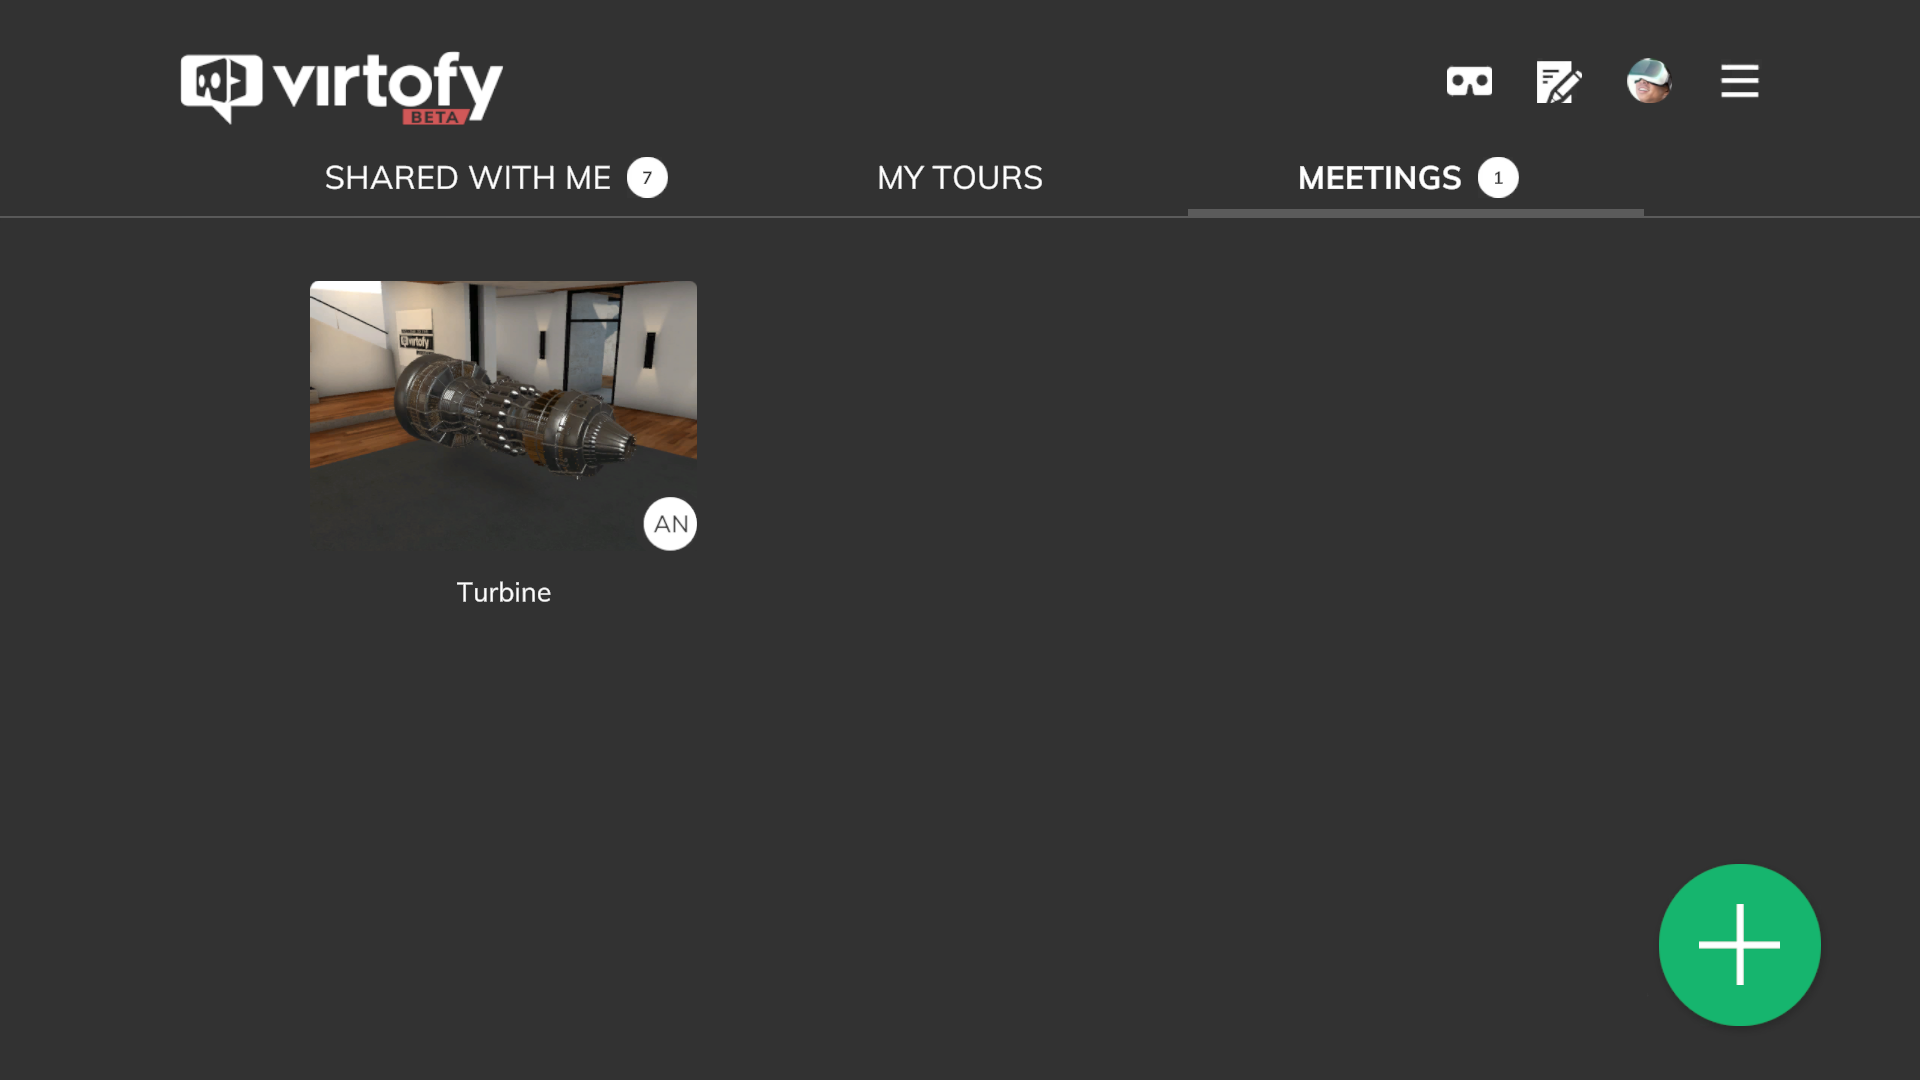
The manage tour screen will show the private meeting in the meeting tab. The user can join by clicking on the tour image and then clicking on the “join” button.
Public meeting
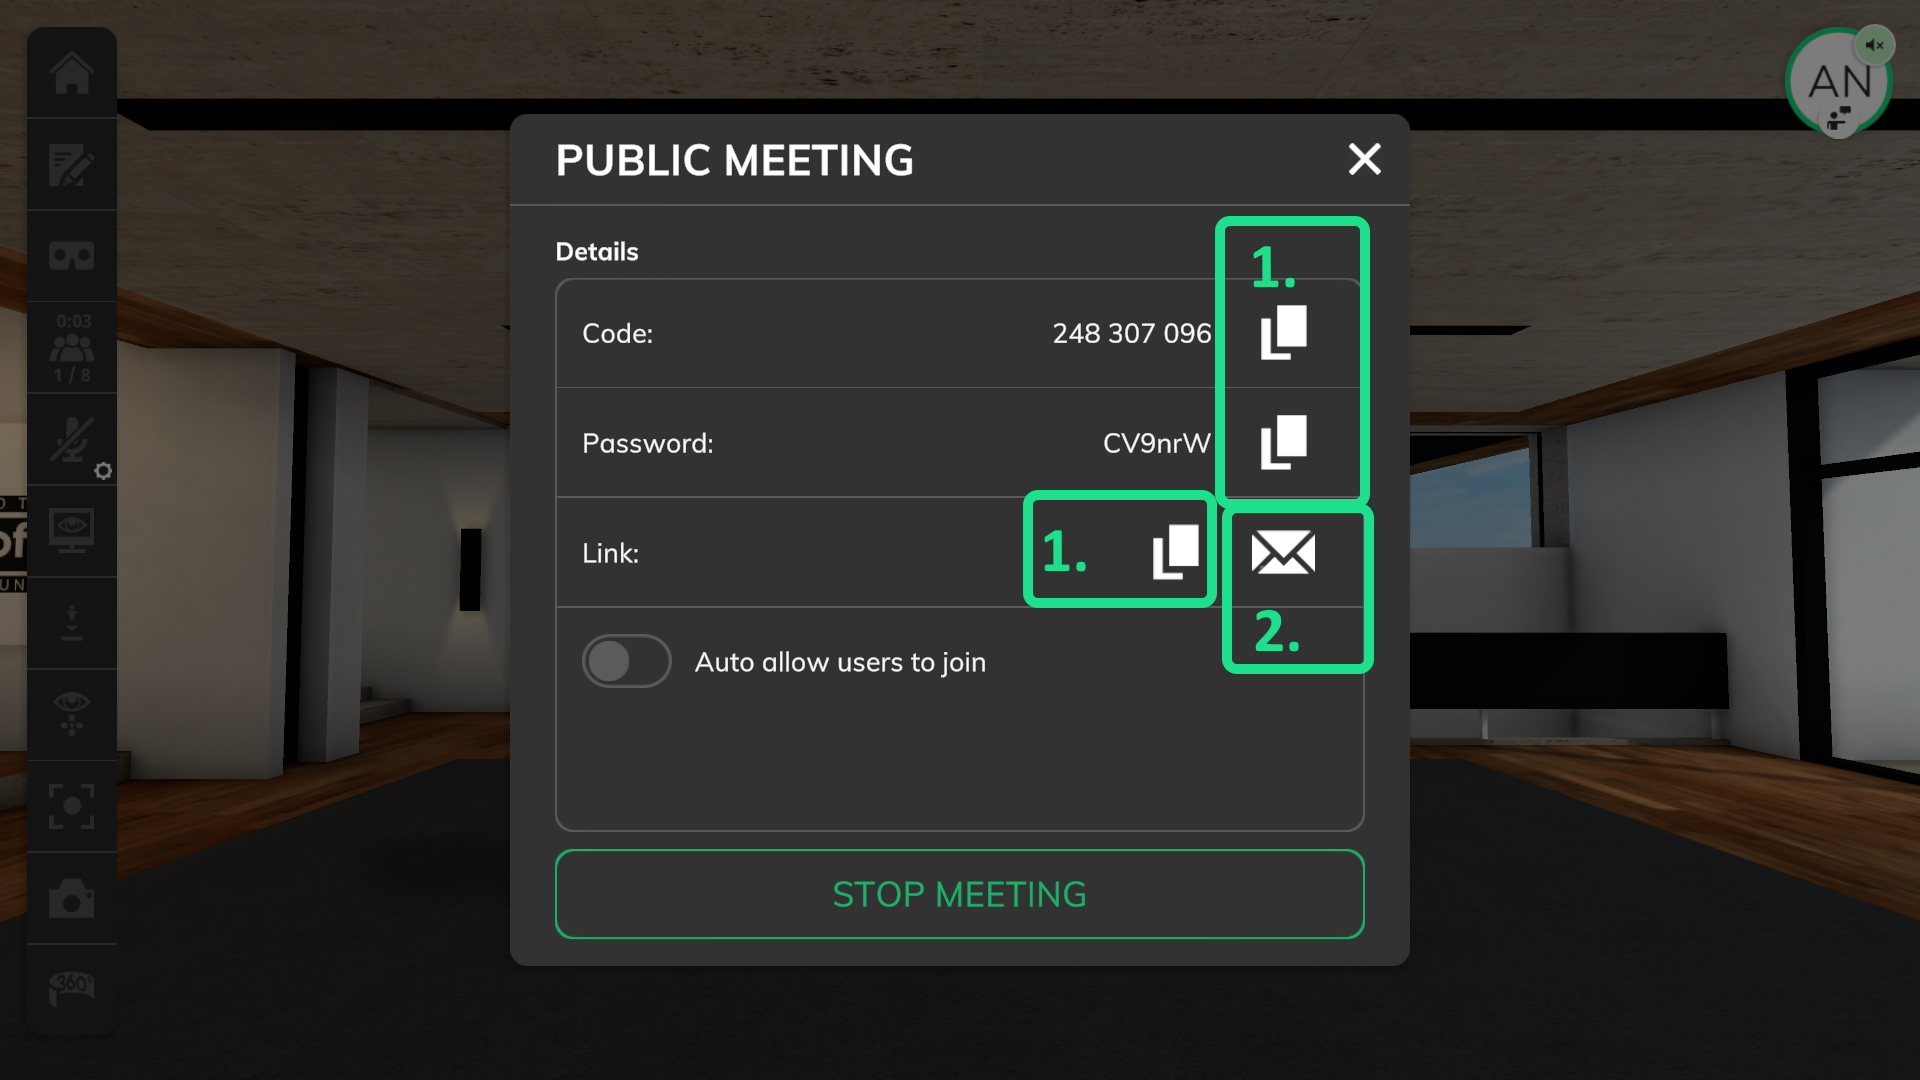
When starting a public meeting, you will get a code, password and link (which combines code and password). You can share this with everyone you want. Anybody who has the public meeting credentials can request the meeting host to join the public meeting. It is up to the meeting host to decide if the user is allowed to join, or not.
Copy to clipboard
The copy to clipboard buttons will copy the corresponding text to the clipboard (see: 1 in public meeting setup screenshot).
Open in mail app
This will open your default mail program with a join link in it, which can be forwarded to other users (see: 2 in public meeting setup screenshot).
Join link
The join link can be shared with other users. When clicking the link on mobile devices, the Virtofy app will be opened and the meeting will be joined if the Virtofy app is installed. Otherwise, a website is opened with all needed details on how to download and install the app. On Windows systems the link always opens a website with all the needed information to join the meeting or to download the Virtofy app.
Known Issue: Public meeting links do not work on meta quest compatible VR headsets, as the integrated web browser does not support opening an app via a link.
Auto allow users to join
If enabled, you will not get a request dialog if a user wants to join the public meeting.
Stop meeting
Stops the meeting.
Join public meeting
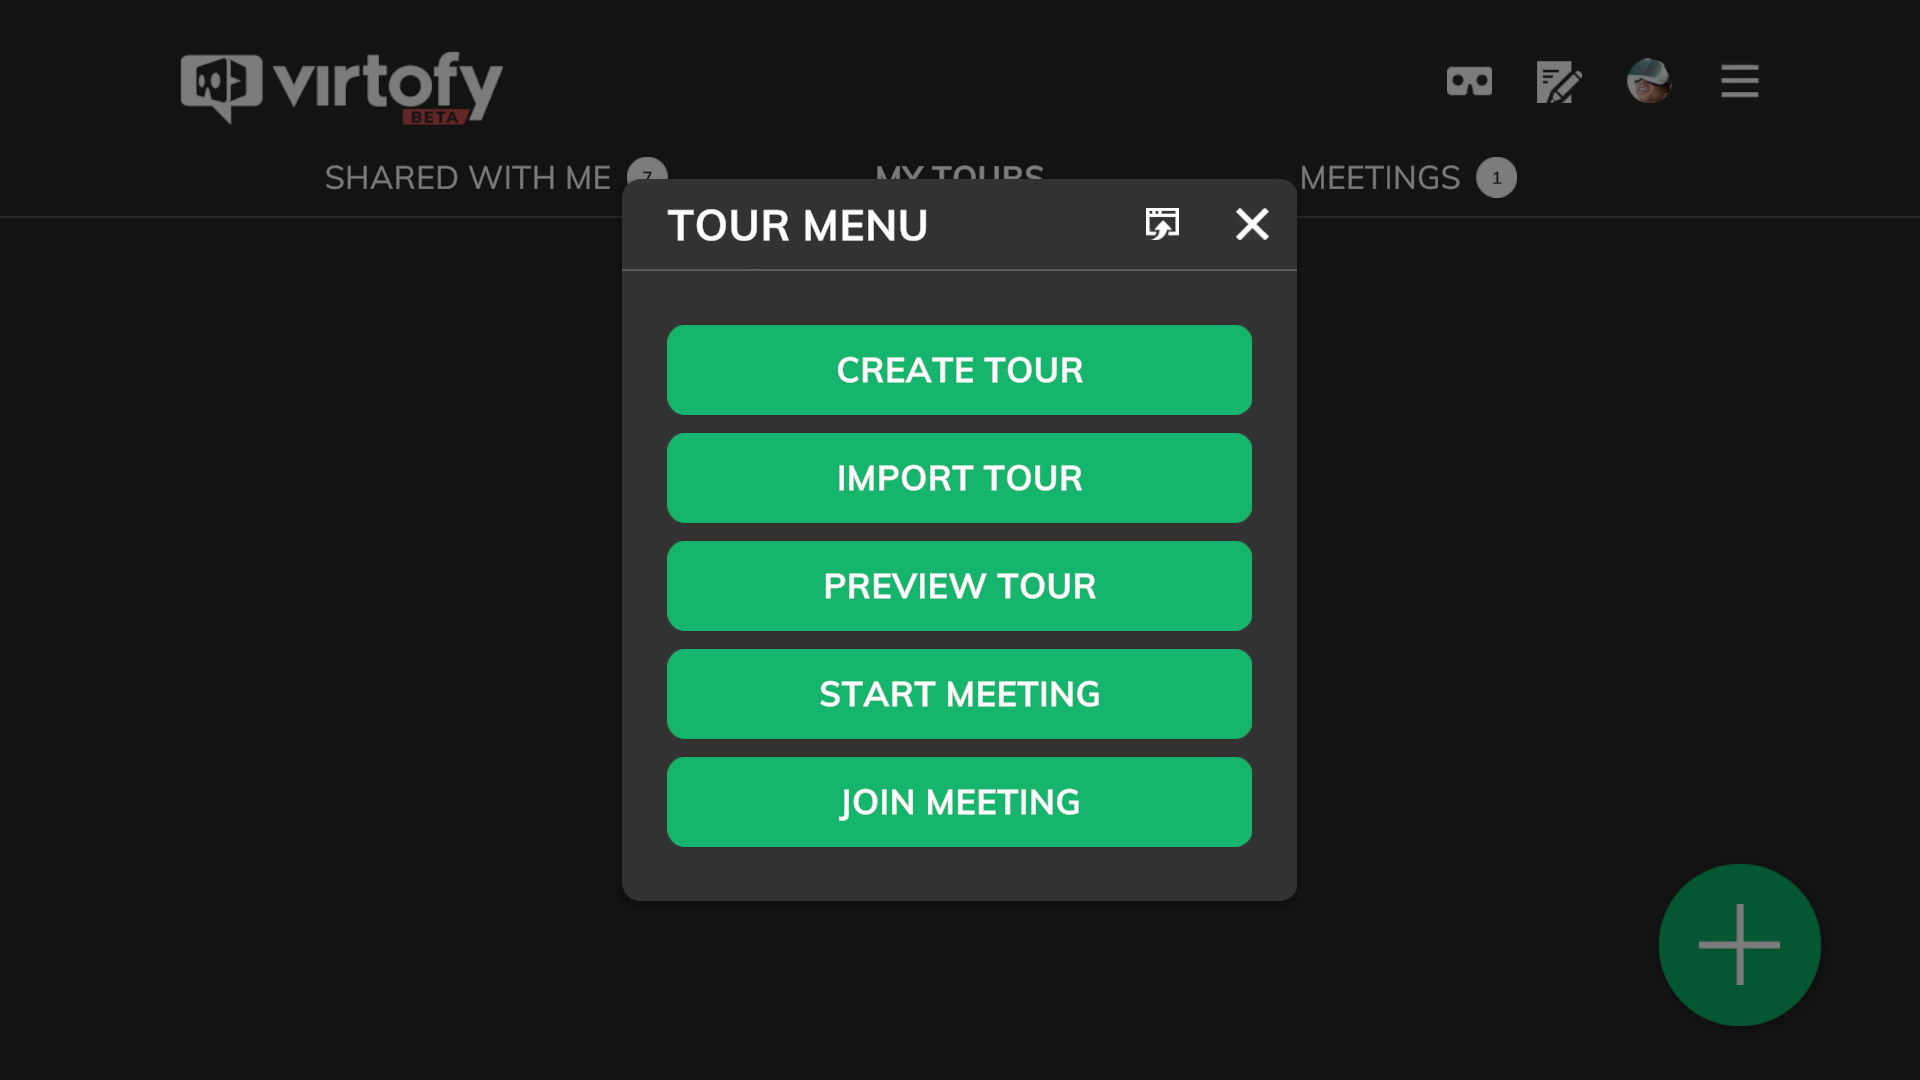
A Virtofy user can enter the public meeting credentials via the main menu after clicking on “+” and then clicking on “join meeting”.
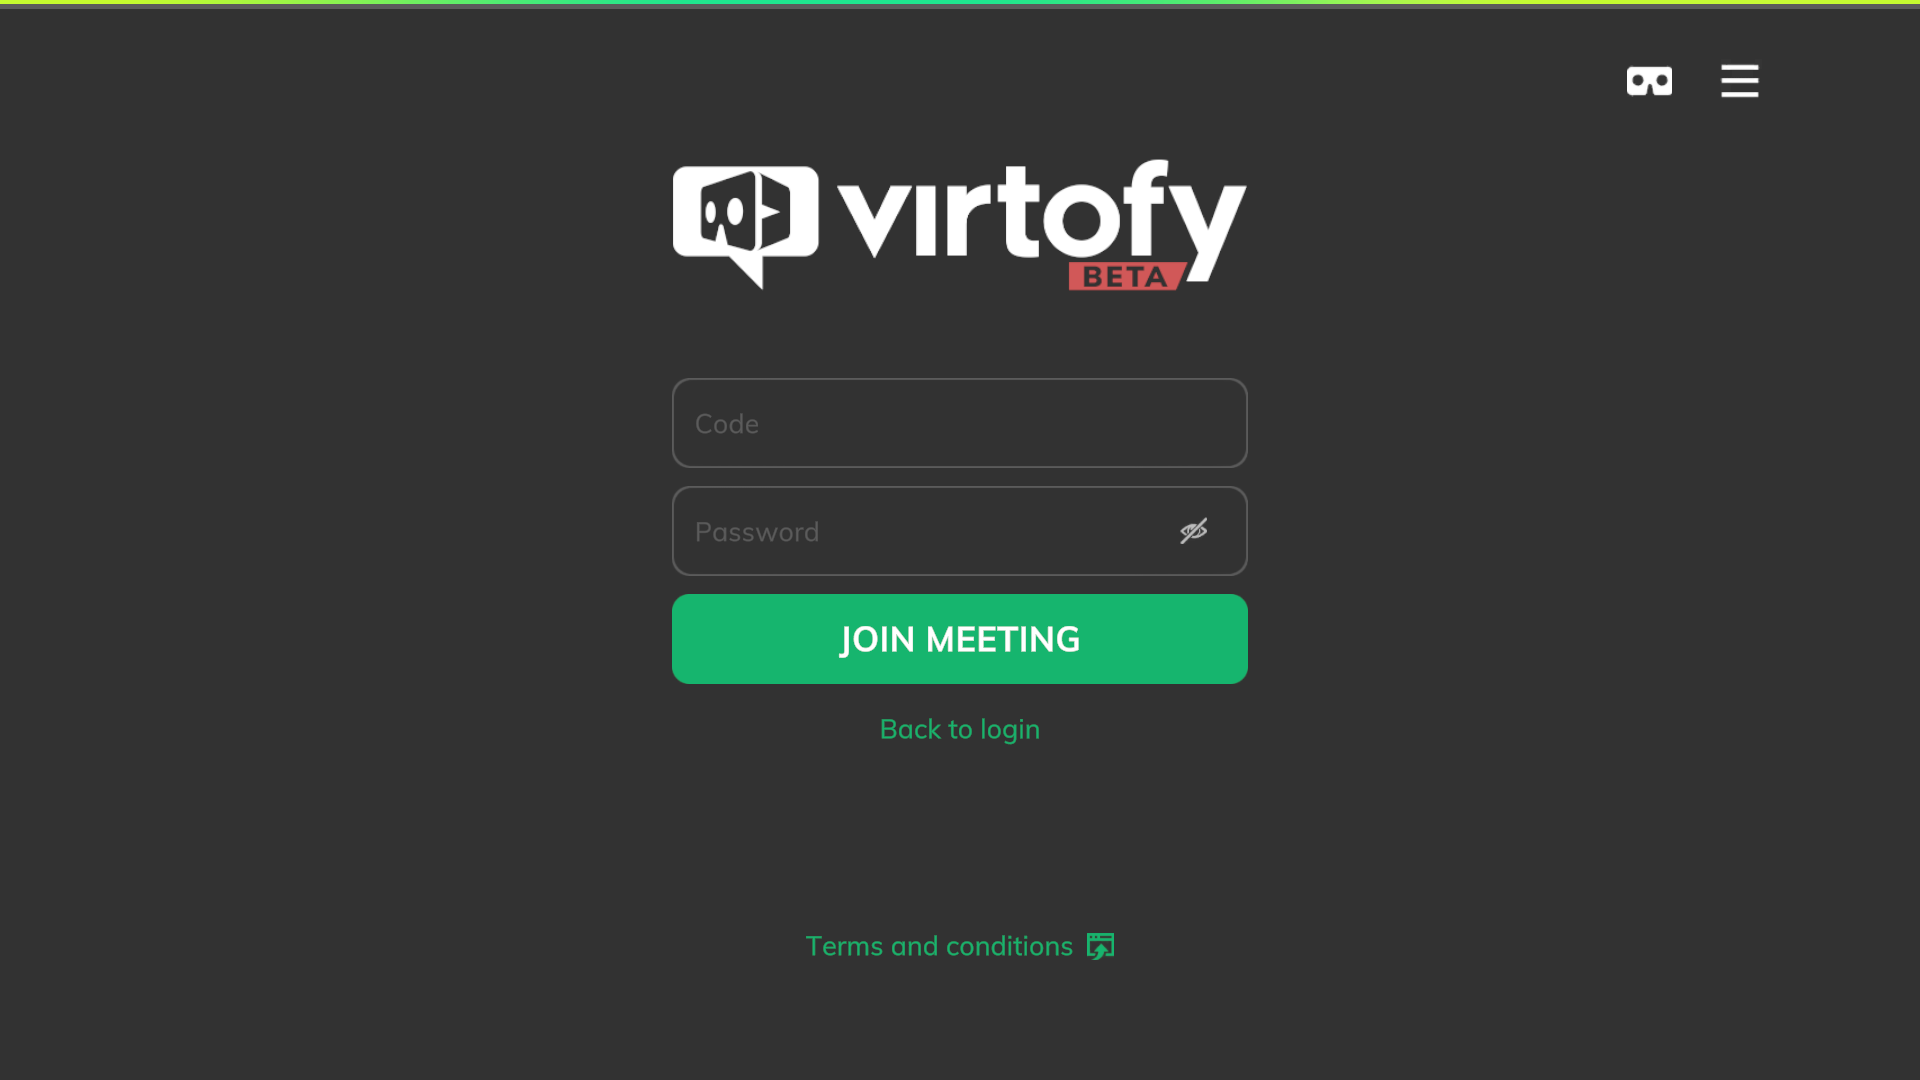
When using the “join meeting” button on the login screen, the user can join the public meeting as a “guest”.
User info
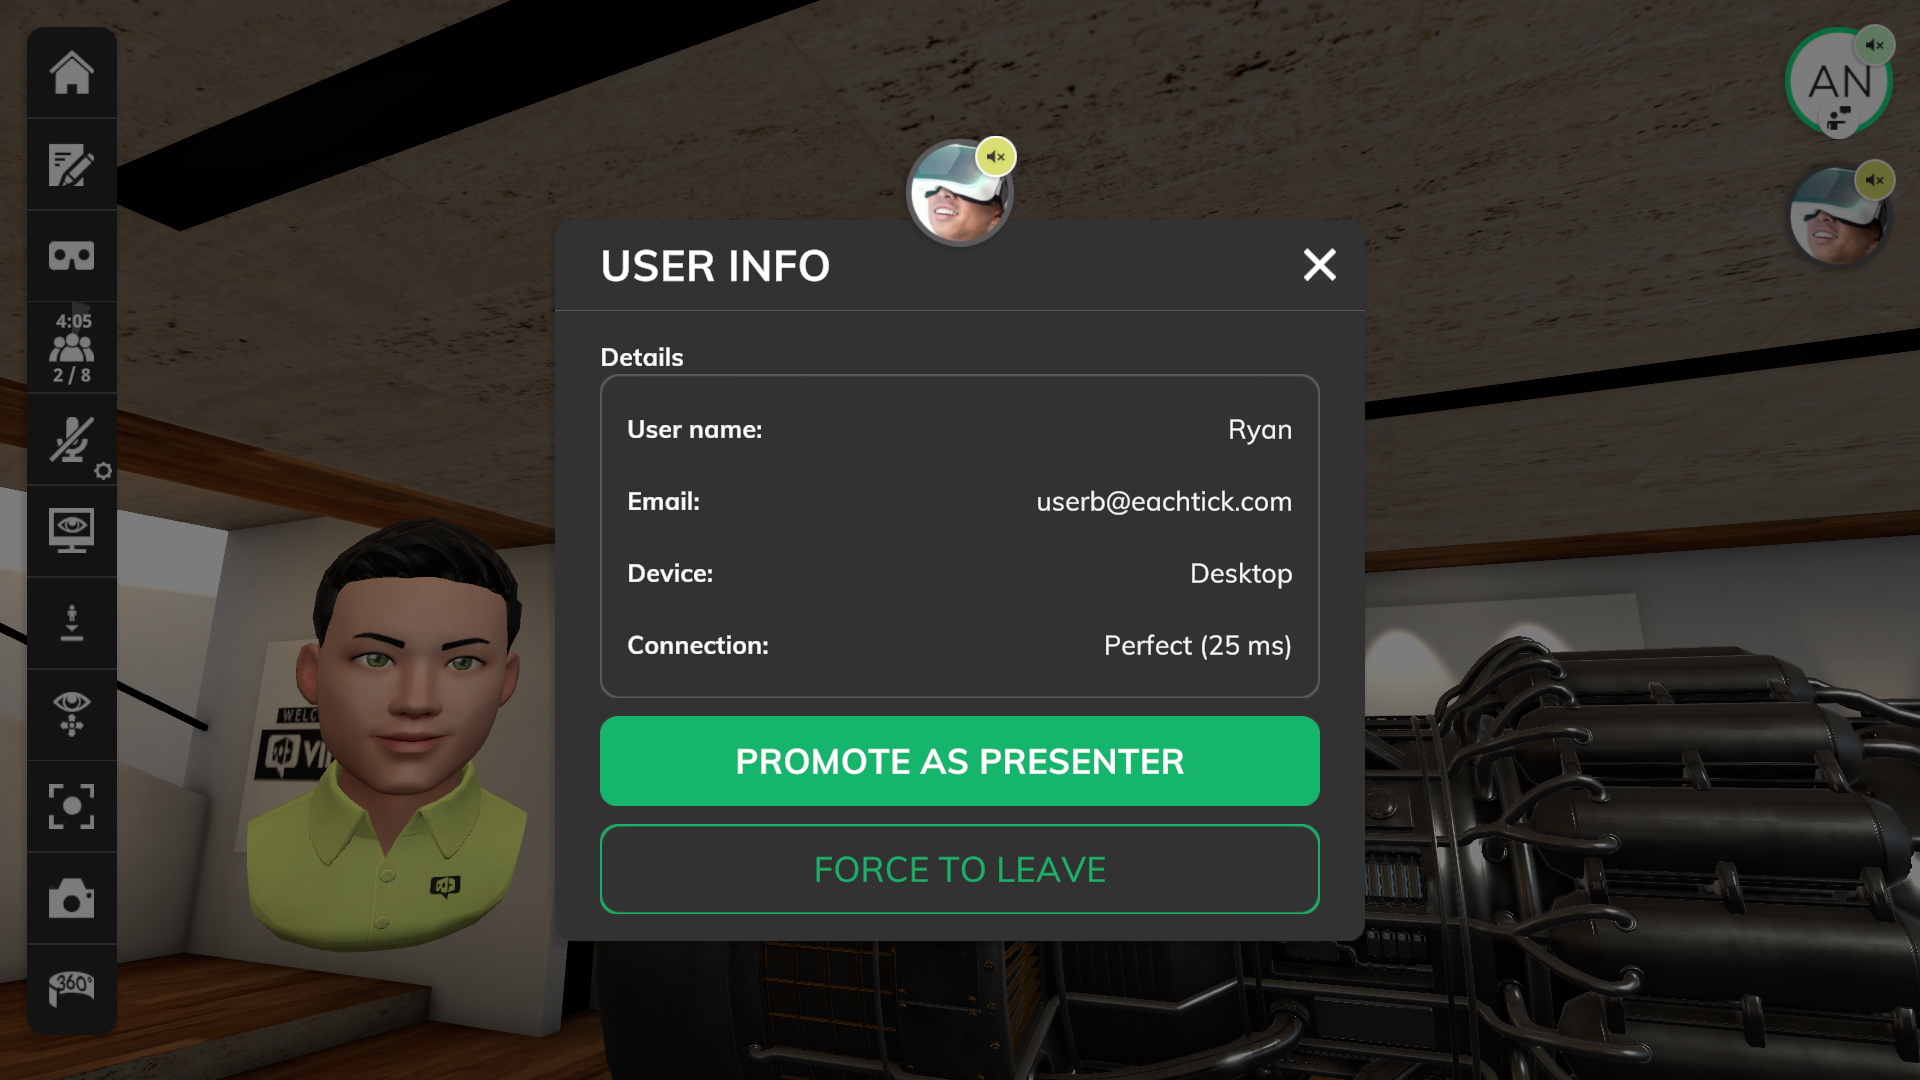
You can get detailed information of a certain user by clicking on the profile image on the UI, or on the name panel of the avatar.
Promote as presenter
Promotes the user as presenter.
Revoke as presenter
Revokes the user to be the presenter.
Force to leave
This will force the user to leave this meeting.
In-App Editor
Introduction
With the in-app editor you can create your own tours in the desktop version of Virtofy. The in-app editor is created with an easy to use workflow in mind. Usability goes over complexity. Highly complex tours can be created with the Virtofy for Unity plugin.
2D Image compression
2D files will be compressed in a way that they will use less diskspace and memory, which will result in much faster loading times.
INFO: Each device type (Windows and Android) needs a compatible version of the compressed 2D file.
3D Model loading
When selecting a 3D model from your harddrive, Virtofy will load and process the file locally and convert it into an internal format which cannot be read by any standard sofware but Virtofy.
3D Model compression (LOD)
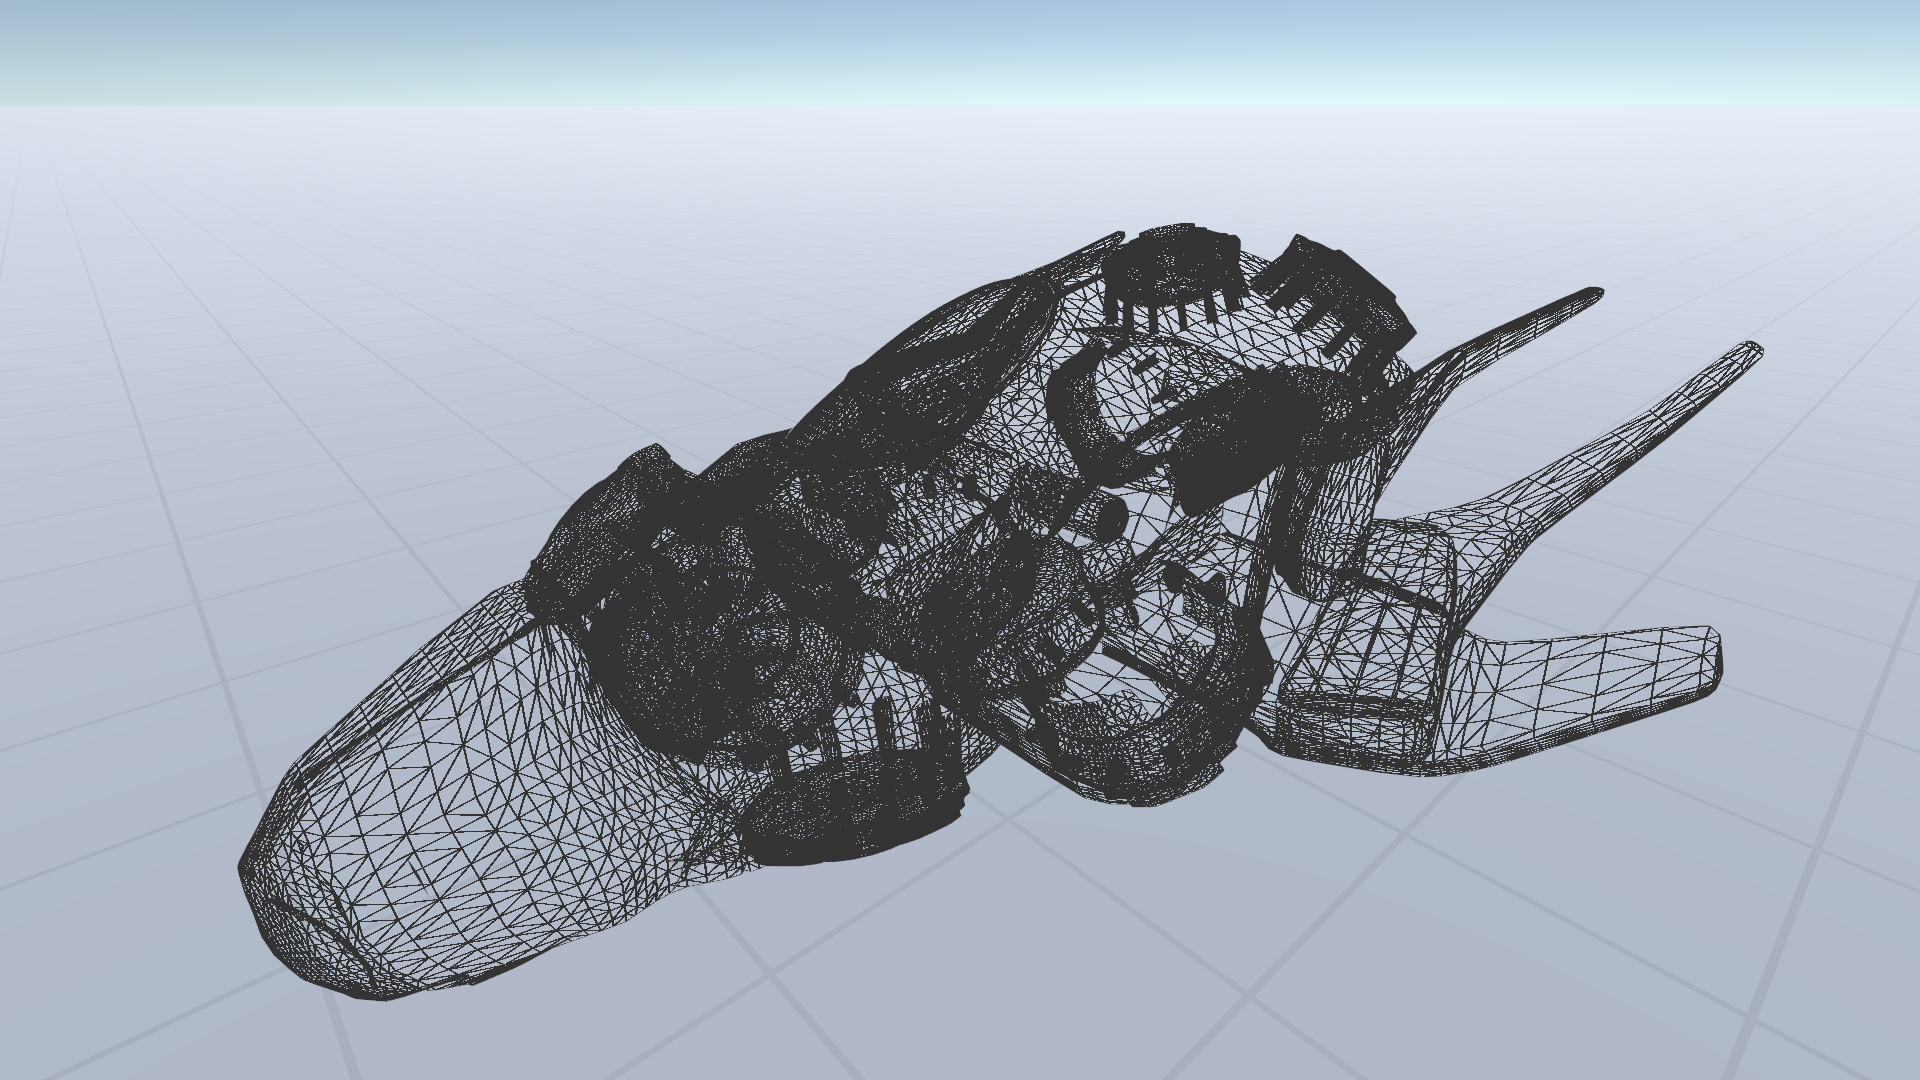
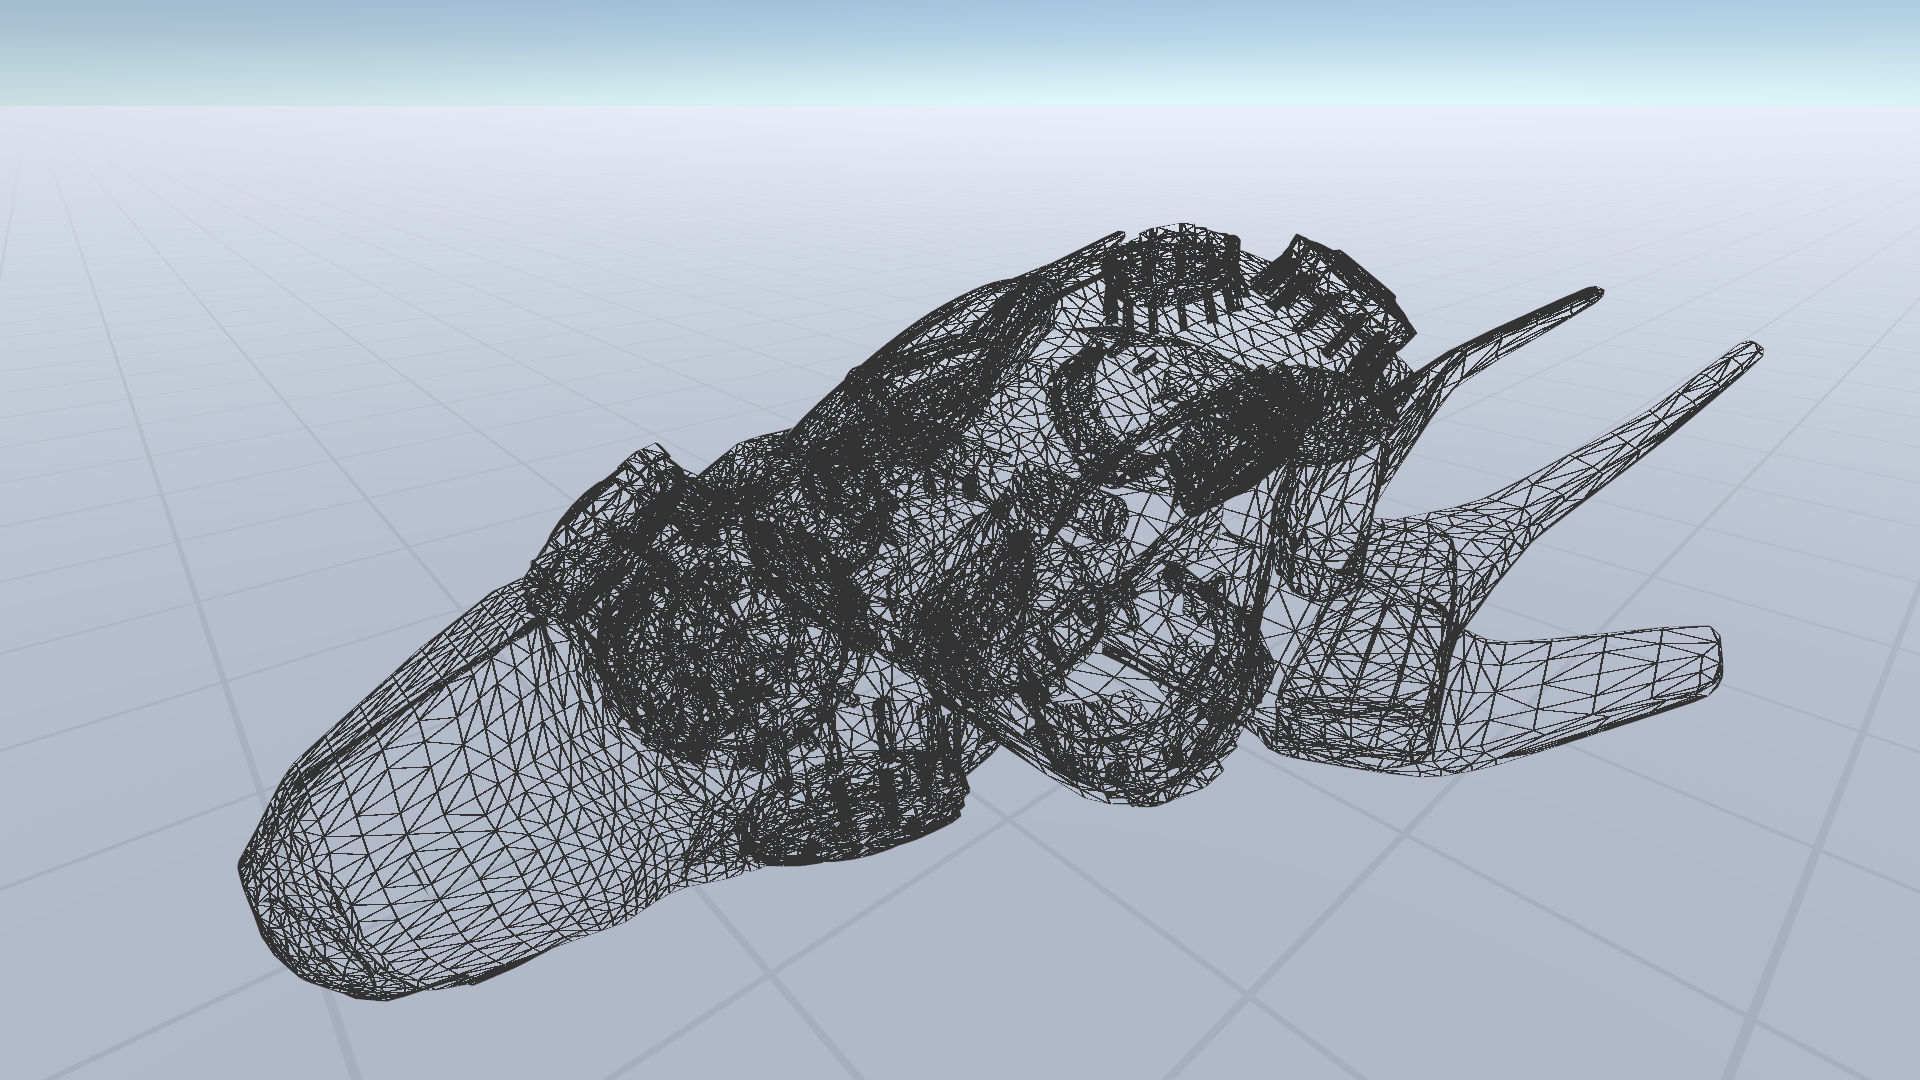
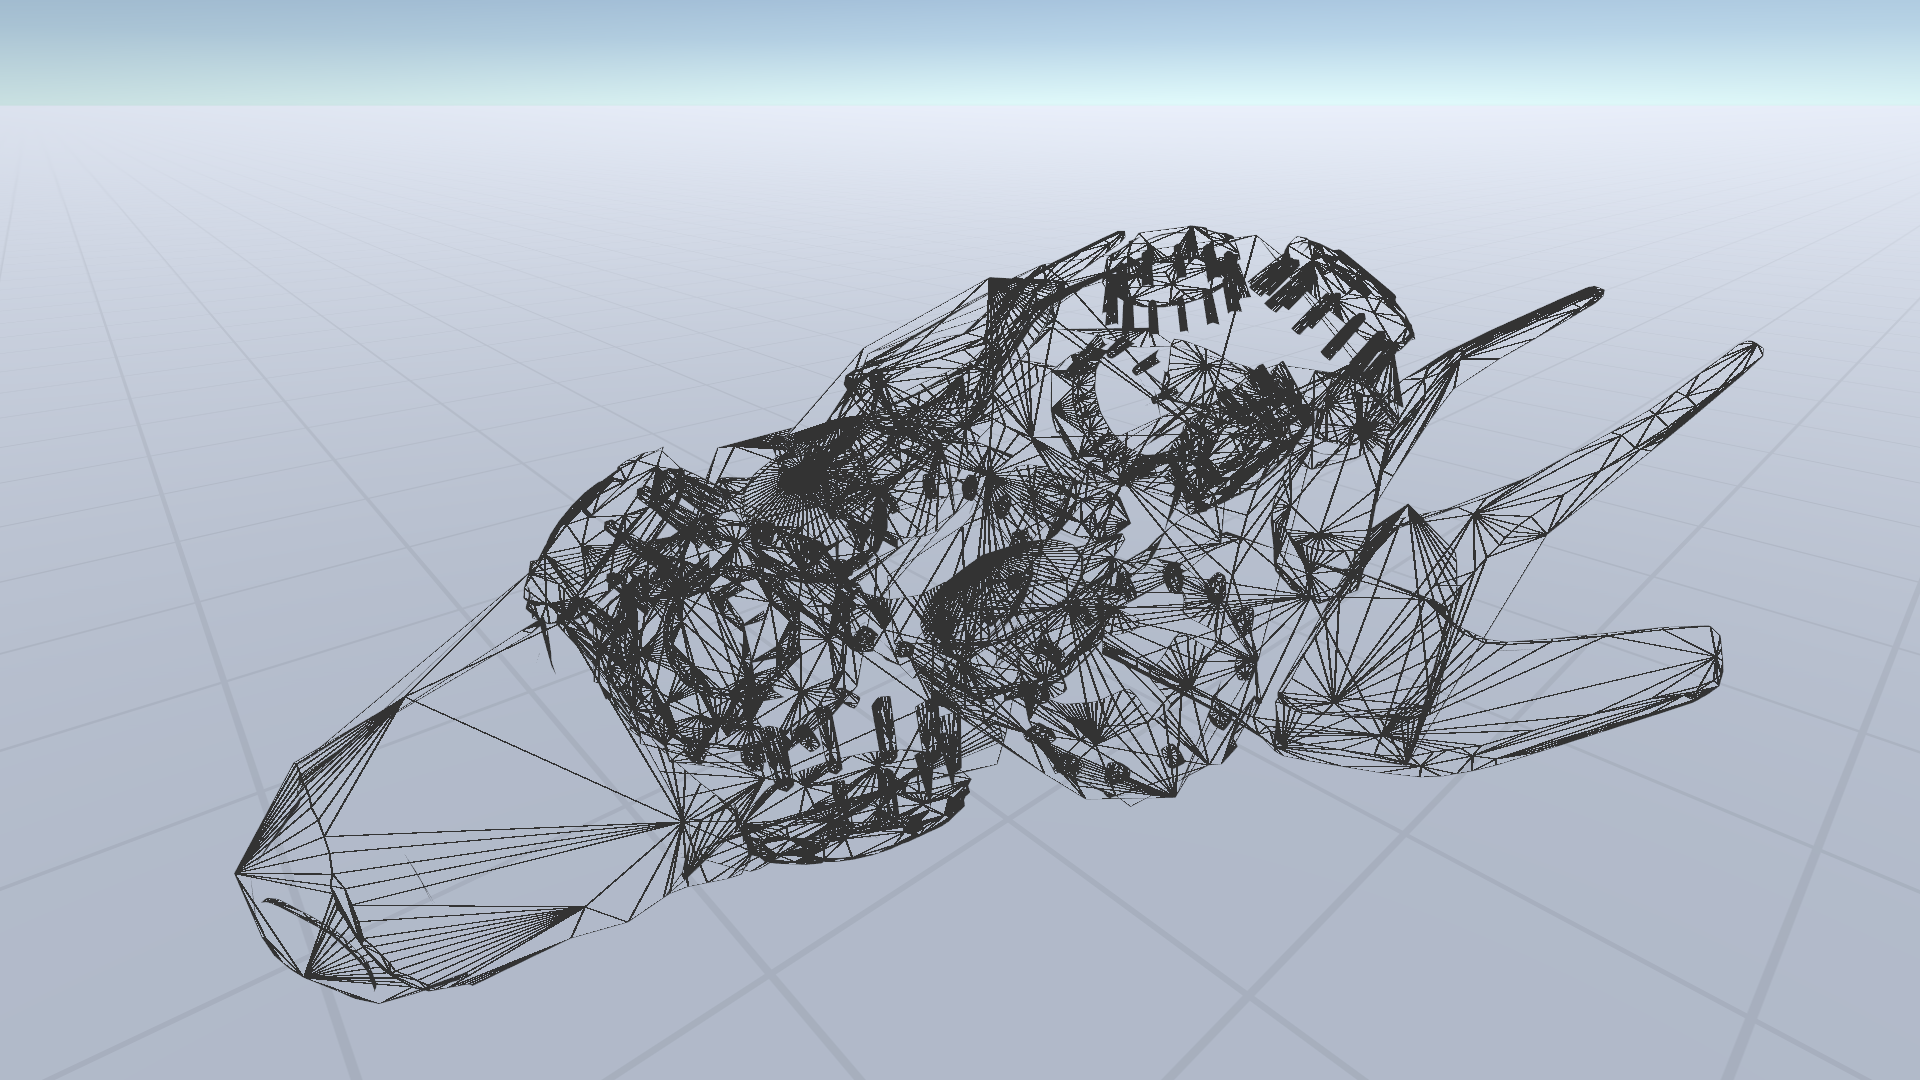

INFO: The slide show above shows different triangle counts per LOD: 160k, 80k, 30k.
To improve the app performance the in-app editor can create a so-called level of detail (LOD) version of certain parts of the given 3D model file. This can improve the performance of the app drastically, especially on android and VR devices.
INFO: LOD generation is currently experimental and can take some time to generate. You can toggle it on in the editor settings.
3D Model optimization
To improve the app performance even further, the in-app editor will optimize the 3D models in a way that certain materials are combined together.
Locking
A tour will be locked for other users if it is loaded in the in-app editor.
Saving
When clicking on save, all missing files which need to be compressed will be created. After that, the changed tour data will be uploaded to the cloud.
View types
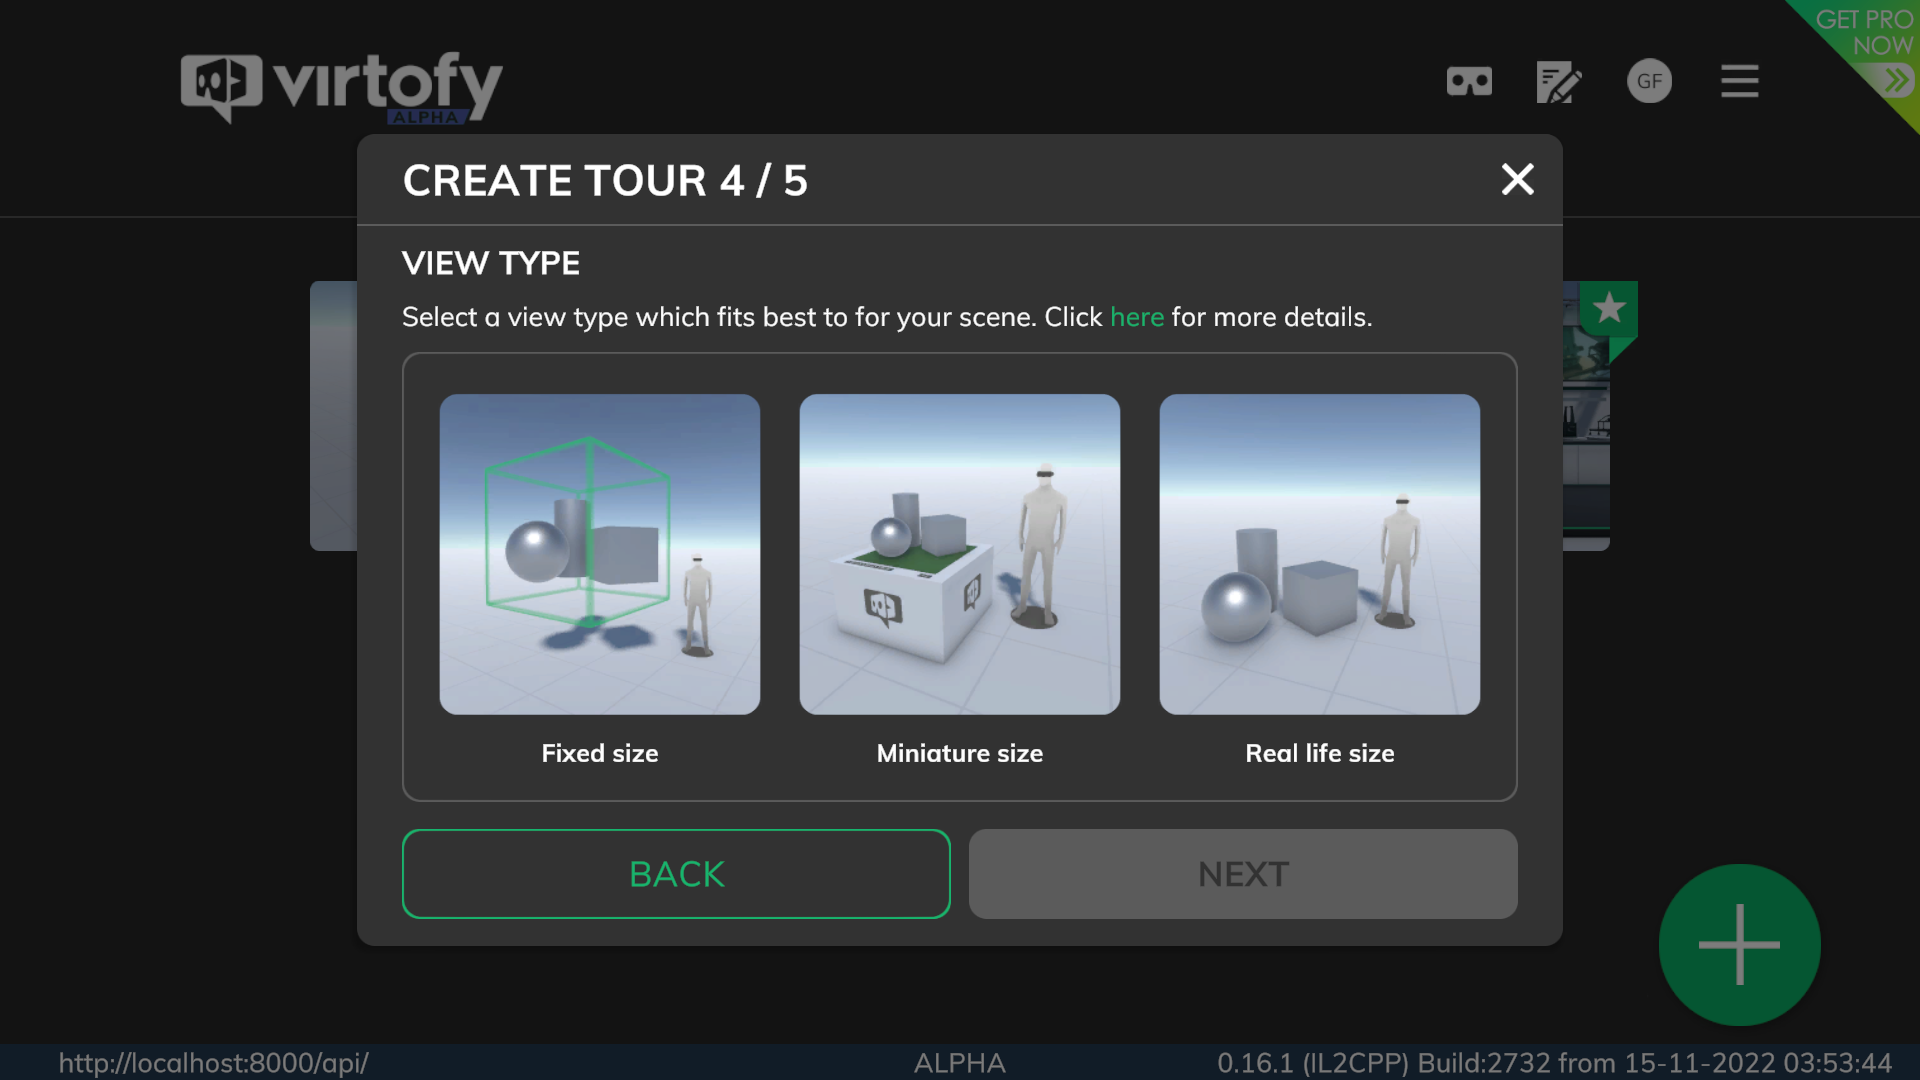
A tour has one of three different view types. The view type can be changed at any time in the in-app editor.
| Feature | Fixed size | Miniature size | Real life size |
|---|---|---|---|
| POVs | Fixed | Customizable | Customizable |
| 3D model scale | Fixed | Customizable | Customizable |
| User scale | Fixed | Flexible per POV on table | Flexible per POV |
| Creation | In-App Editor | In-App Editor | In-App Editor and Virtofy for Unity plugin |
| Best used for | Rapid prototyping, Engineering, Machinery | Architecture, Landscaping, Very large scenes | Automotive, Game design, Interior design |
Fixed Size
If you want to quickly import and preview your 3D model without worrying about sizes and measures, choose this view type.
Note: This view type is not recommendable when the correct size of the 3D model is important.
Miniature size
In the miniature size view, your 3D model will be displayed on a table and you can let users enter your 3D model via teleportation. You can add POVs on certain positions if you want.
Note: Keep an eye on the size of the 3D model, to have a correct scale ratio.
Real life Size
Real size will take your 3D model without any special functions.
Presets
You can select from various view type presets which will change the surroundings in the scene and give another look to your tour. Custom always gives you complete freedom to configure your surroundings based on the provided in-app editor scene settings.
Tour creation

Click on the add button on the manage tour screen (see: 1 in the settings screenshot) and then on “Create tour”.
The wizard will guide you through the needed steps for the tour creation.
Scene setup

The available options depend on the selected view type and preset. Most options are available when using a custom preset.
View type

View type
Here you can selected the view type and preset.
Allow overview
This option is only available with the “Real Life Size” view type. If enabled, the user will get the “Place at overview” button in the main toolbar. This is useful if you want, that the user can see the selected 3D model from outside.
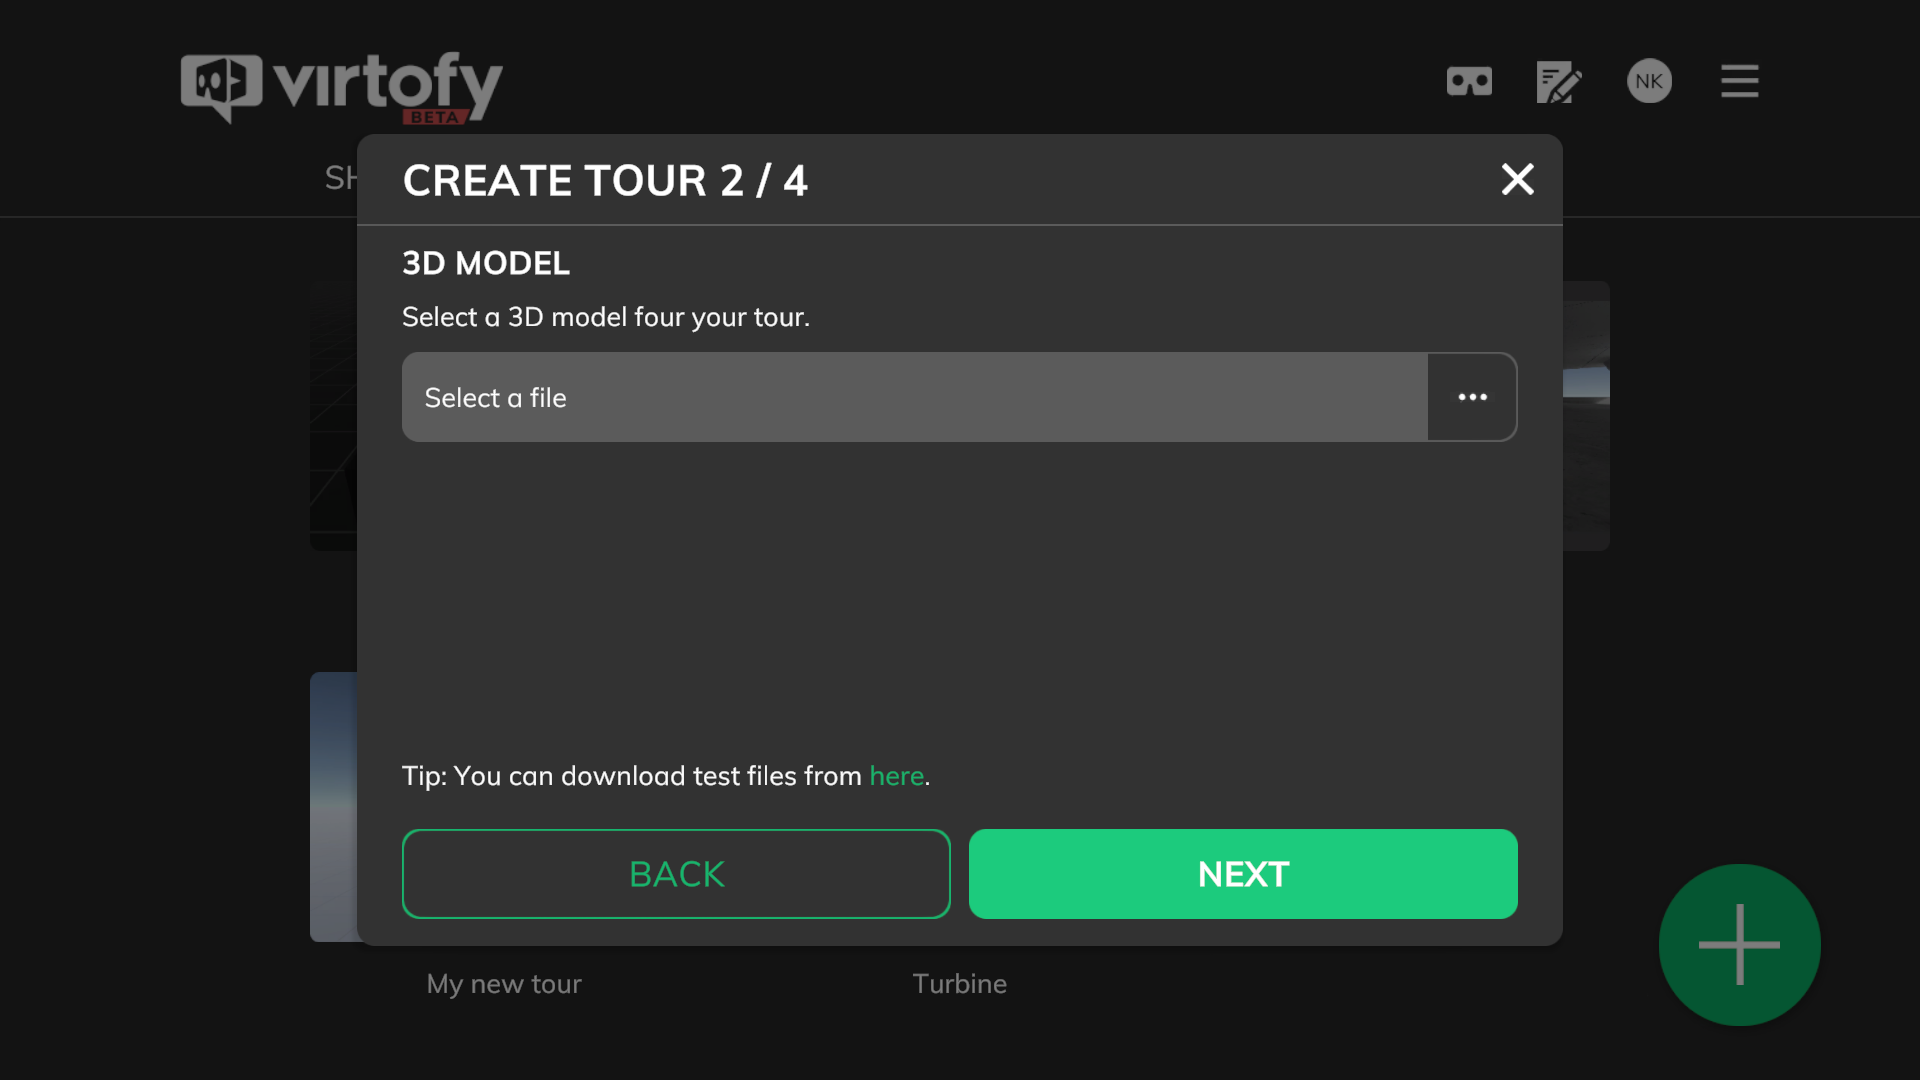
3D Model
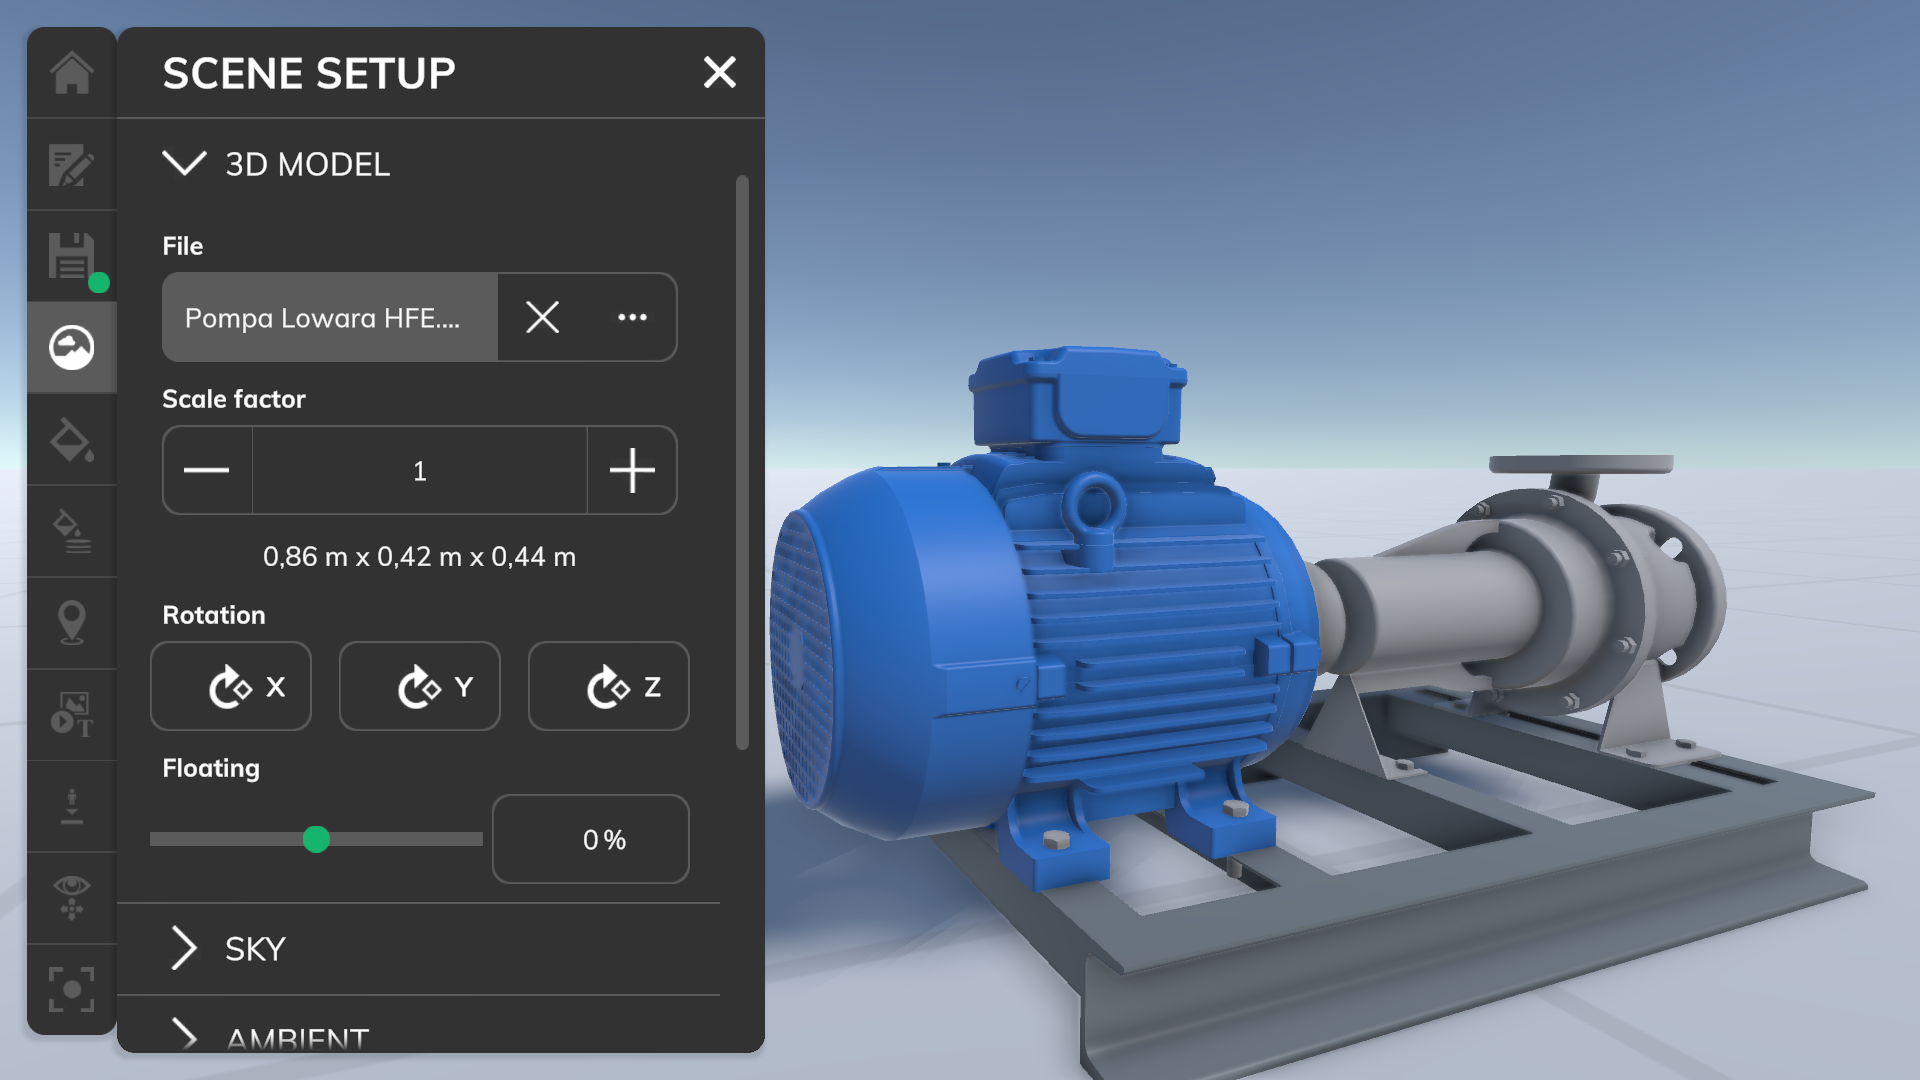
File
Select a 3D model to import. Click here to see all supported file formats.
Scale factor
Scales the 3D model by the given factor. This is not possible when using the fixed size view type.
TIPP: Some 3D programs do export models with too large or too small dimensions. You can check the real world dimensions below the scale factor edit field. This can help you to find the right scale factor for your needs.
Rotation
Rotates the 3D model around the given axis.
Floating
Adjusts the height position of the 3D model.
Sky
The sky setup allows you to control the background of the scene.
Sky type
Select the sky type.
Color
Use just a single color to tint the sky.
Sky color
Tint color for the sky.
Cutom image
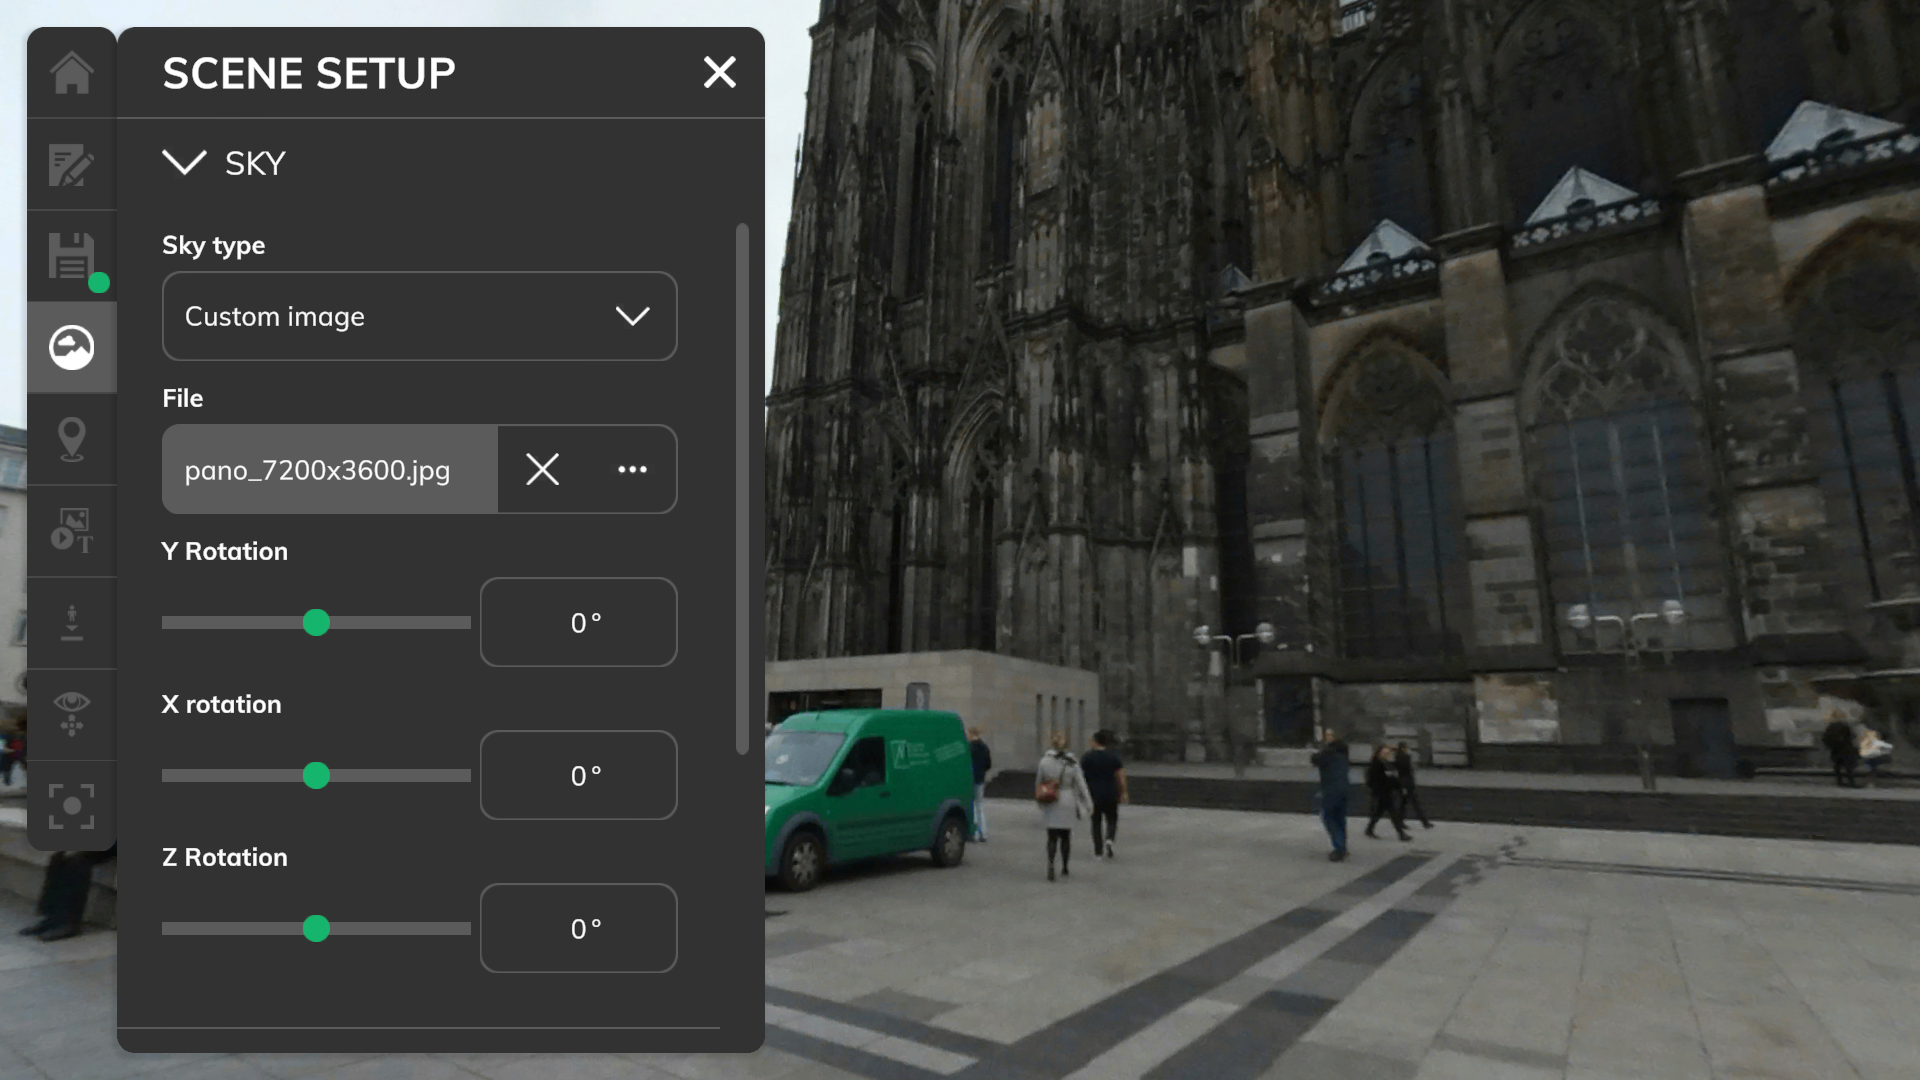
Use a custom 2D image (panorama or skycube) as sky background.
File
The 2D image file which should be used for the background. The 2D image must meet one of the following criteria to be displayed correctly. The width height ratio must be 2:1 (panorma), 4:1 (stereo-panorma) or 6:1 (cube).
X Rotation
Controls the rotation on the X axis.
Y Rotation
Controls the rotation on the Y axis.
Z Rotation
Controls the rotation on the Z axis.
Default sky
Default sky with sun.
Sky / ground color
Gives the top and ground color. The final colors in the 3D view are calculated based on the colors given here and the sun’s position (day and night cycle).
Sun size
Gives the sun size
Gradient
Use a color gradient as sky background.
Sky / ground color
Start (sky) and end (ground) color for the gradient.
Horizon color
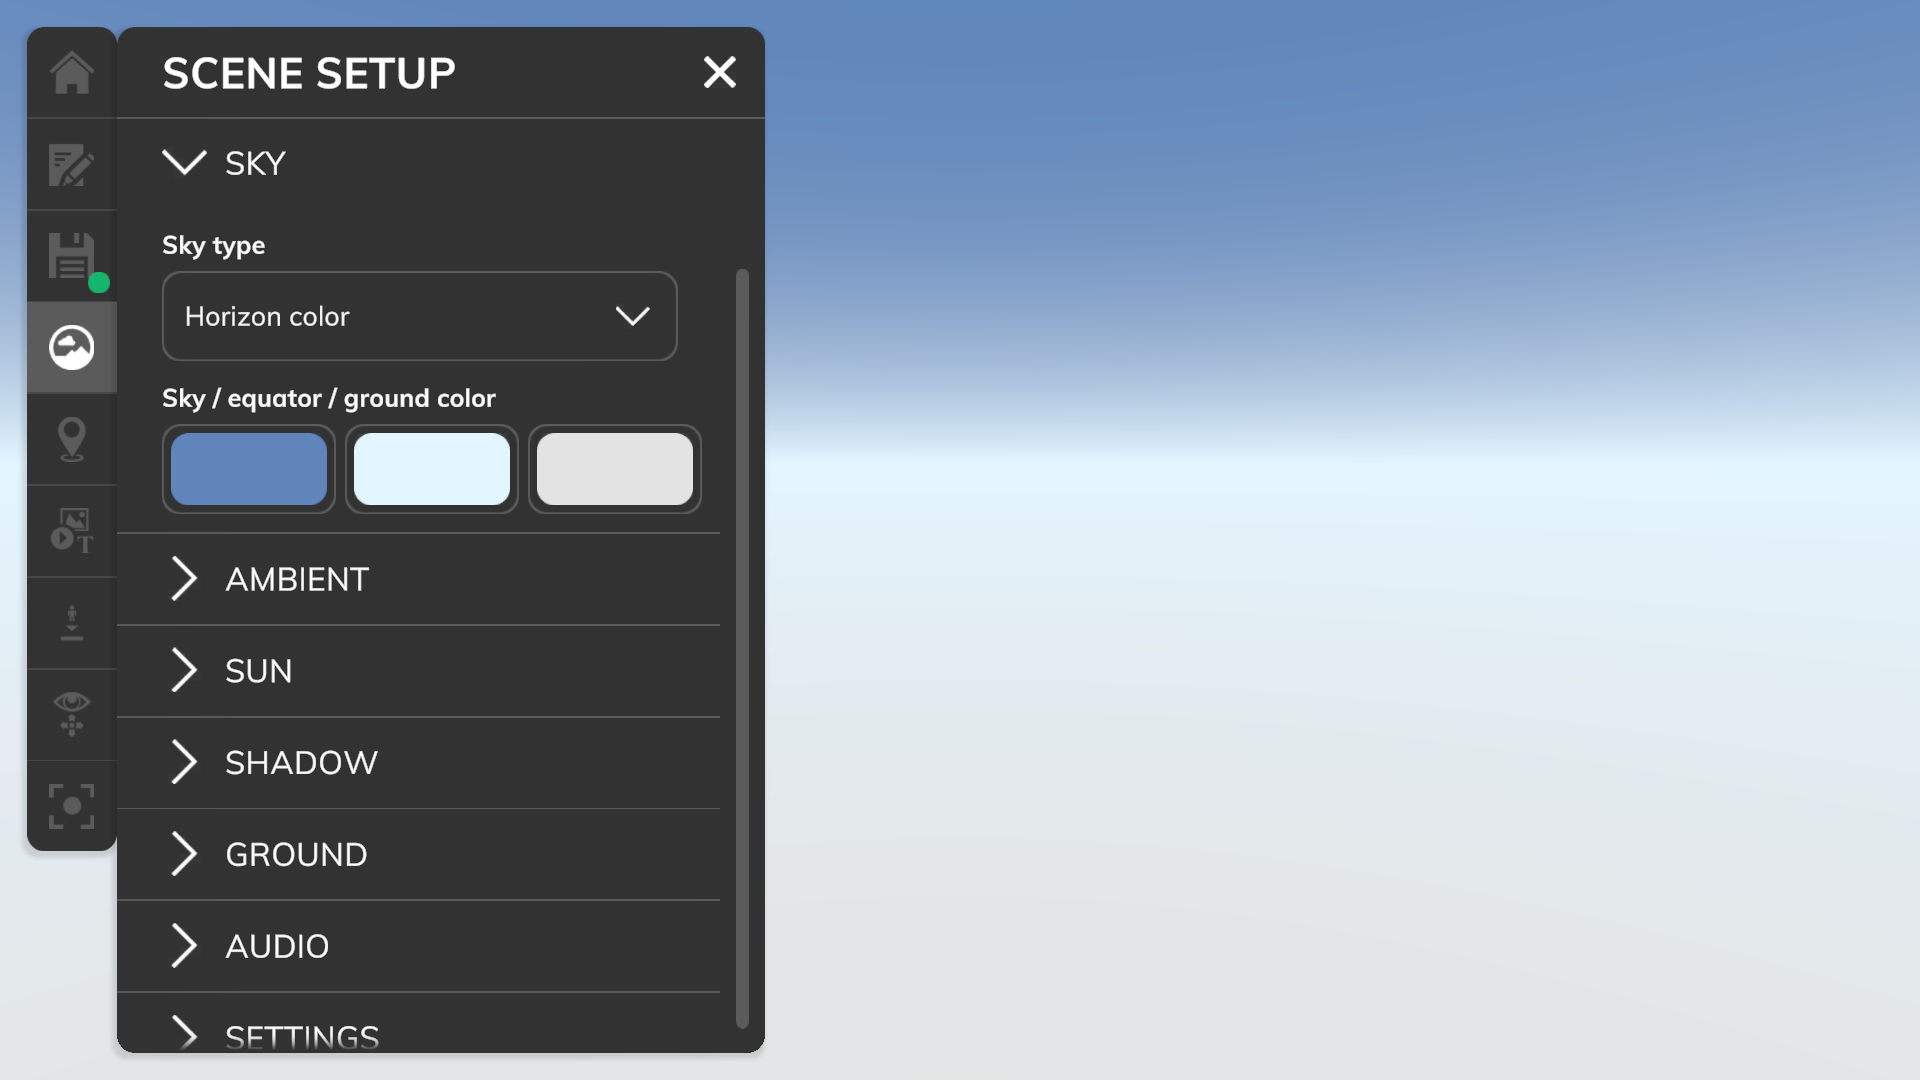
Use 3 color values in a gradient style.
Sky / equator / ground color
Start (sky), middle (equator) and end (ground) color for the gradient.
Ambient
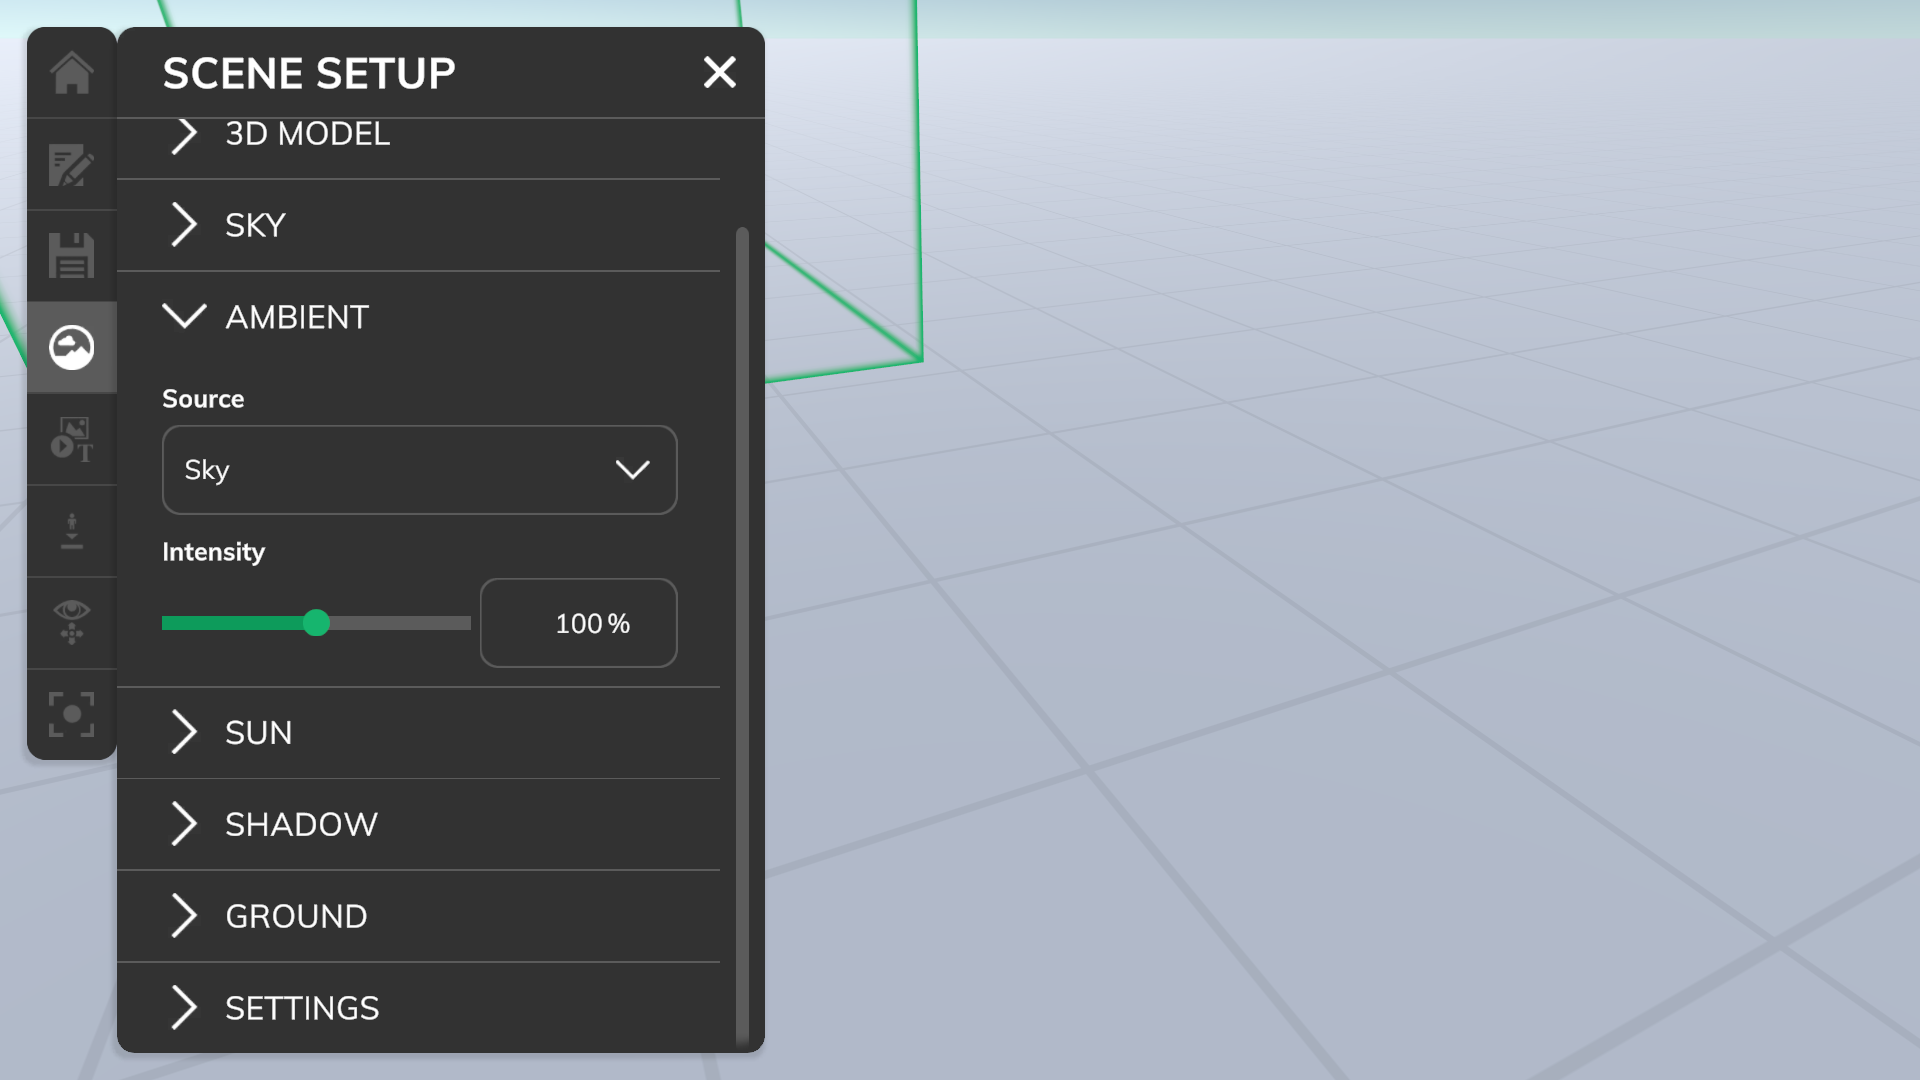
The ambient colors will be used to colorize the scene and have a direct influence on the shading of all surfaces.
Source
Determines the source of the ambient color values.
Color
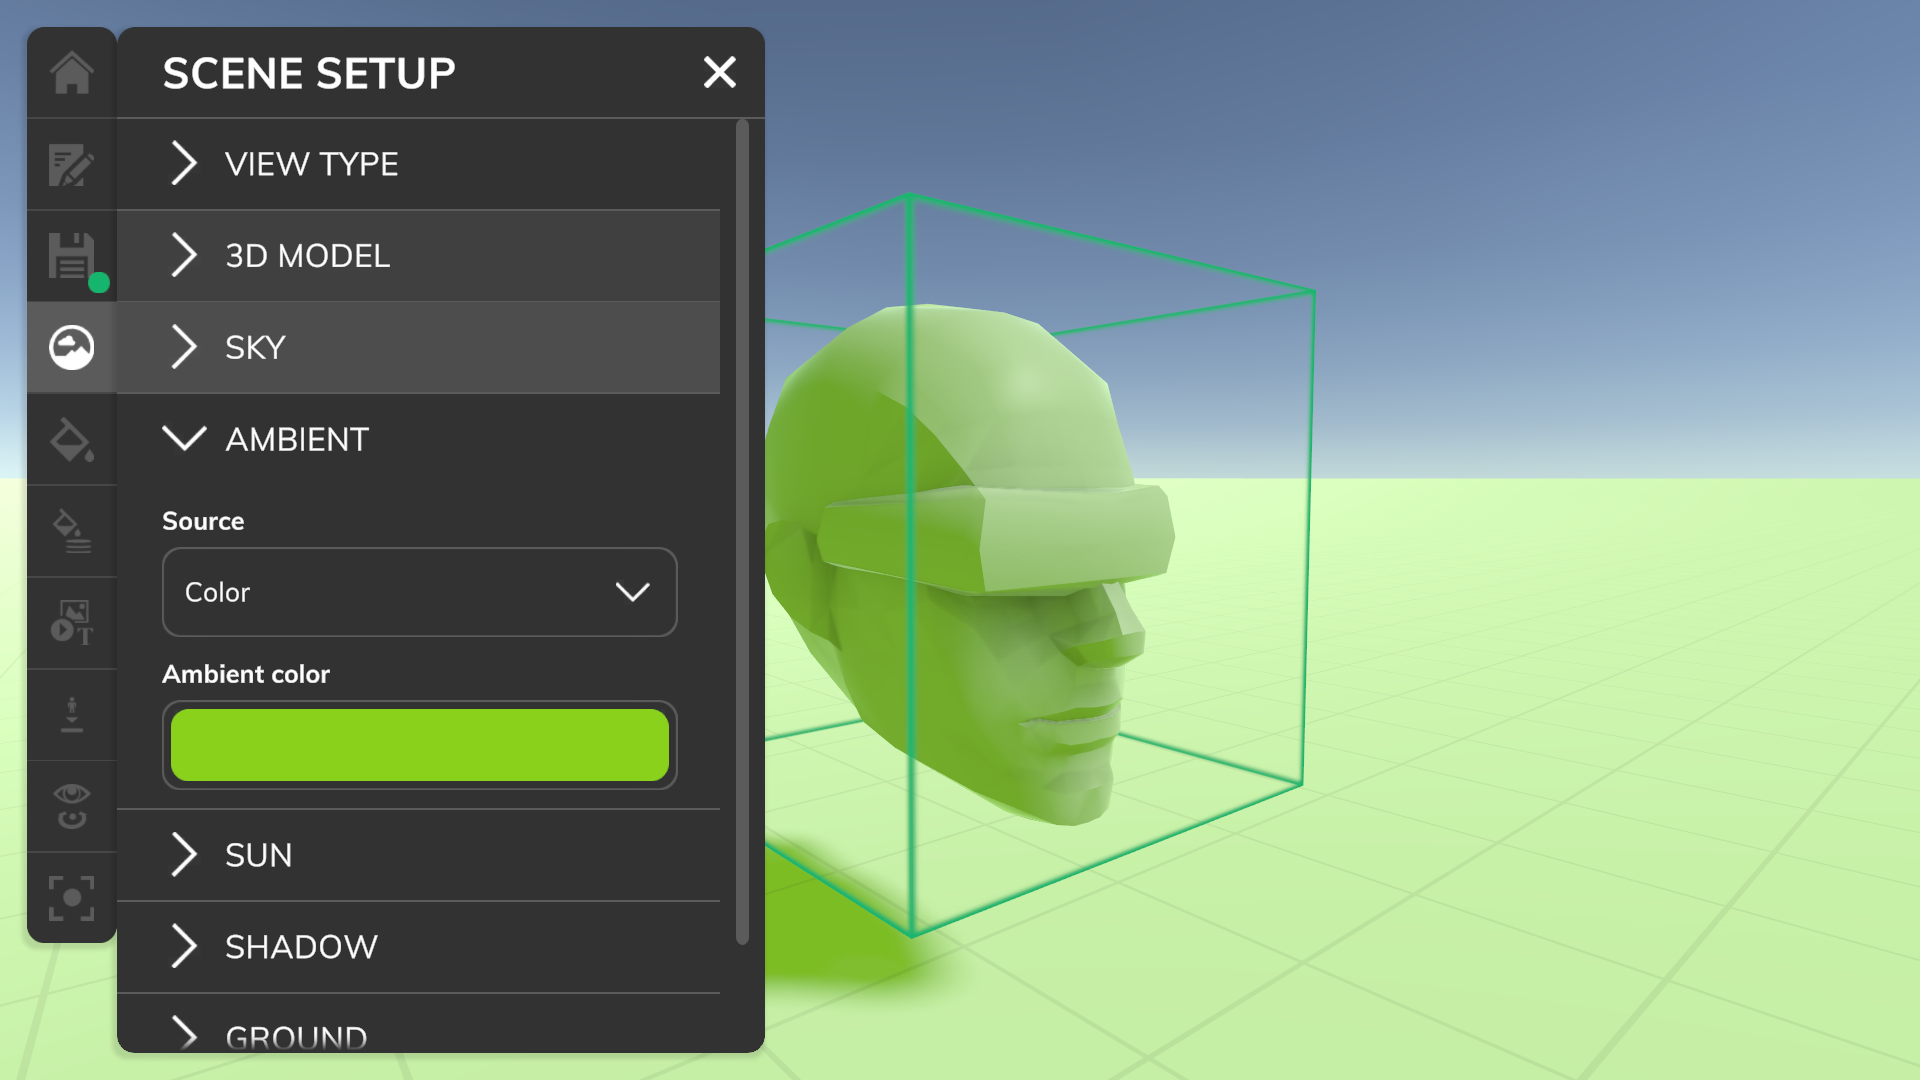
The color ambient source is the simplest one. It just uses one color.
Ambient color
Use the single color for the ambient color calculation.
Gradient
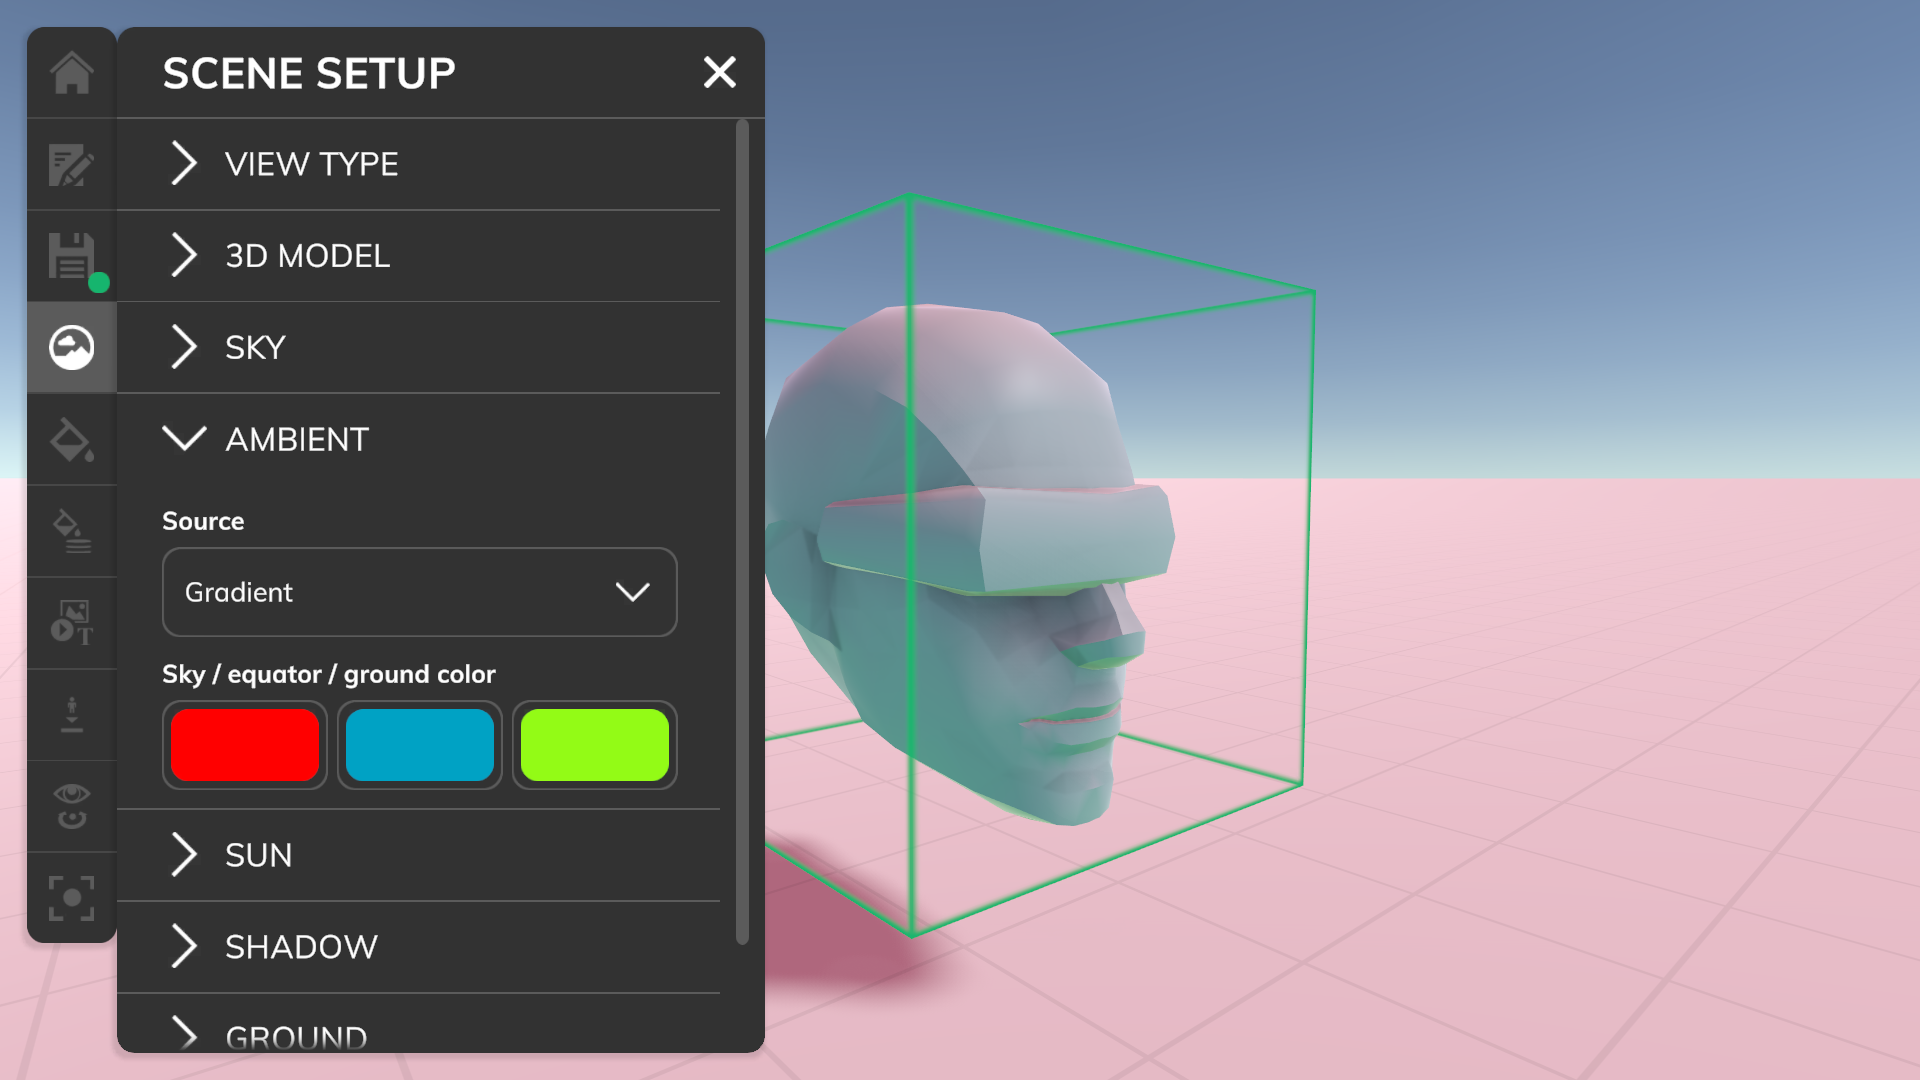
The gradient ambient source uses three colors for calculating the ambient color.
Sky / equator / ground color
Top (sky), middle (equator) and bottom (ground) colors of the gradient.
Sky
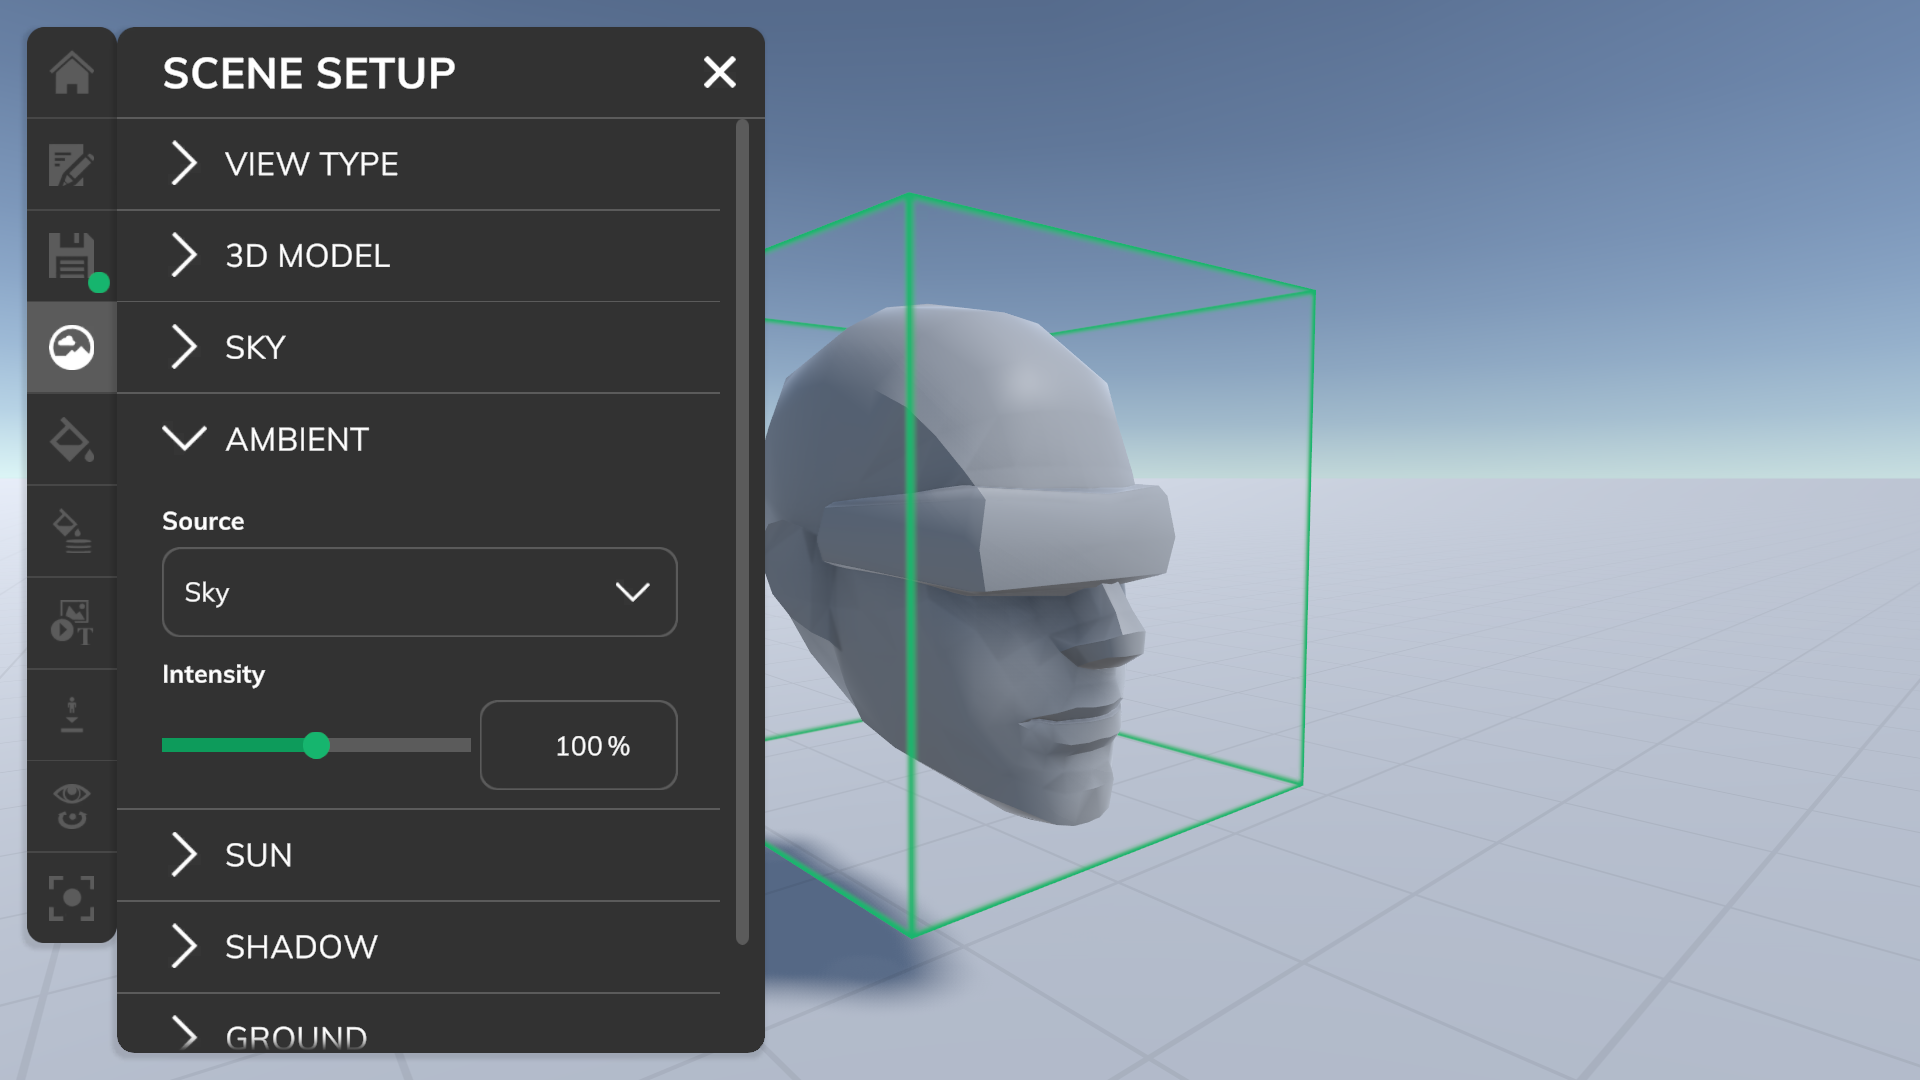
The sky ambient source uses color values based on the sky setup.
Intensity
Sets the intensity of the sky ambient color values.
Sun
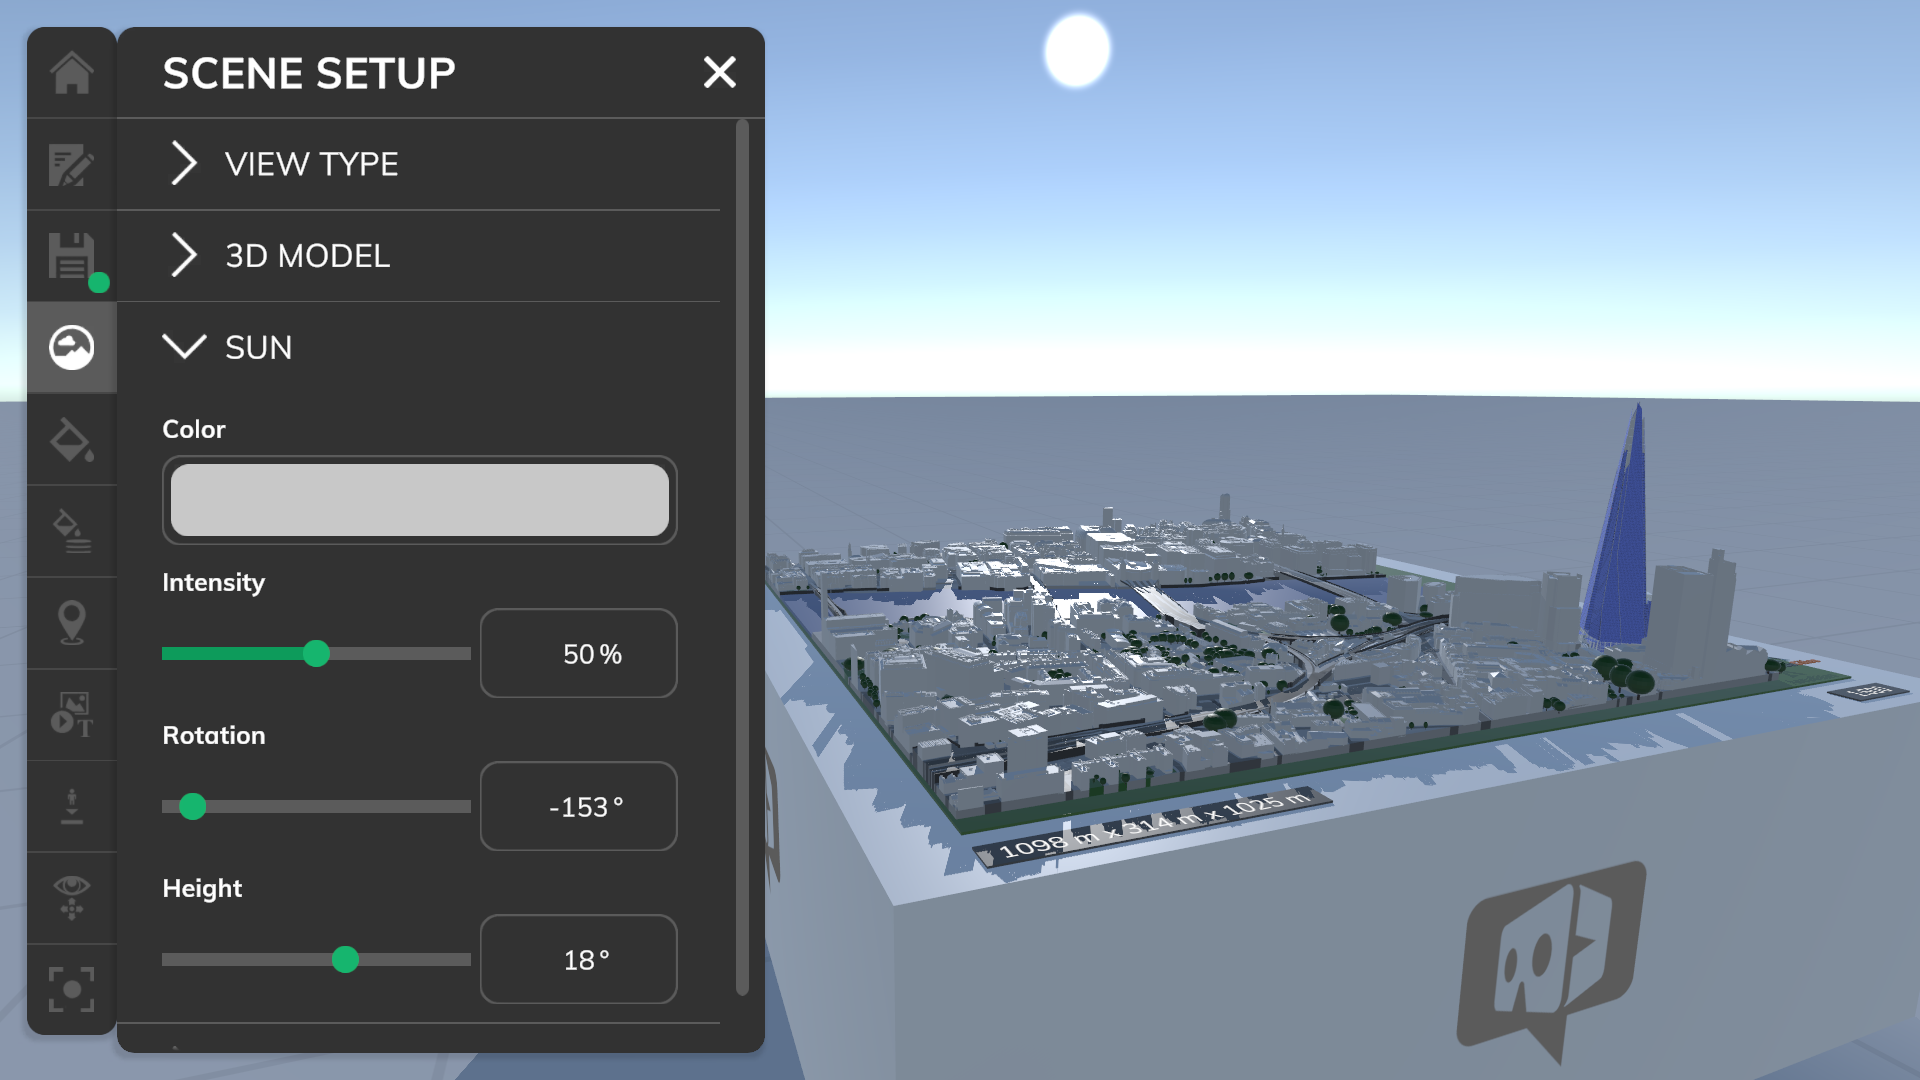
The sun is the primary light source in the scene. When using the default sky, the sun will be displayed in the sky.
Color
Sets the light color of the sun.
Intensity
Sets the intensity of the sun.
Rotation
Sets the horizontal rotation of the sun.
Heights
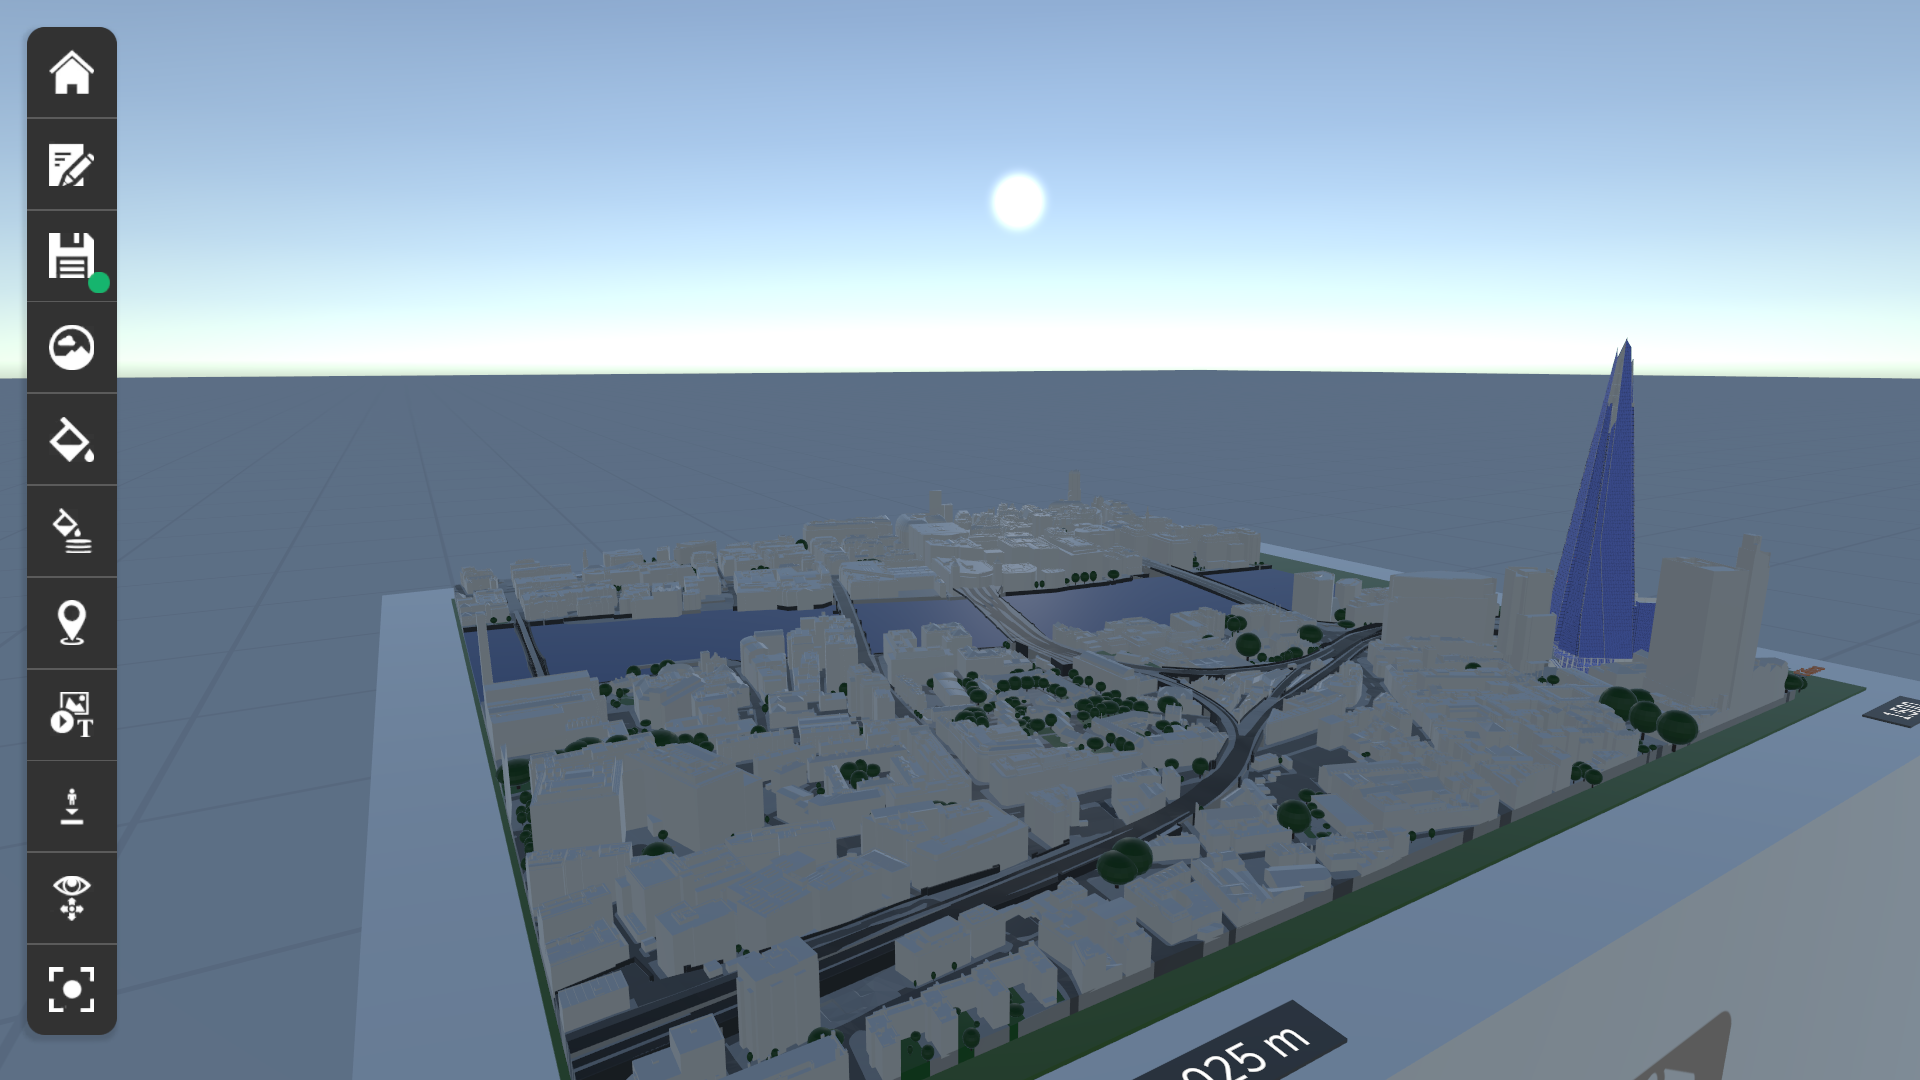

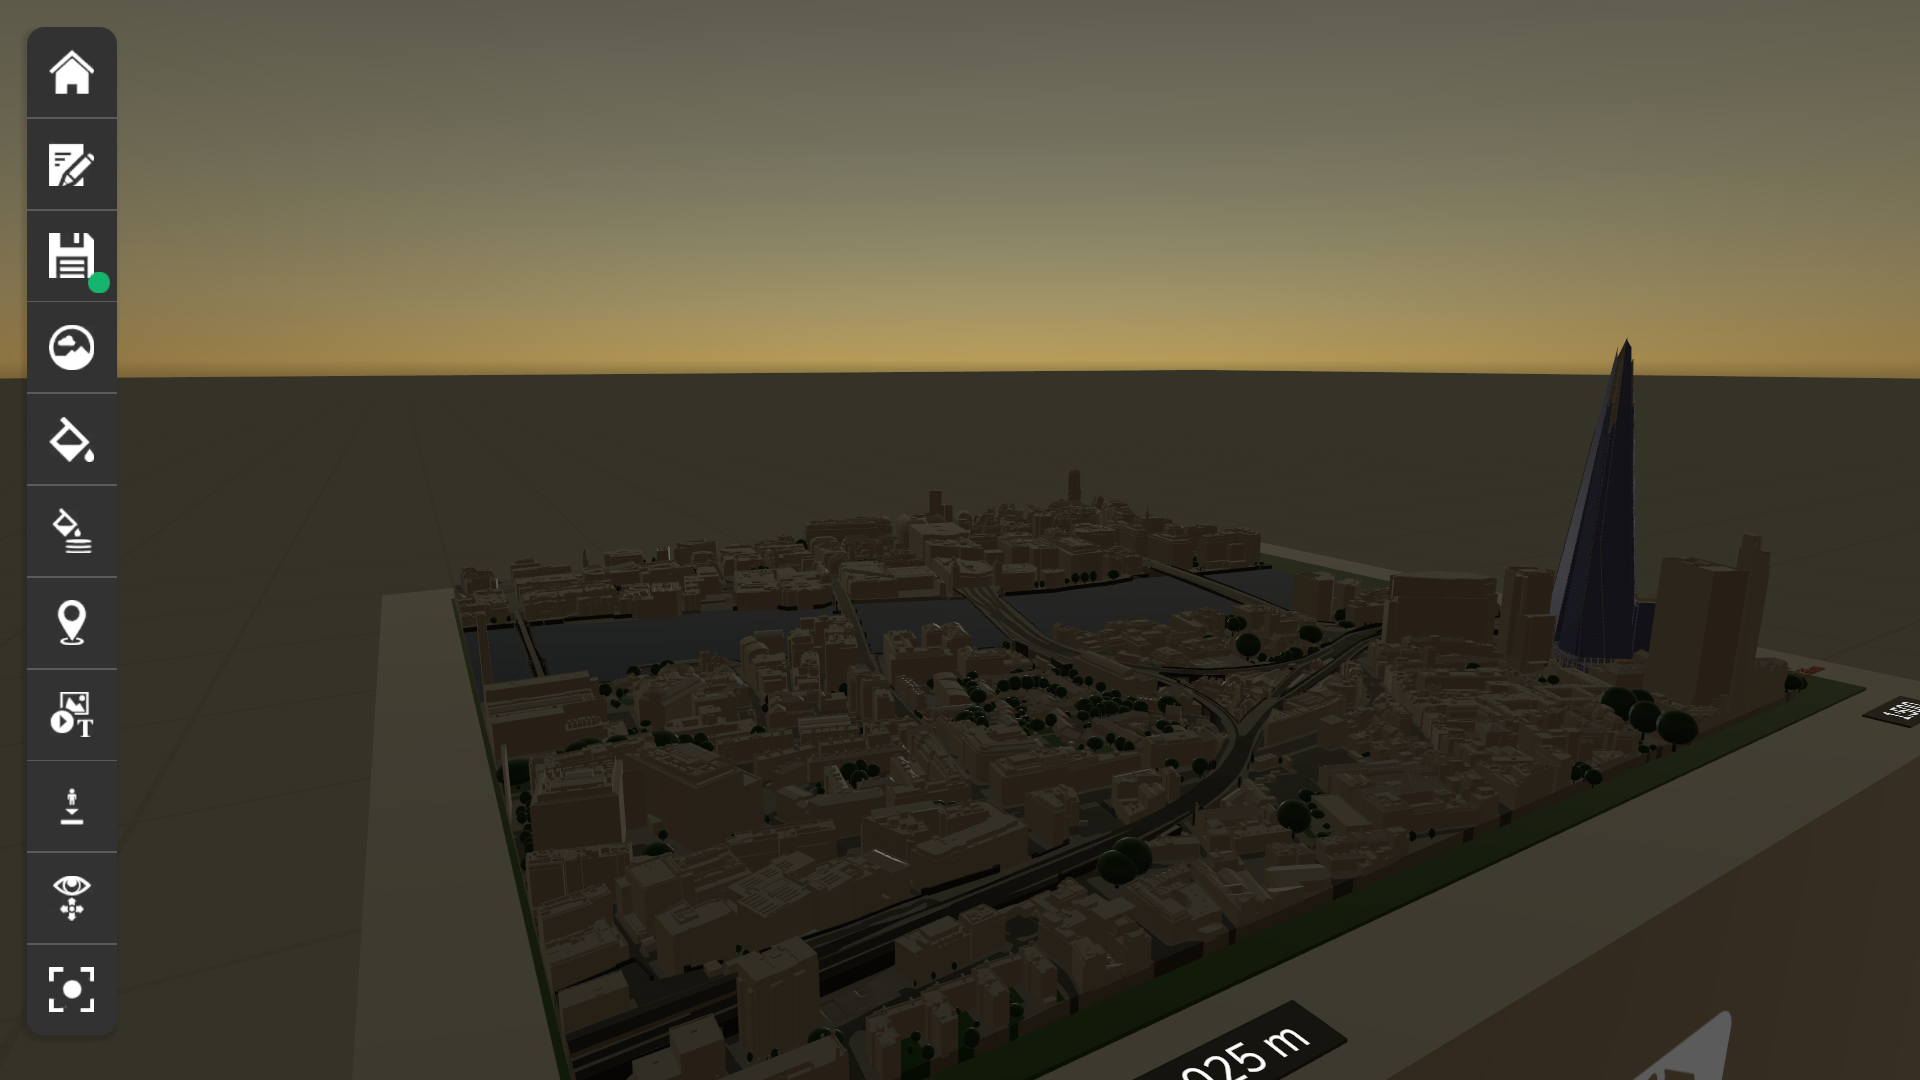
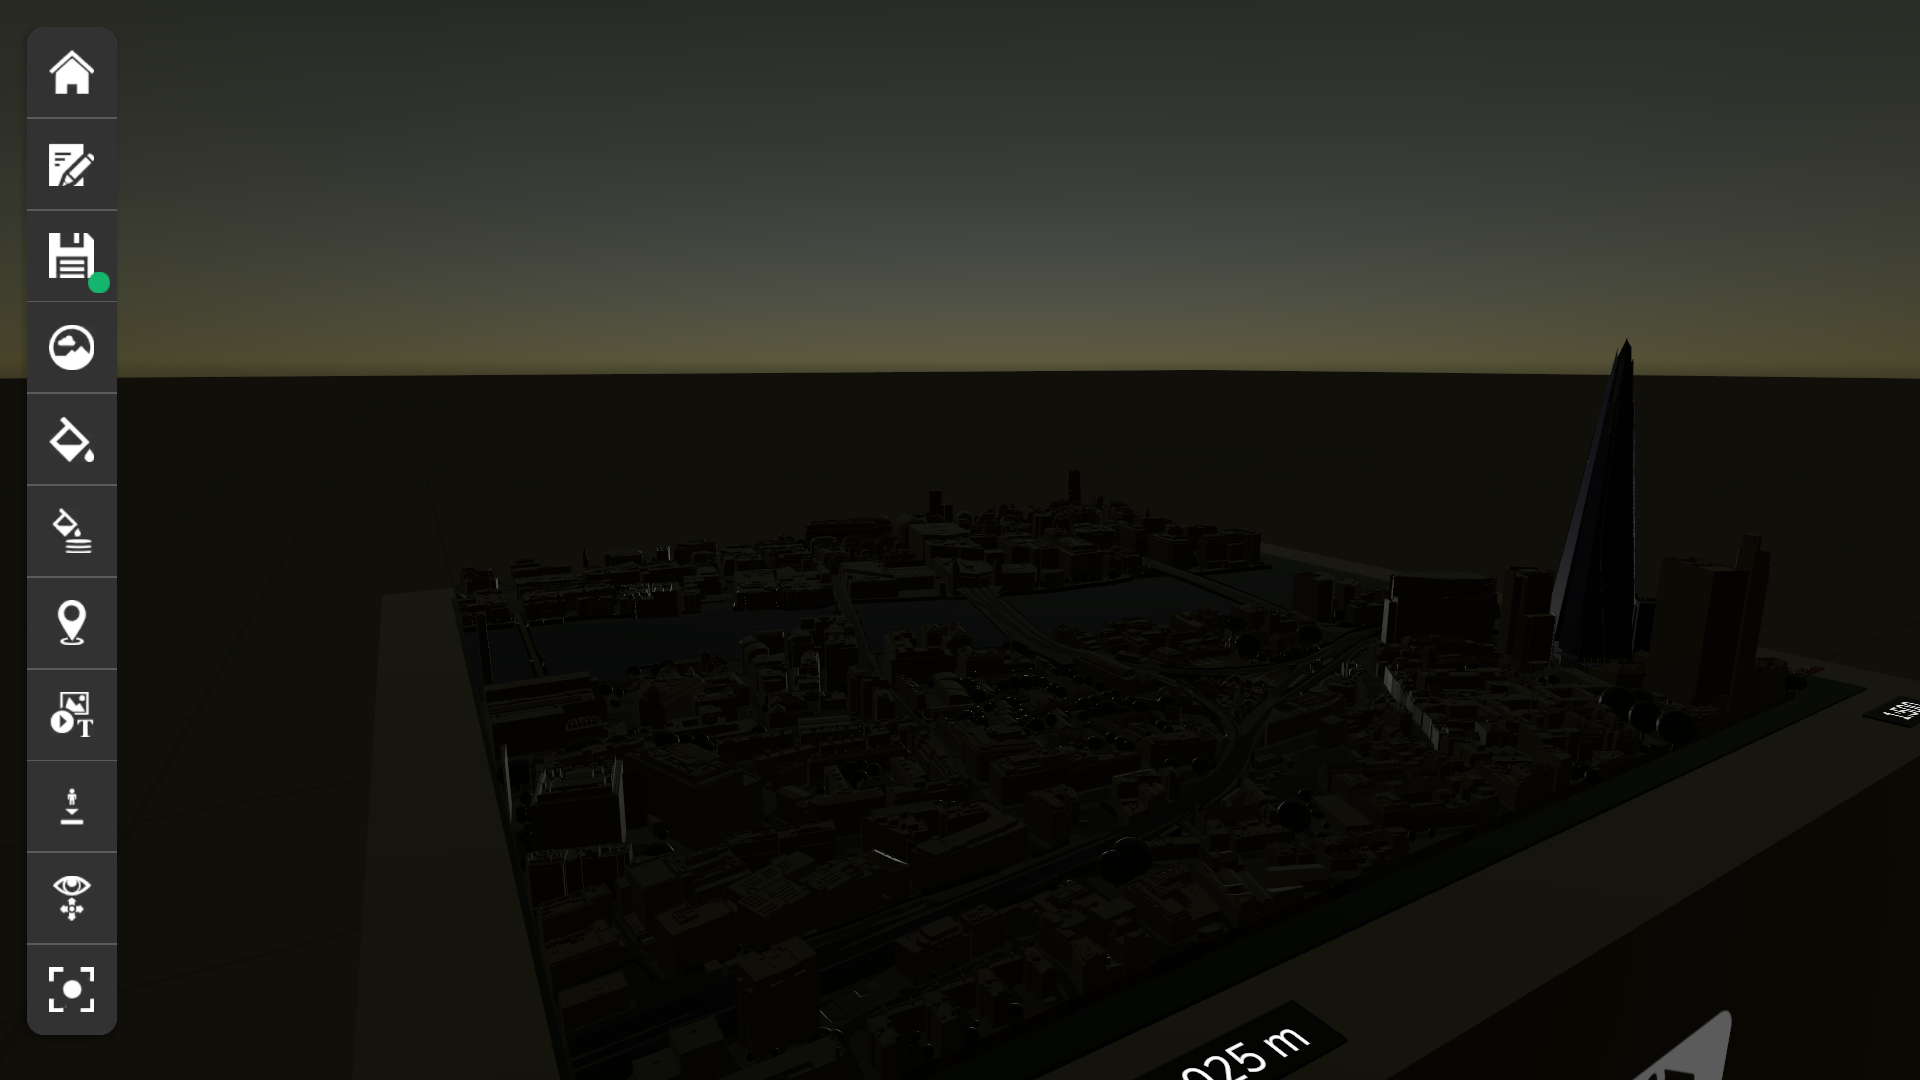
Sets the height position of the sun. You can simulate a day and night cycle when using the default sky.
Shadow
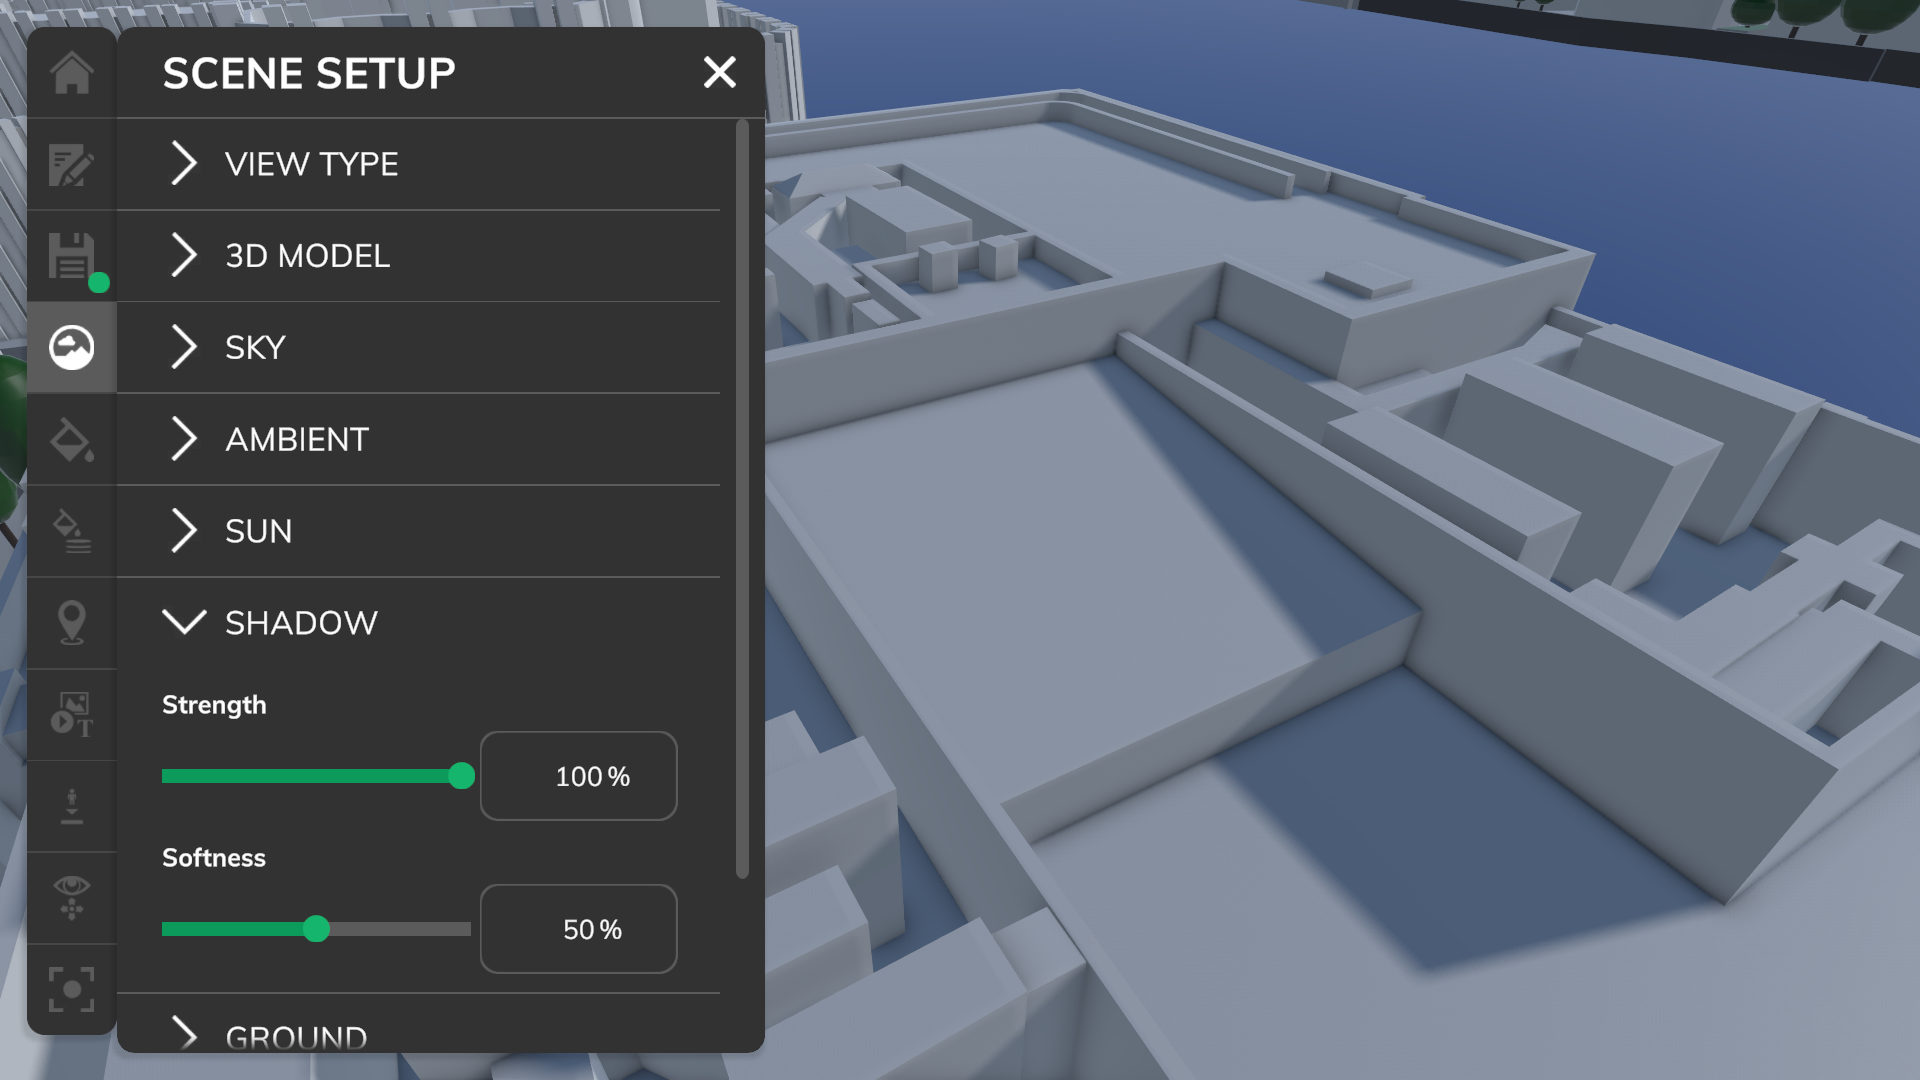
The shadow setup gives you full control over how the shadows will be displayed.
INFO: Shadows are disabled by default on mobile VR devices to achieve better performance. The user can disable all shadows in the app settings.
Strength
The strength of the shadow (0%=Invisible, 100%=Opaque).
Softness
Sets the softness of the border edges of the shadows (0%=Hard, 100%=Soft).
Ground
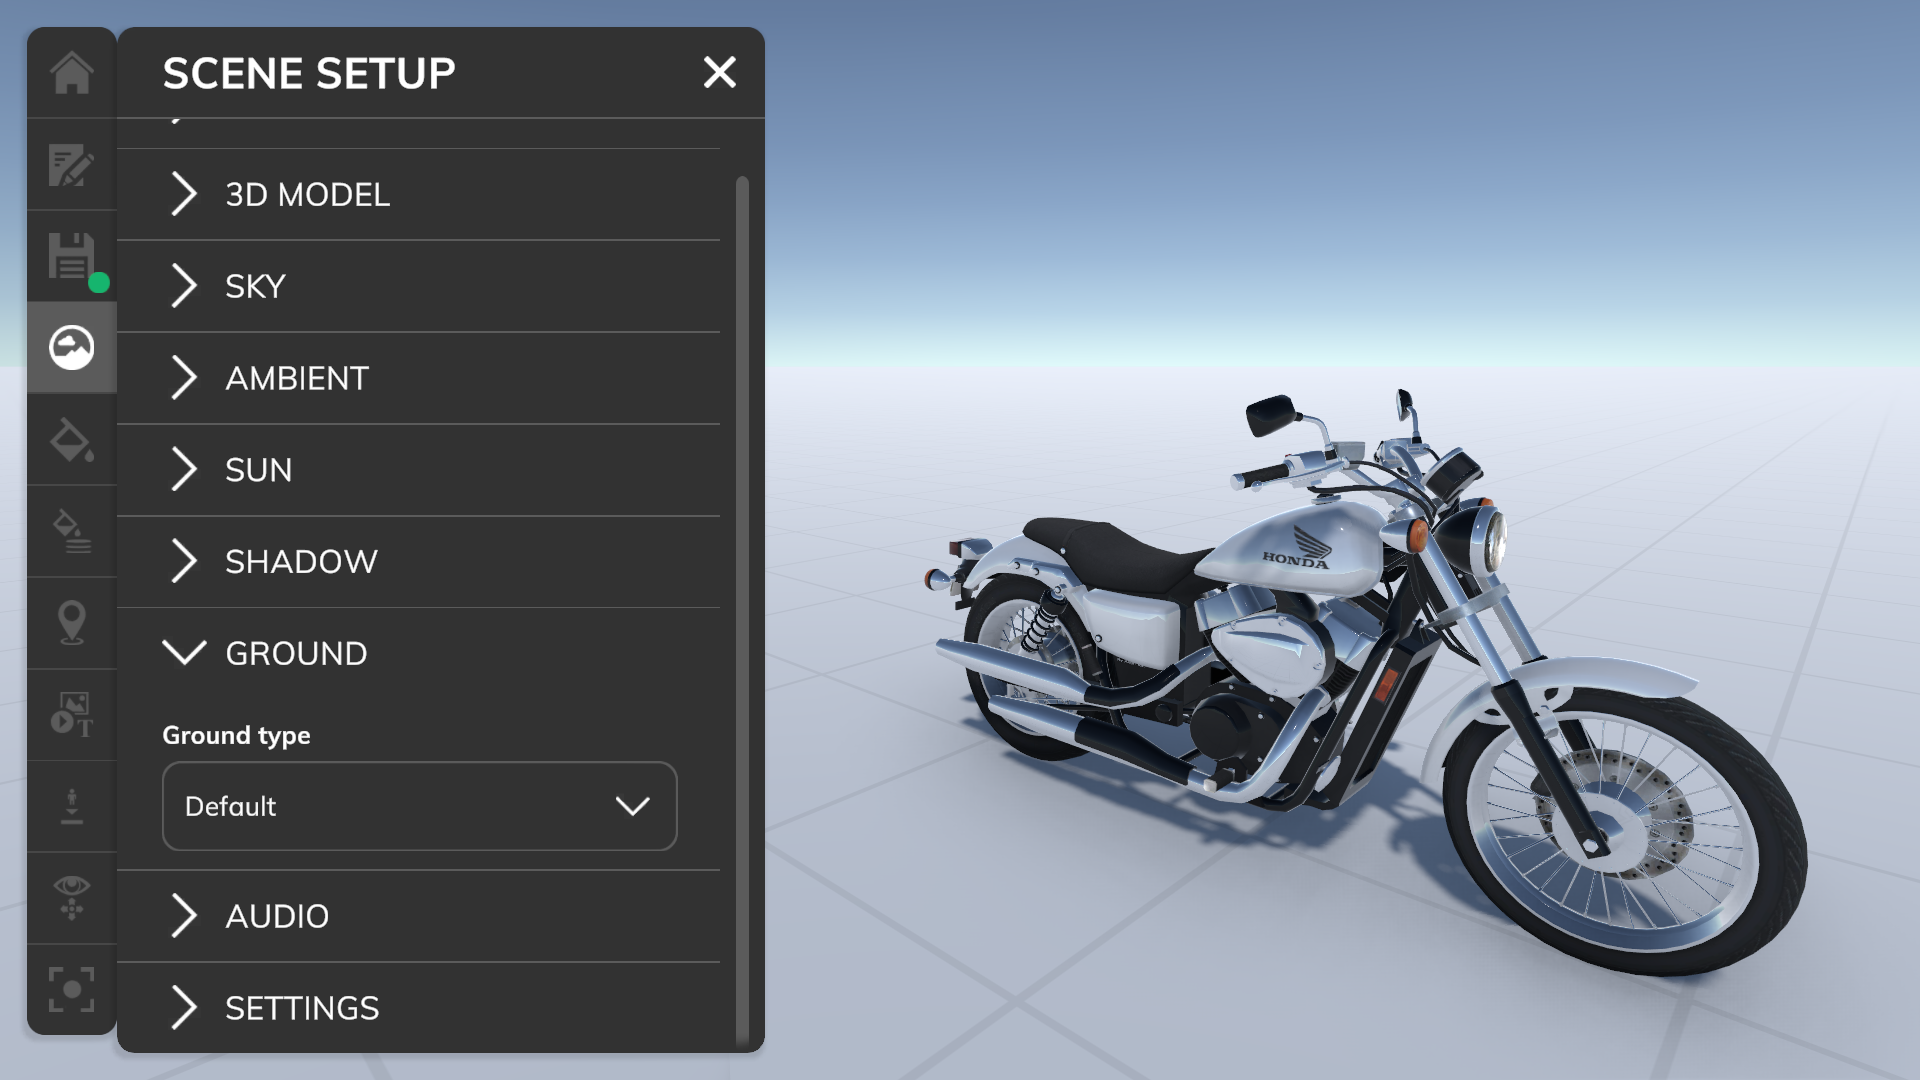
The ground is used like an large infinite plane.
Ground type
Set the ground type.
Custom image

The custom image ground type allows you to change the appearance of the ground completely.
Color
The ground will be tinted by this color.
Image
2D Image to be used for the ground.
Single / Tiled
The single mode will display the 2D image only once as ground. The tiled mode will repeat the 2D image several times.
Size (Single)
Sets the size of the single 2D image in the scene.
Rotation (Single)
Rotates the single 2D image in the scene.
Tiles per m2 (Tiled)
Set how many tiles should be displayed per m2.
Roughness
Sets the “roughness” of the ground material.
Metallic
Sets the “metalness” of the ground material.
Light spot
If enabled, the ground material will have a light spot.
Reflections
If enabled, the ground material will receive reflections.
Fading
If enabled, the ground material will fade out.
Fading distance (Tiled)
The ground material will fade out completely after this distance.
Default

Use the default ground.
No ground
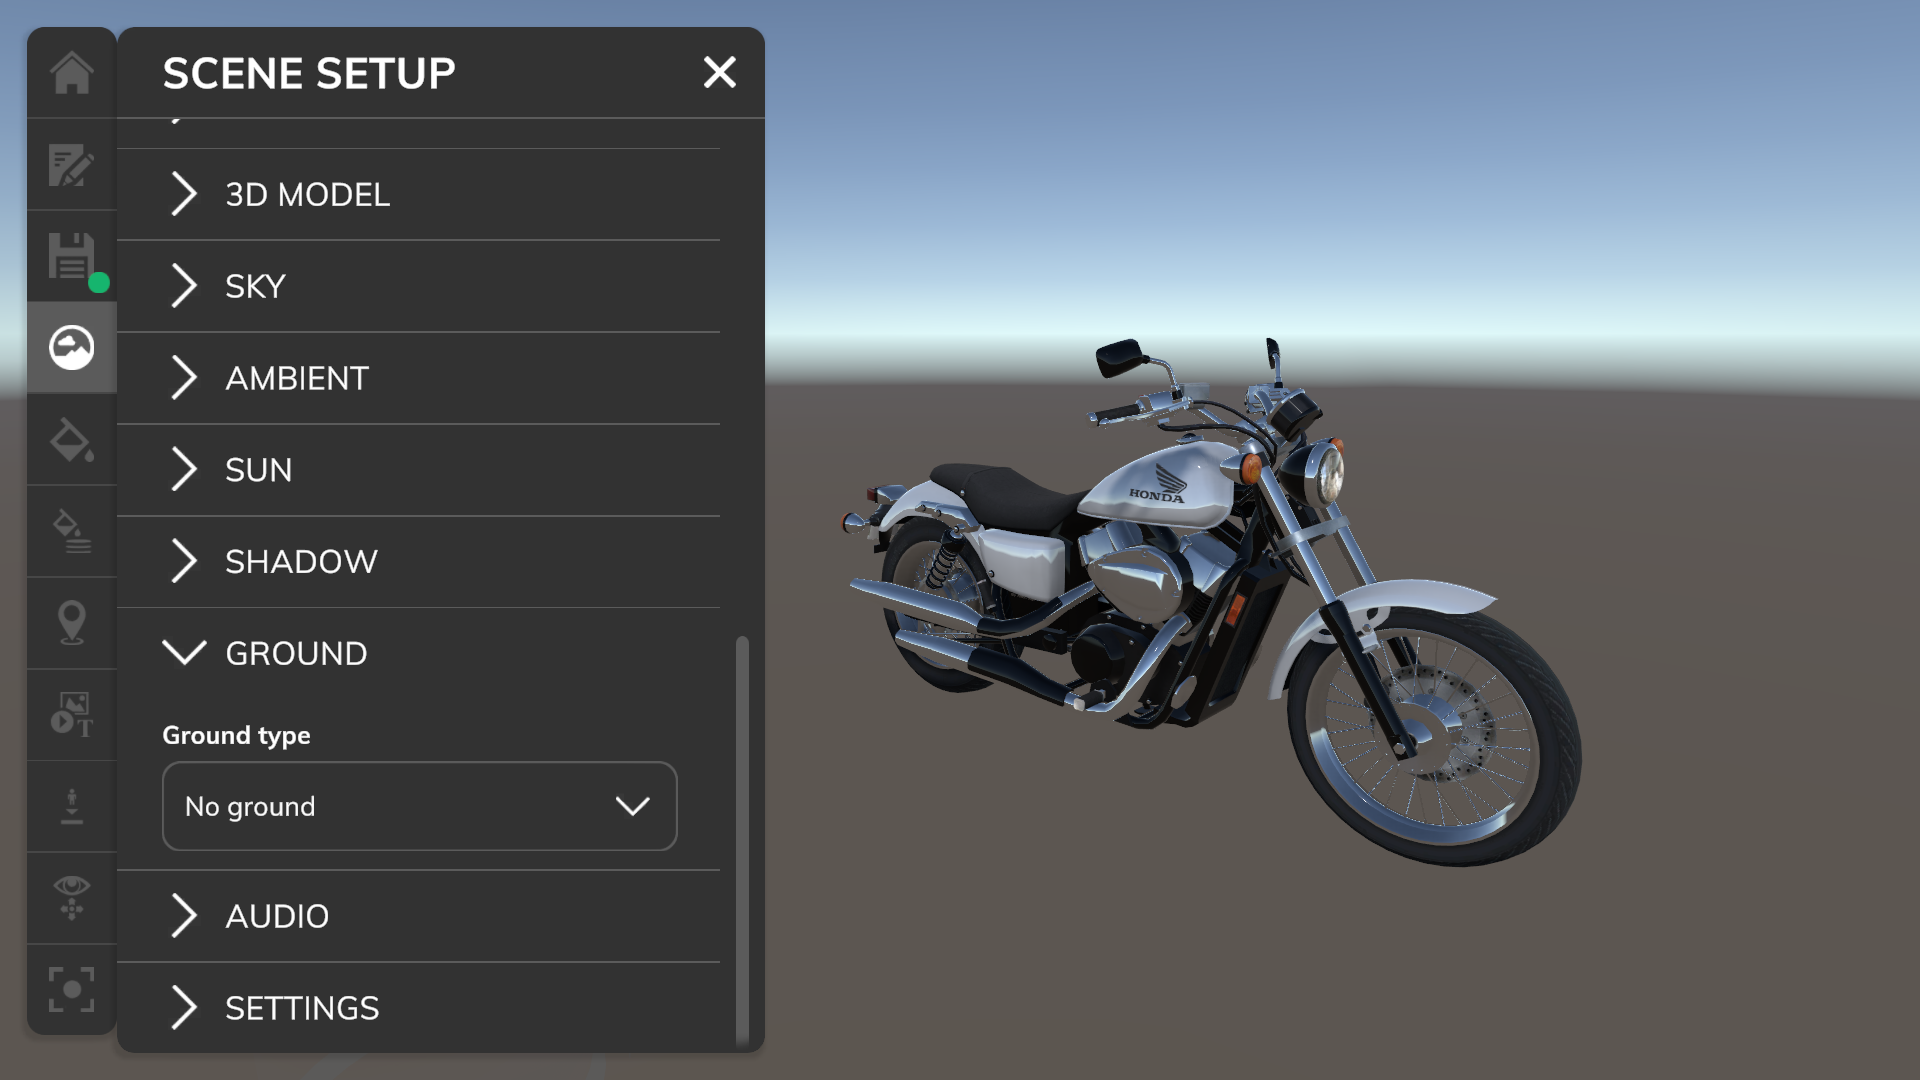
Does not use any ground.
Audio
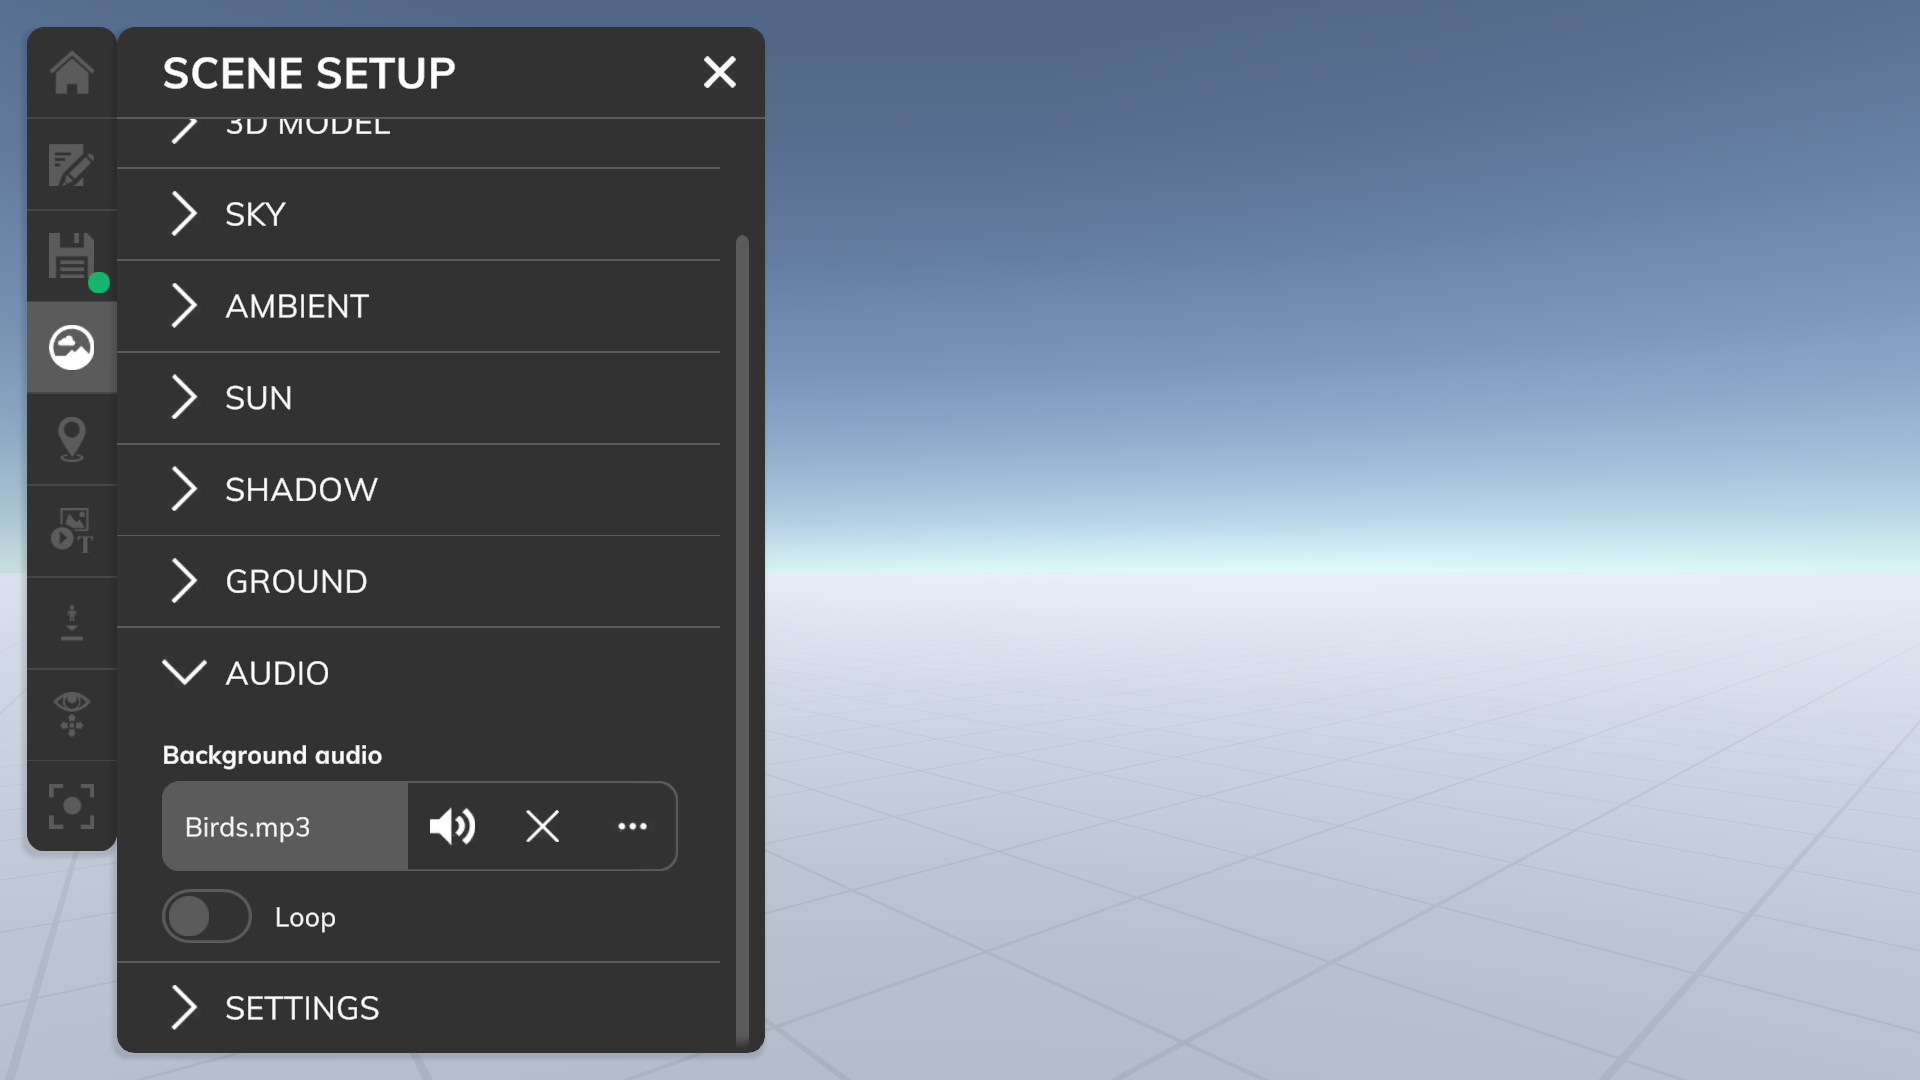
Set the audio track which will be played when starting the tour.
Background audio
The file which will be played. Click here to see all supported file formats.
Loop
If enabled, the audio track will be looped.
Settings
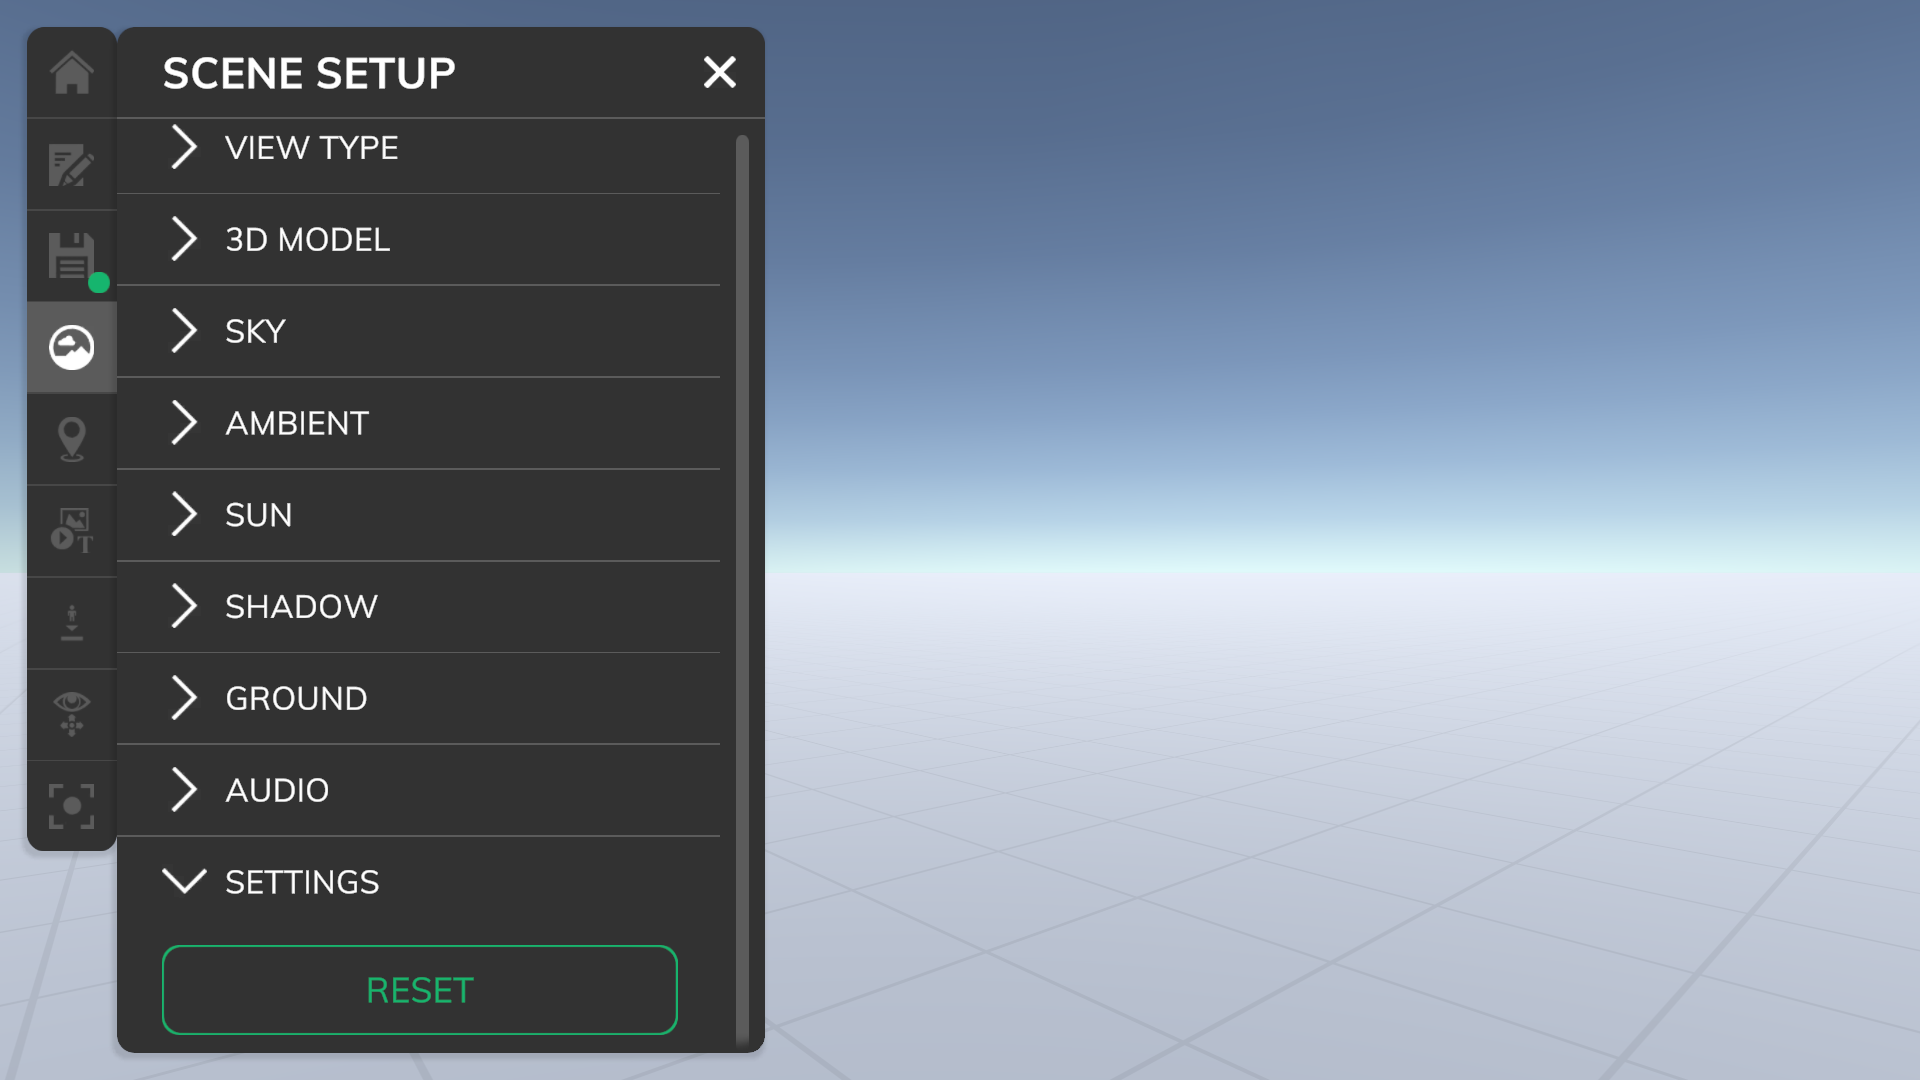
Special settings for the scene can be adjusted here.
Reset
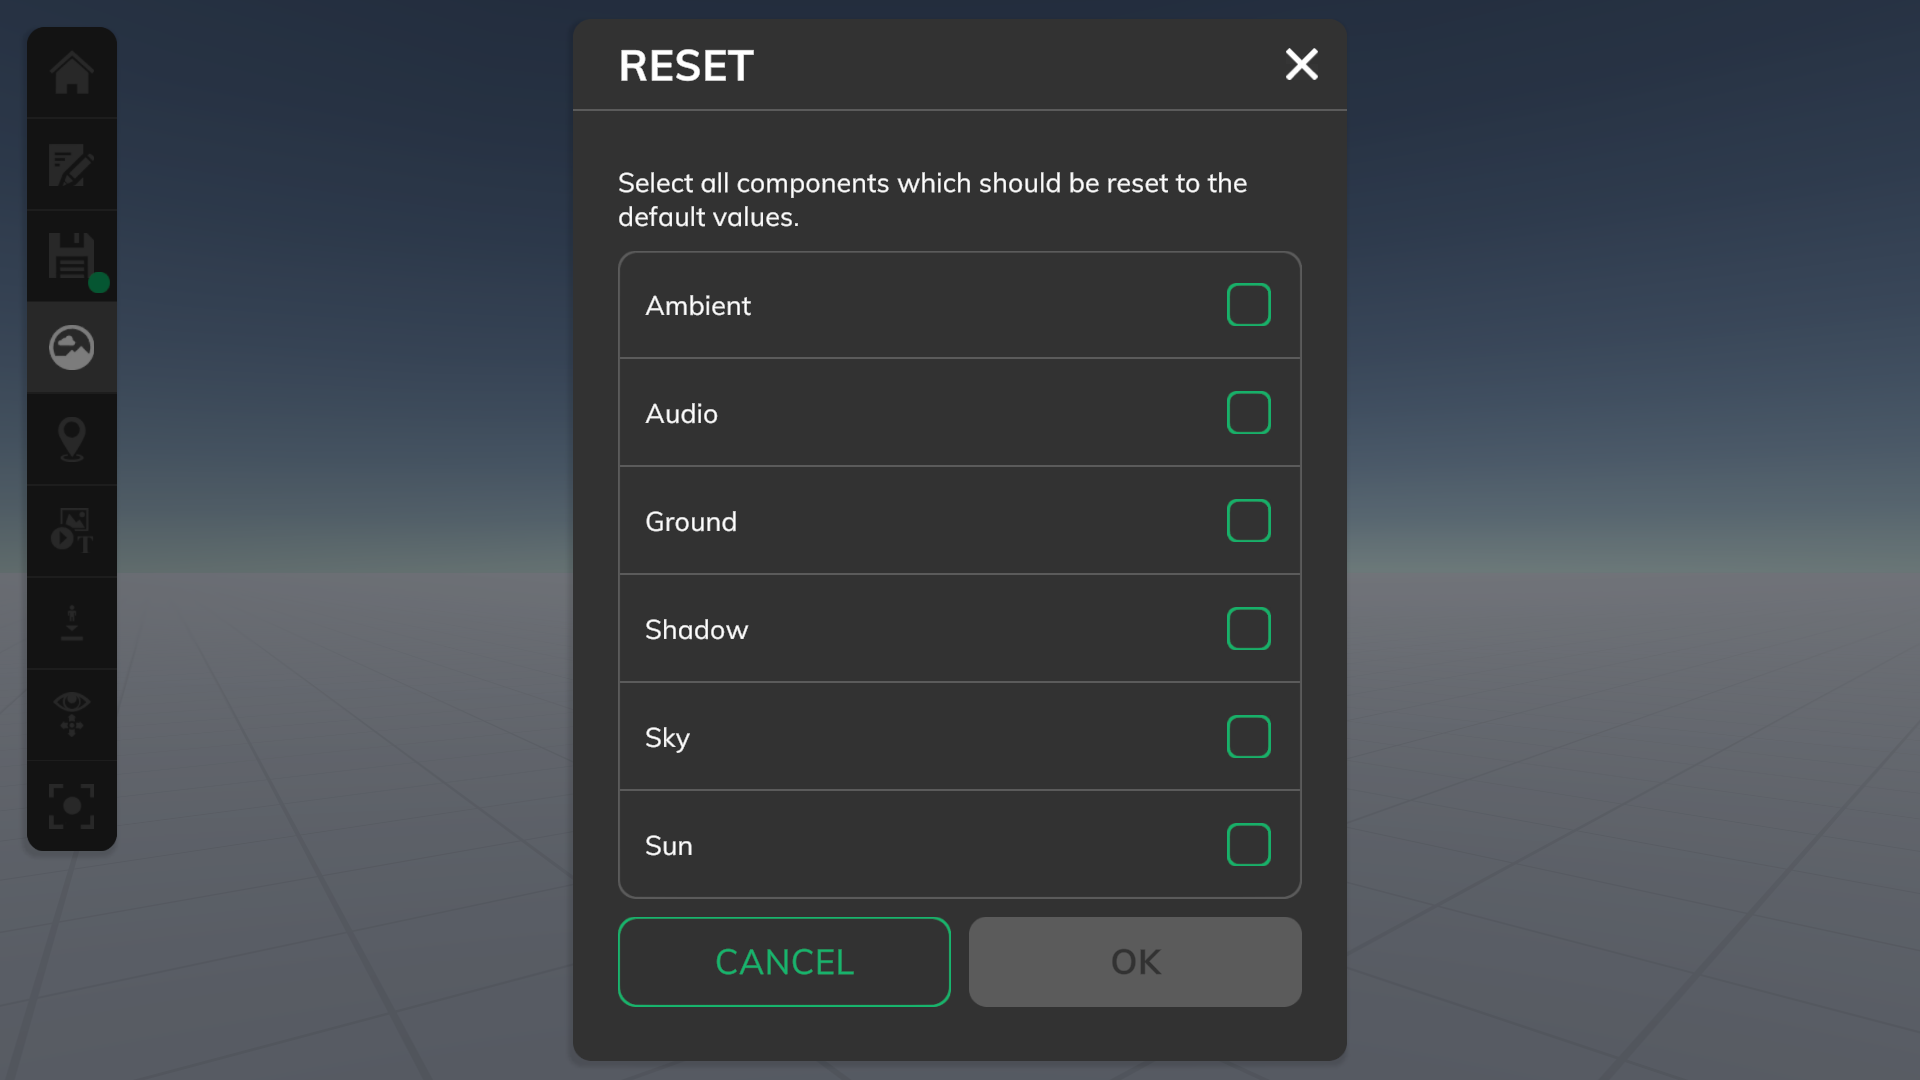
This will reset all selected items to the initial values of the selected view type preset.
Points of view (POV)
Add

You can add a POV on the table when using the miniature size view type or at any position when using the real life size view type. Click right in the world to open a context menu which shows you the option to add a POV. The POV will be visible in the 3D view and in the POV list.
The created povs can later be used in the tour to navigate around quickly.
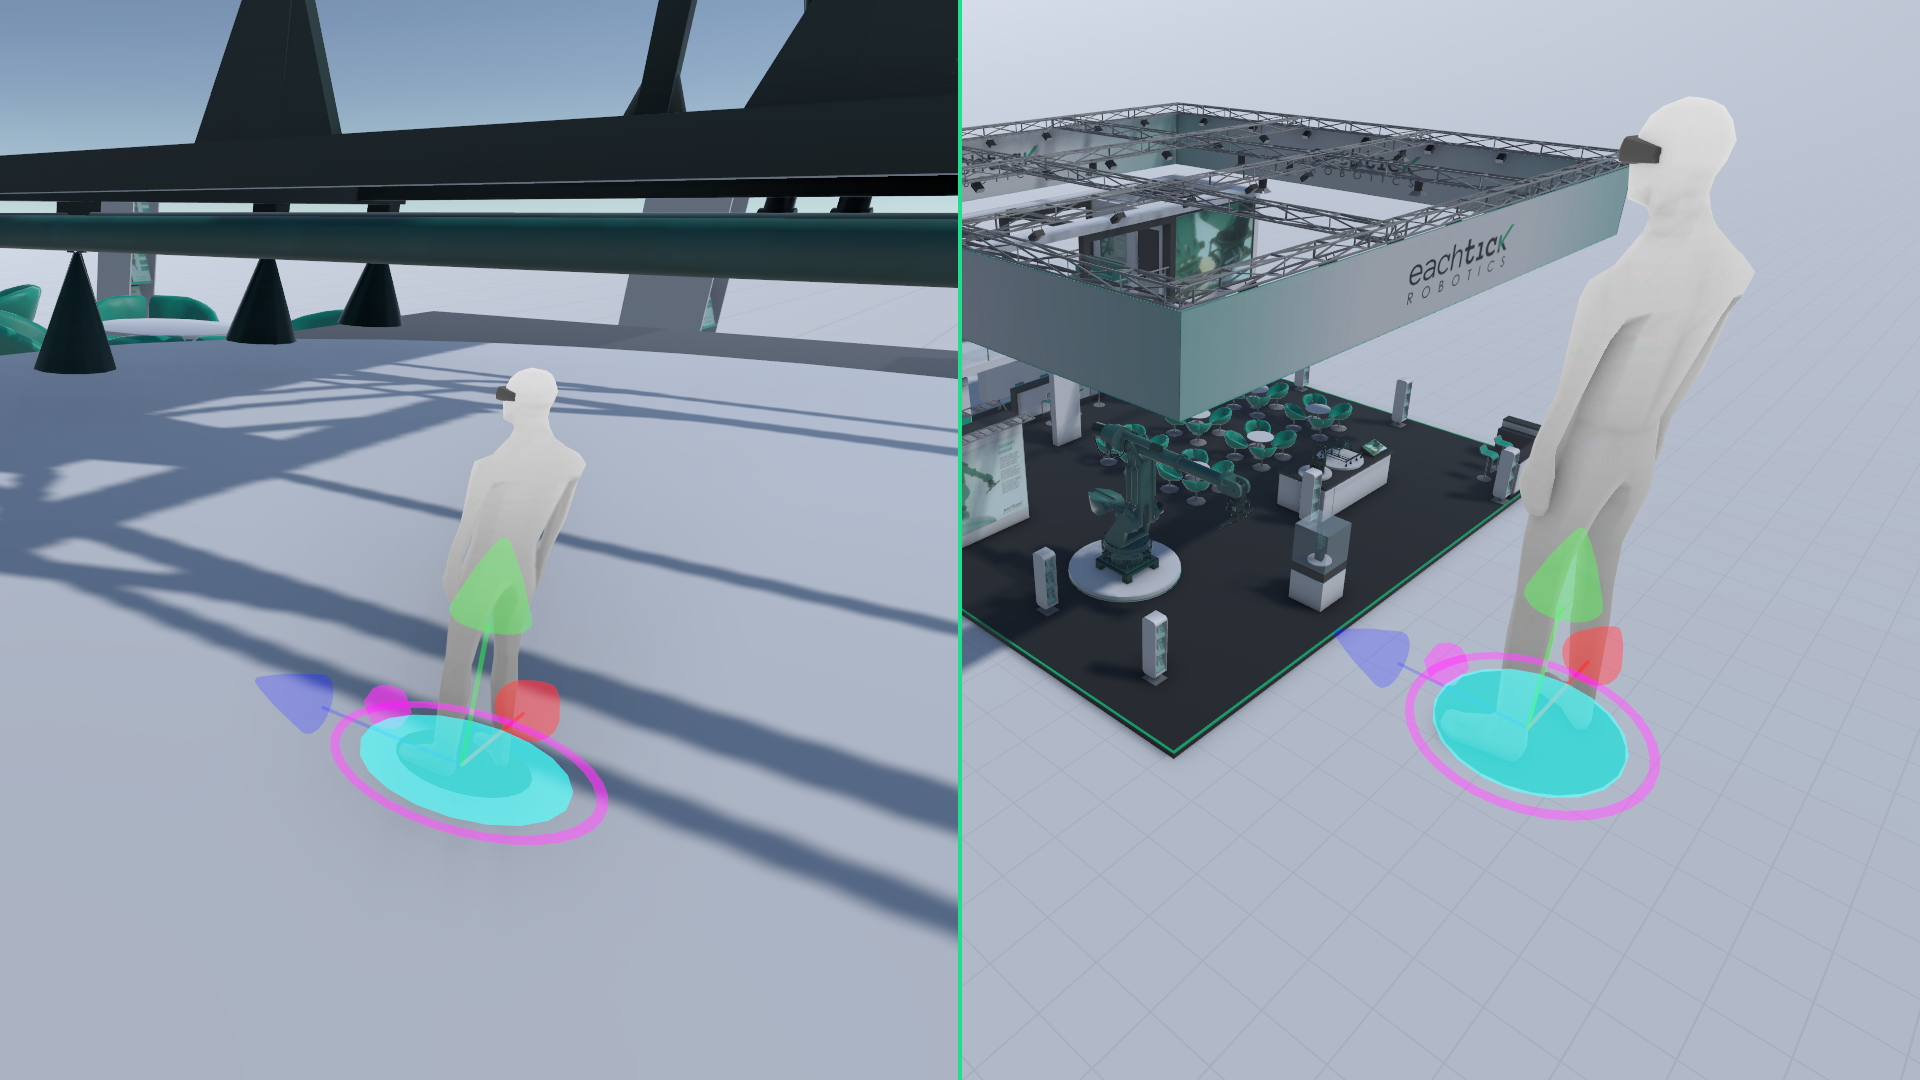
TIP: When adding a new POV the camera will auto focus the newly added POV. You can change that behaviour in the editor settings. CAUTION: Avoid floating POVs or POVs which do intersect with geometry as these can cause discomfort for users in VR. The POV settings area will show a warning in such cases.
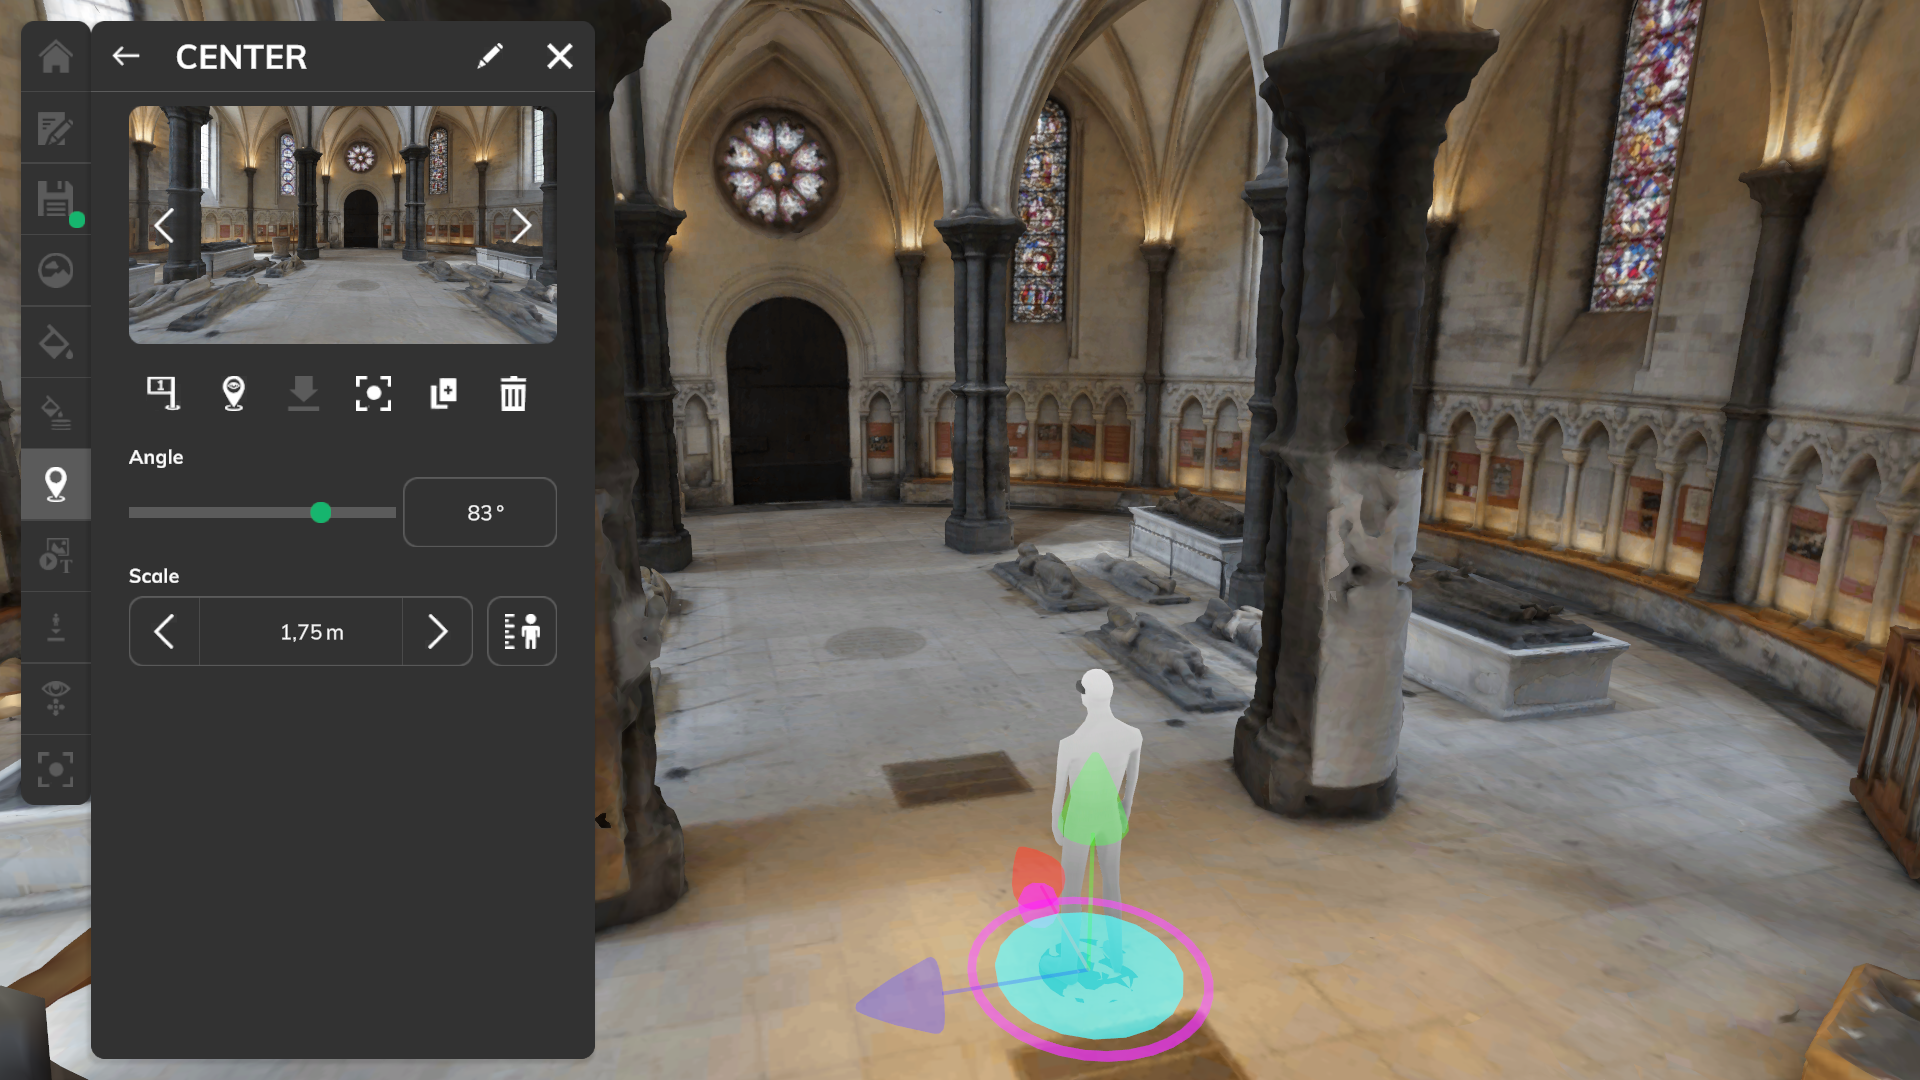
Settings
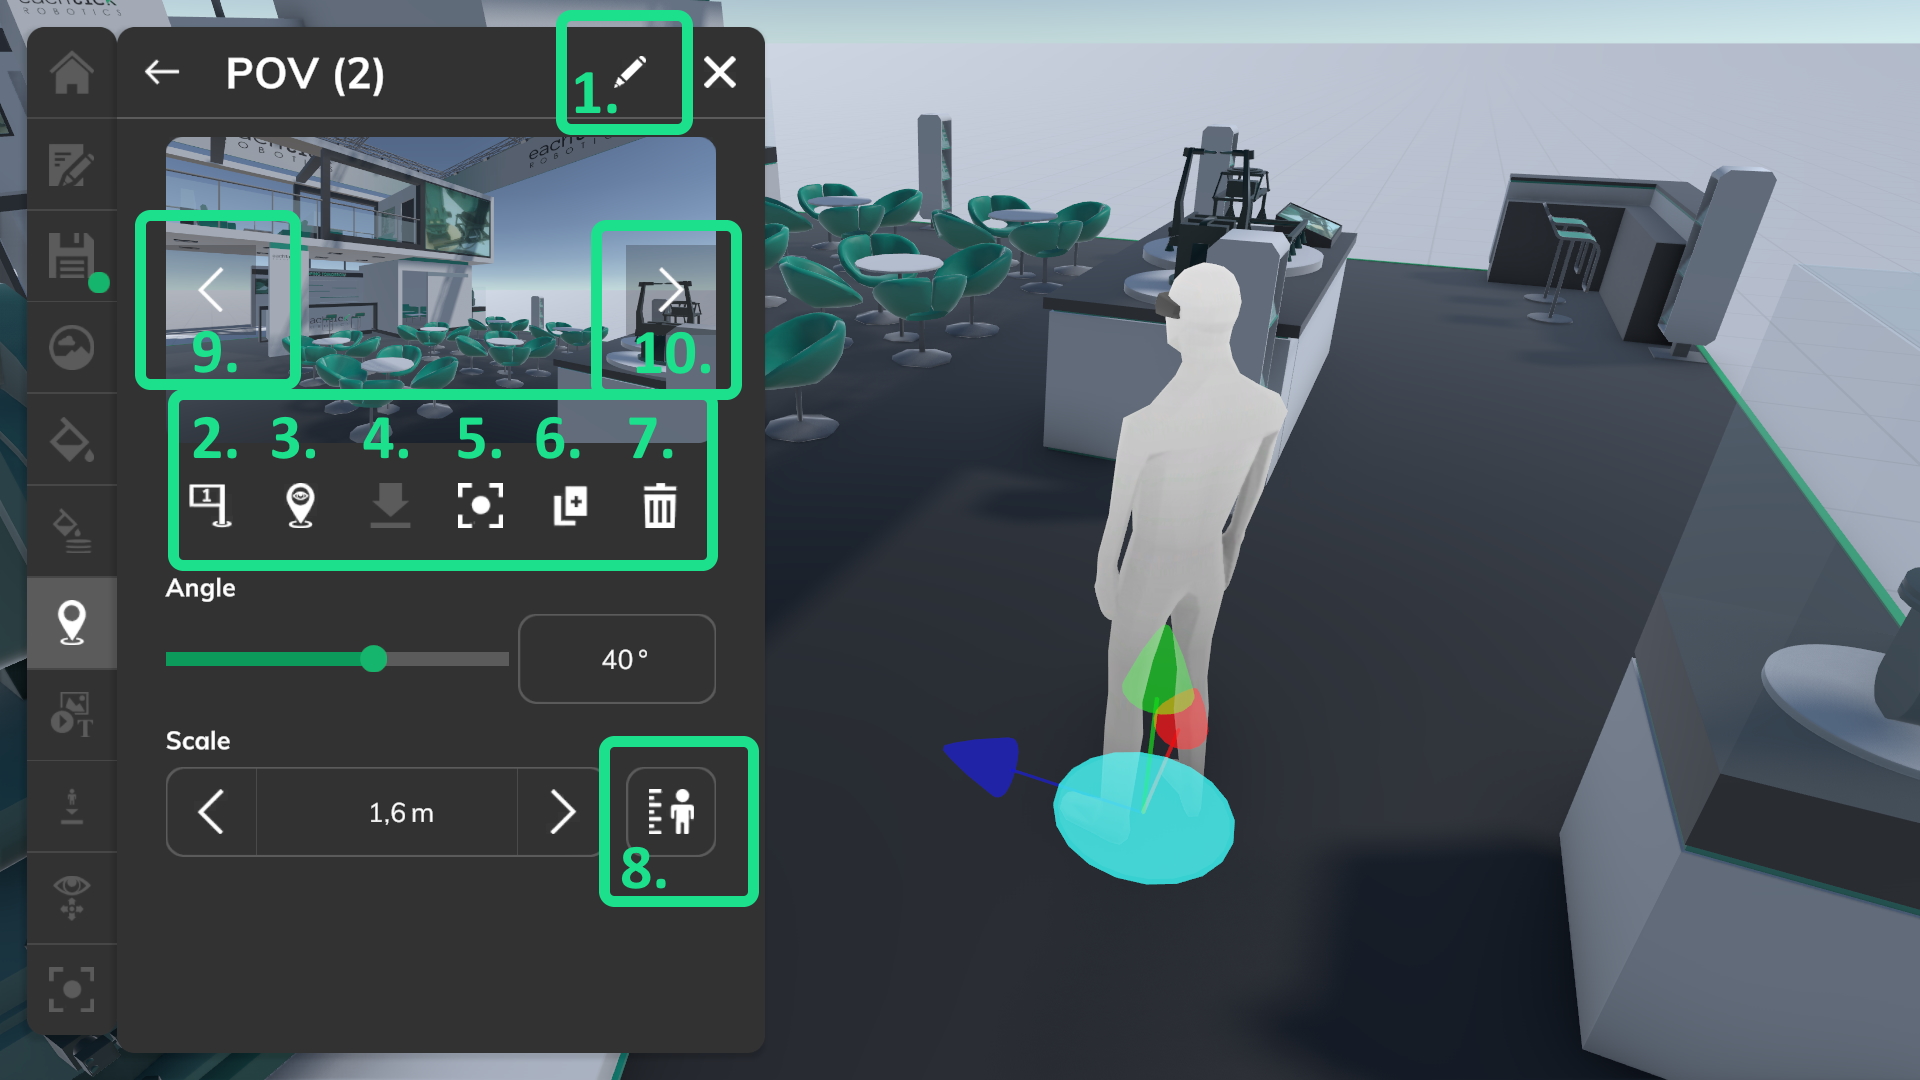
Change name
Change the name of the POV (see: 1 in the settings screenshot).
Change selected POV
When clicking on the left or right arrow (see: 9, 10 in the settings screenshot), the selected pov will be switched.
TIP: When switching to another POV the camera will auto focus on the new POV. You can change that behaviour in the editor settings.
Preview
The preview shows the view of the POV. Clicking on the preview image will give you a full screen preview of the current POV.
Set as start POV
If the tour is started the user will be placed at this POV (see: 2 in the settings screenshot). The preview image of this POV is used, if no custom preview image is selected in the tour settings.
Move POV to camera
Place the POV at the current camera position and uses the horizontal rotation (no up down) (see: 3 in the settings screenshot).
Place POV on ground
Place the POV on the ground below (see: 4 in the settings screenshot).
Move camera to POV
Focus the camera on the POV (see: 5 in the settings screenshot).
Duplicate POV
Duplicate the POV (see: 6 in the settings screenshot).
Delete POV
Delete the POV (see: 7 in the settings screenshot).
Angle
Change the horizontal angle of the POV.
TIP: You can enable a 3D gizmo rotation in the 3D View in the editor settings.
Scale
The default POV scale is 1.75 meters which is based on average human size. The scale can be used to simulate a very tiny or large user size. Users using a VR headset will be scaled based on a factor (used size divided by 1.75 meters). You can reset the scale with the reset scale button (see: 8 in the settings screenshot).
Gizmo
The gizmo is a 3D axis object which will appear in the 3D view when selecting a POV. Grab one of the axis to move the POV in this direction. When dragging the large circle at the bottom, the POV can be dragged on the floor level in two axes. Use the sphere at the bottom to place the POV on the ground. If you enable rotation for the gizmo in the editor settings, you can also rotate the POV by rotating the circle around the POV.
Points of action (POA)
Add
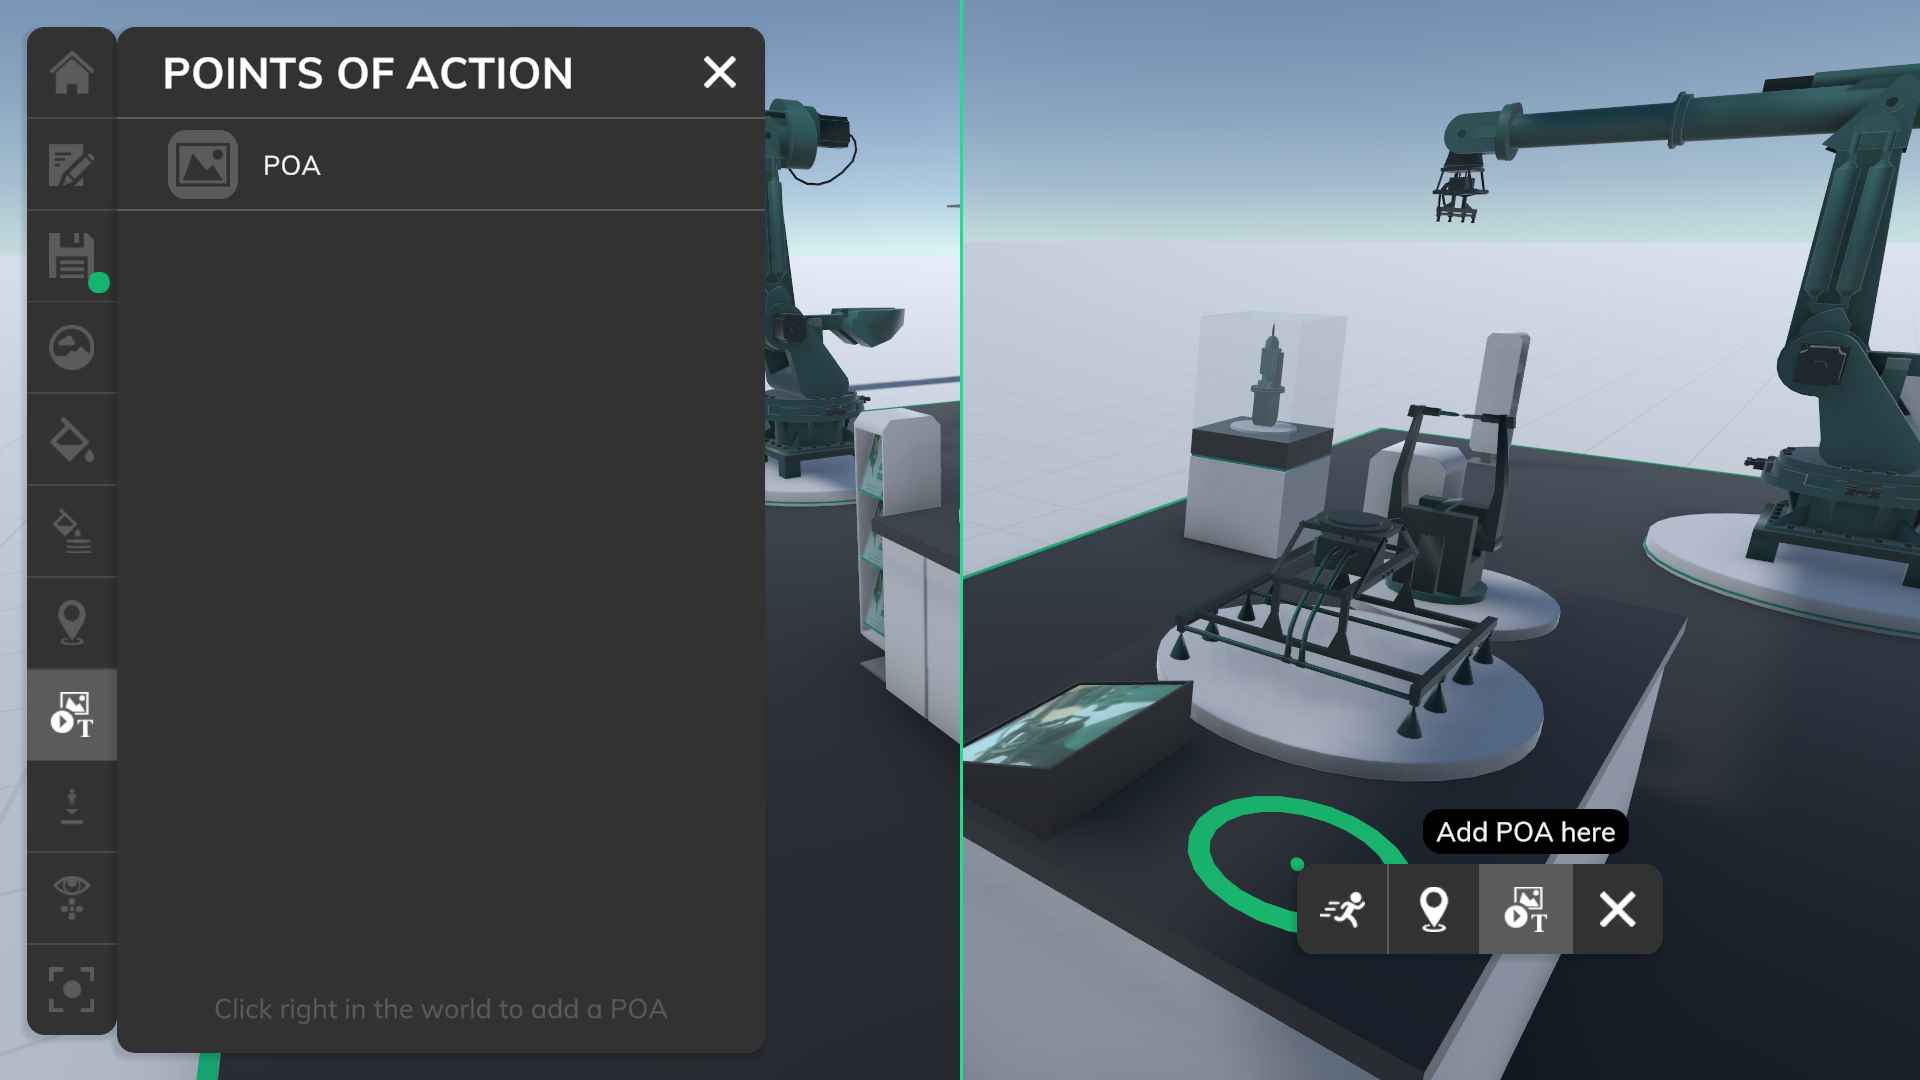
You can add a POA on the table when using the miniature size view type, at any position when using the real life size view type or on a 3D model if you are using the fixed size view type. Click right in the world to open a context menu which shows you the option to add a POA. The POA will be visible in the 3D view and in the POA list.
To finish the adding process, you have to select a content type (Audio, Image, Material, Material set, Text, Video).
Settings
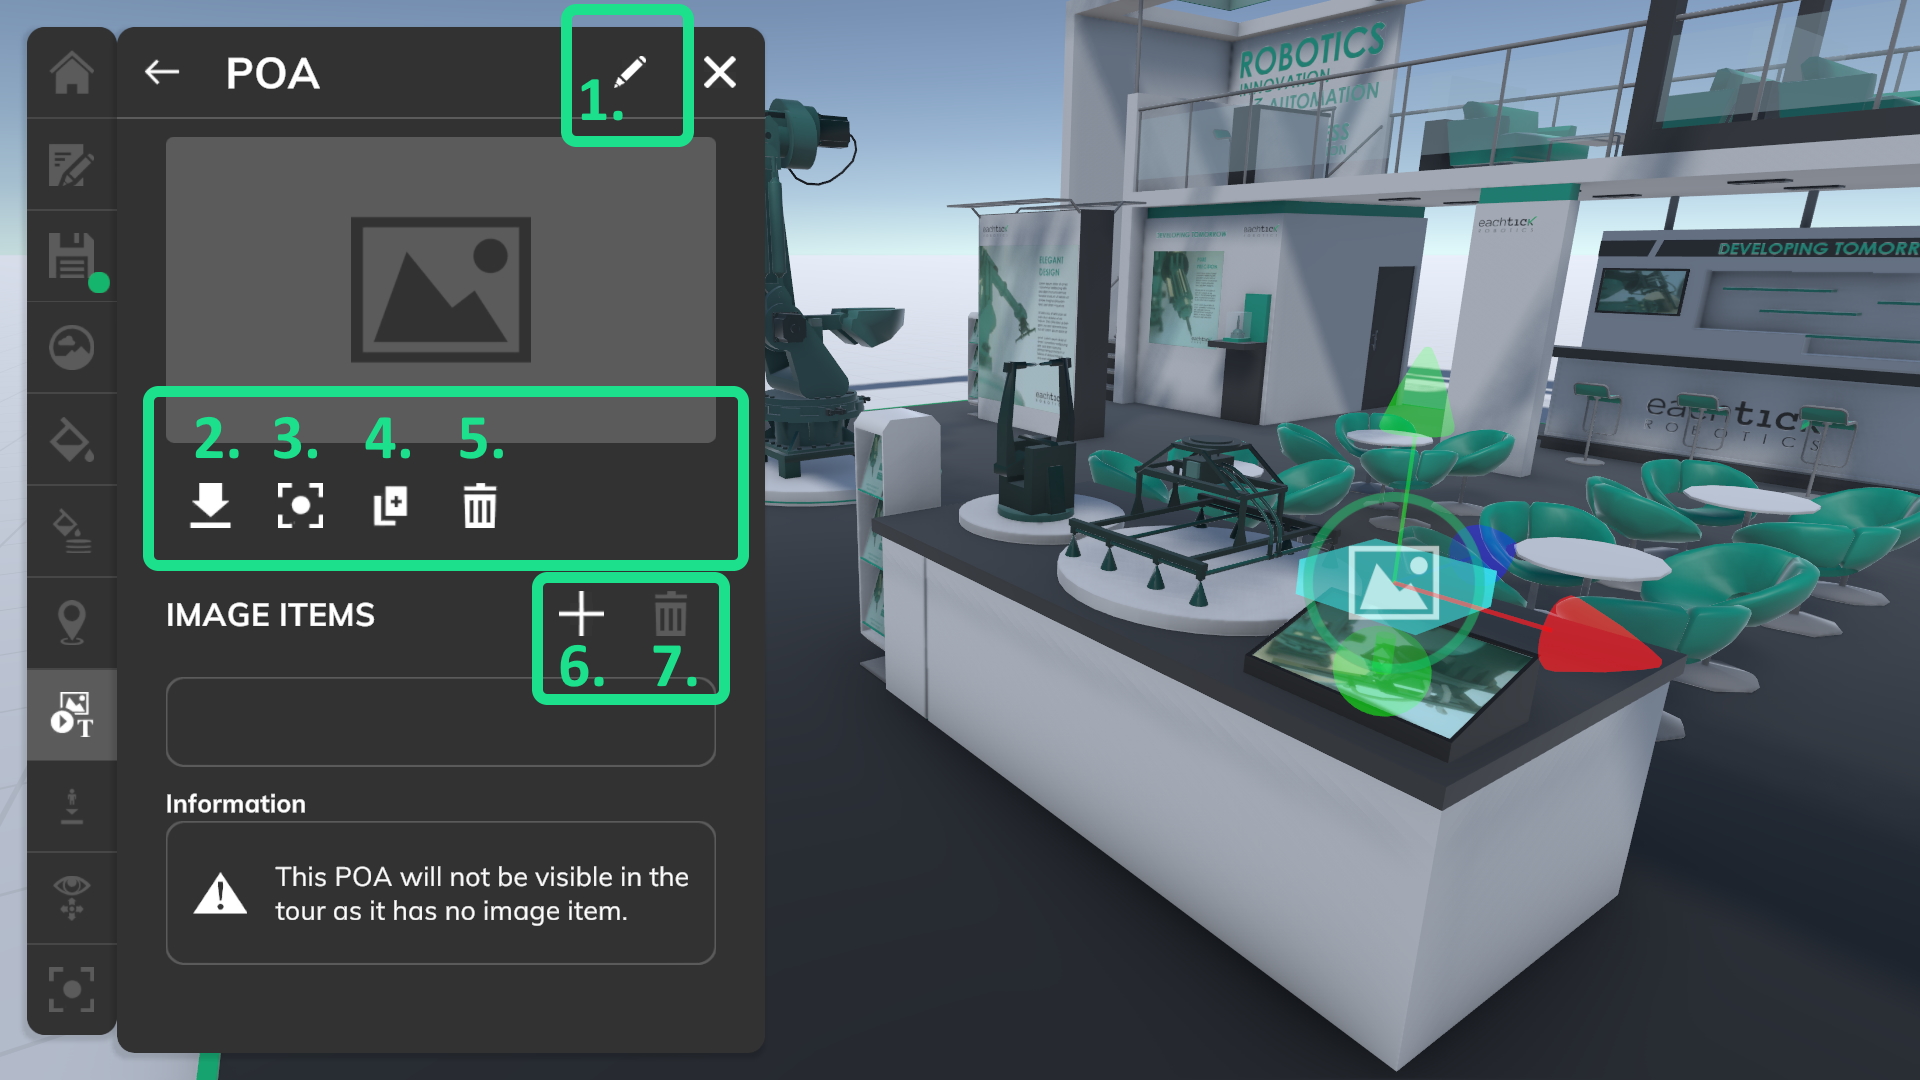
Change name
Change the name of the POA (see: 1 in the settings screenshot).
Place POA on ground
Place the POA on the ground below (see: 2 in the settings screenshot).
Move camera to POA
Focus the camera on the POA (see: 3 in the settings screenshot).
Duplicate POA
Duplicate the POA (see: 4 in the settings screenshot).
Delete POA
Delete the POA (see: 5 in the settings screenshot).
Add item
Add an item to the POA (see: 6 in the settings screenshot).
Delete item
Delete the selected POA item (see: 7 in the settings screenshot).
TIP: If a POA does not have any item, it will not be shown in the tour.
Gizmo
The gizmo is a 3D axis object which will appear in the 3D view when selecting a POA. Grab one of the axis to move the POA in this direction. When dragging the large block at the center, the POA can be dragged on the floor level in two axes. Use the sphere at the bottom to place the POA on the ground.
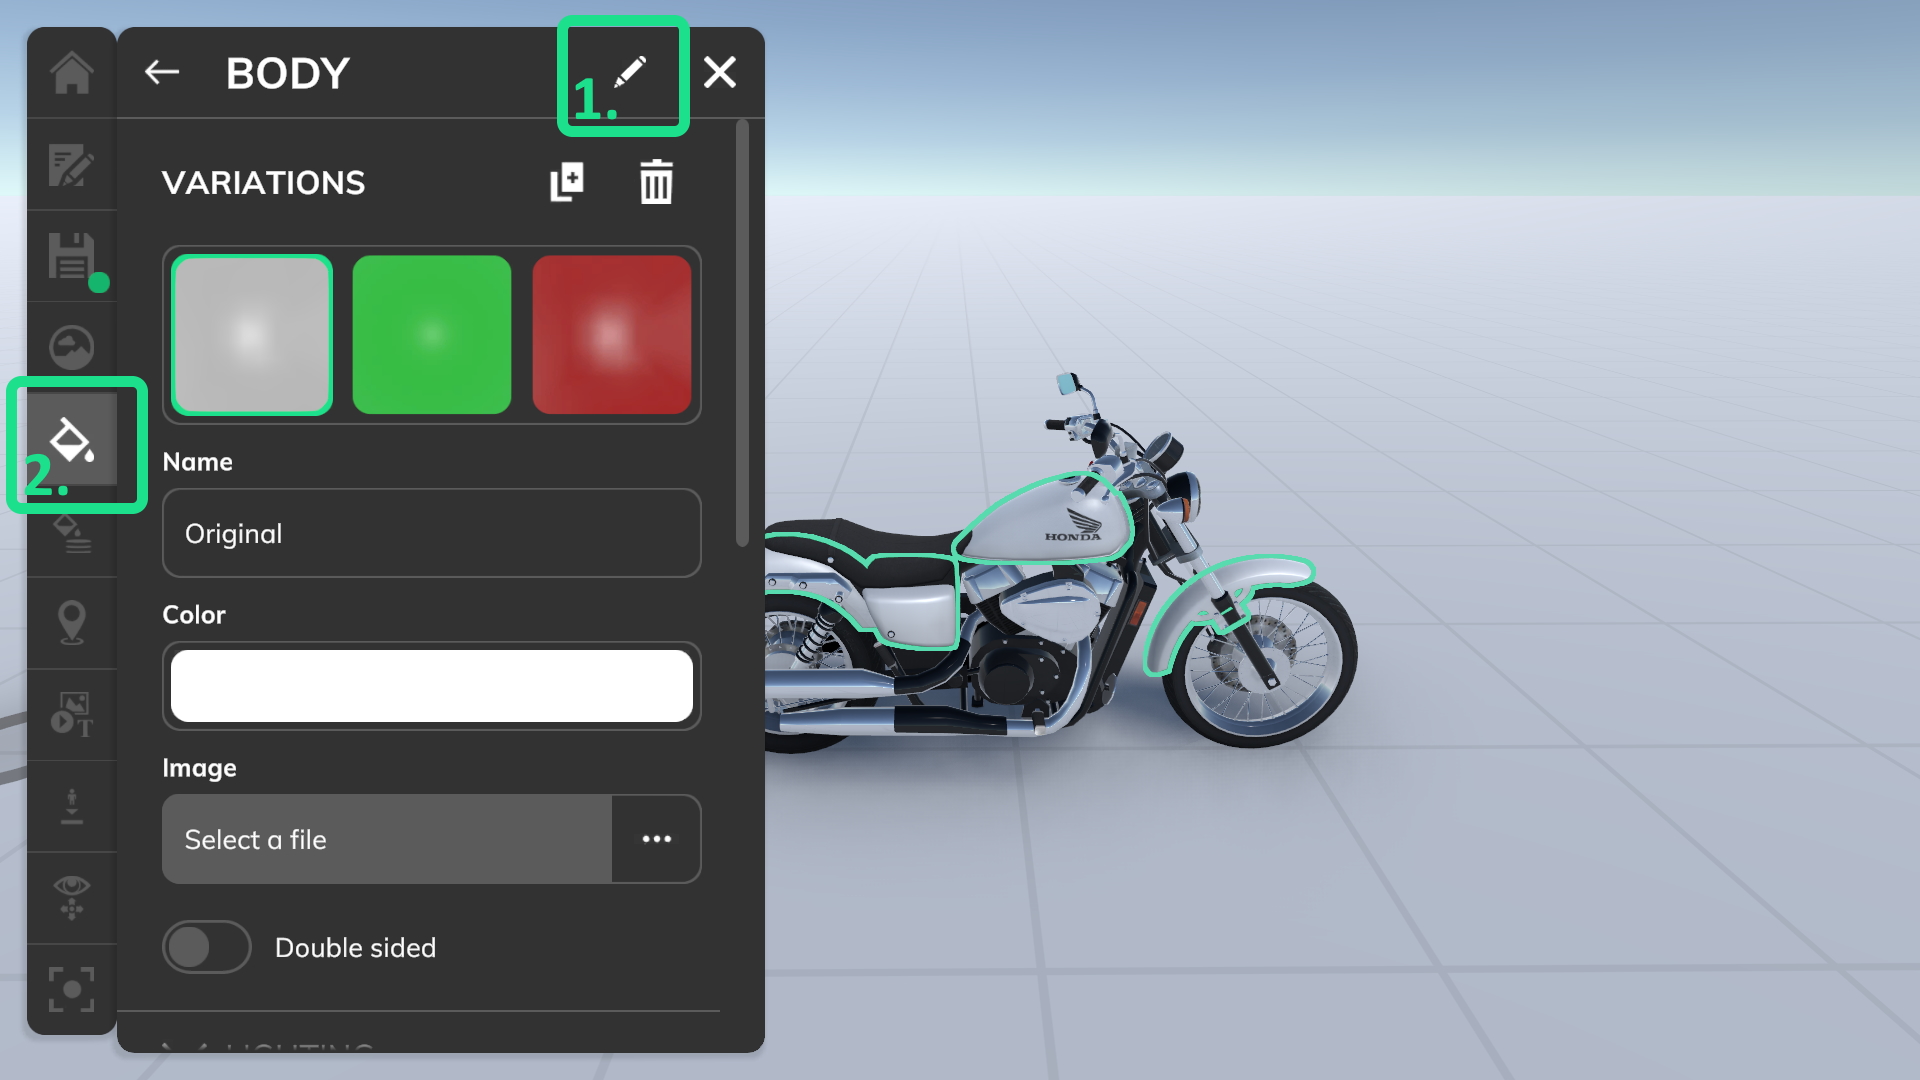
Materials
When importing 3D models, Virtofy will convert all materials to a GLTF 2.0 compatible format.
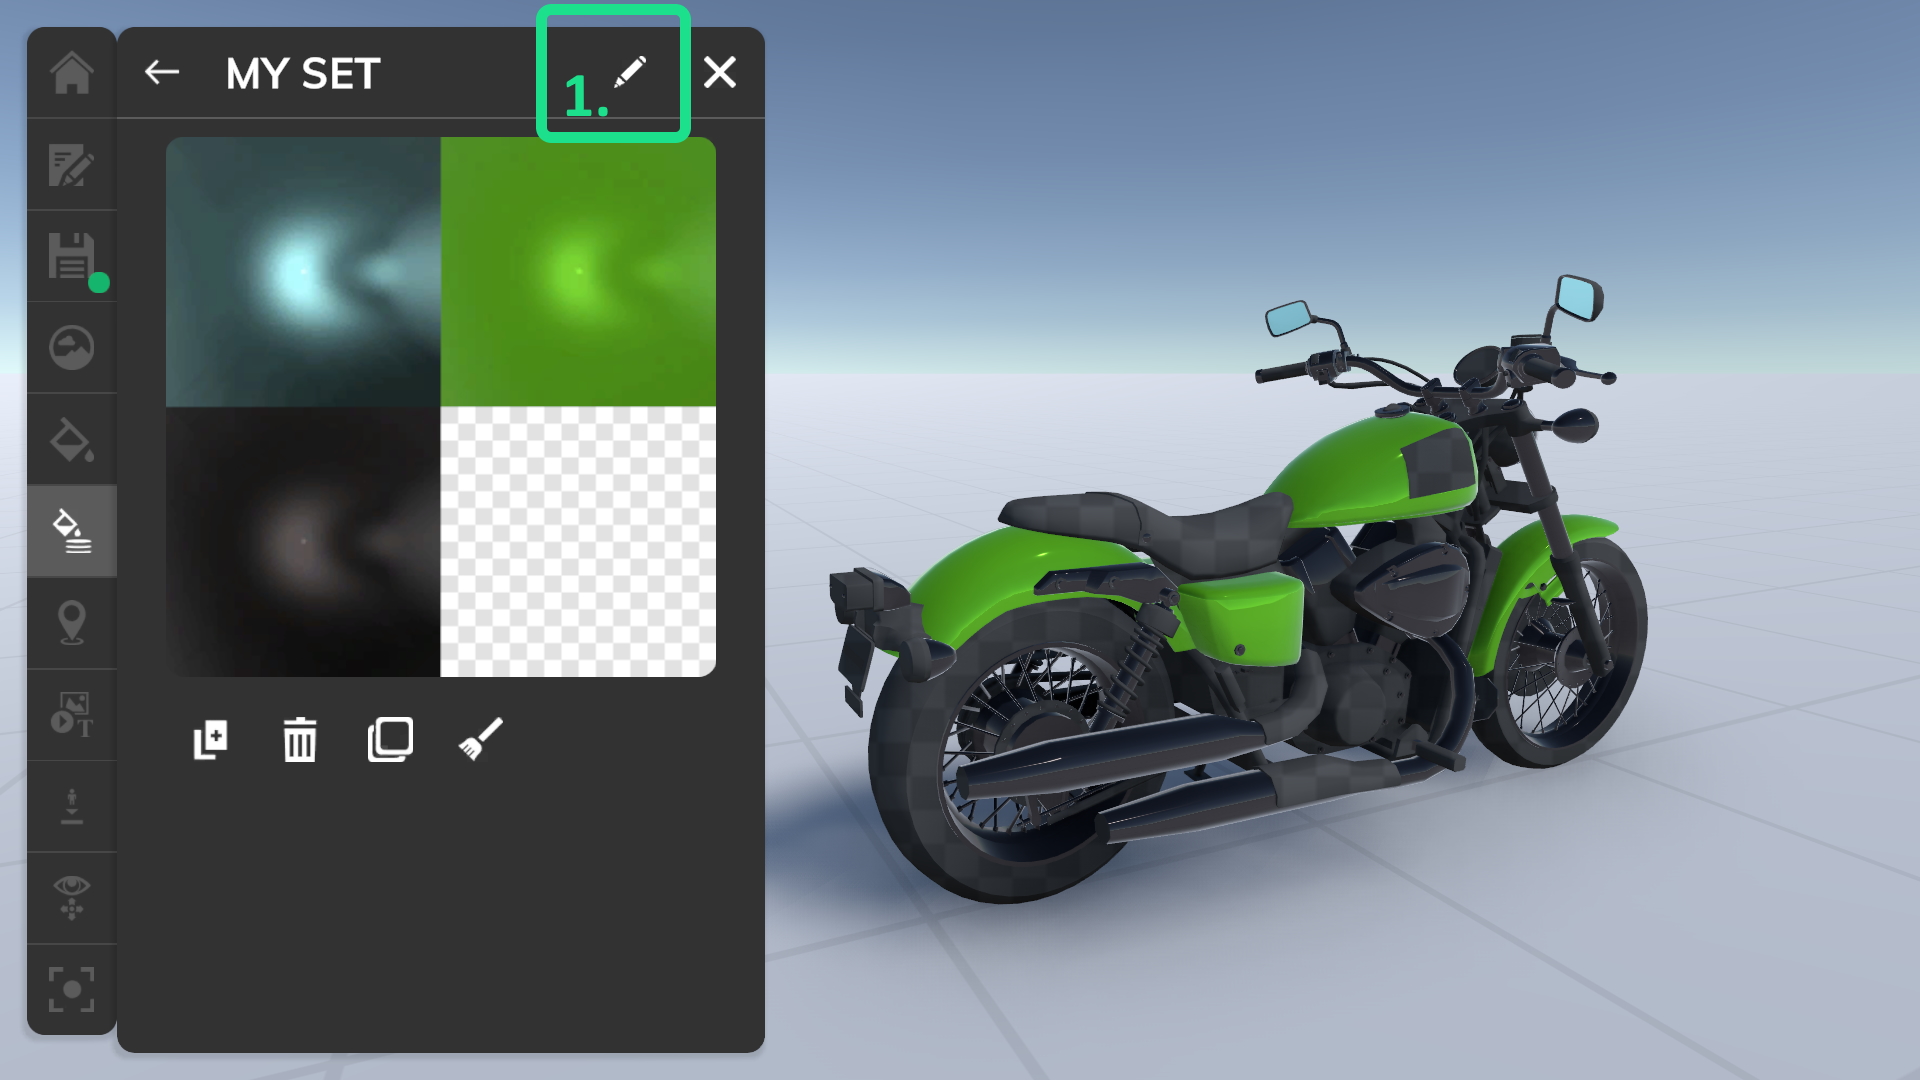
You can select a material by clicking on a surface in the 3D view or by clicking on an item in the material list (see: 2 in variation properties screenshot).
Names
Material names must be unique. If a material name in the source 3D model is not unique, it’s name will get a sequential number 0..999 added to the end.
If the source 3D model file does not have any material names in it, an automatic name will be generated: material 001..999.
The material name can be changed in the material inspector (see: 1 in variation properties screenshot).
TIP: Use short material names, to make reading easier.
Variations
Each material can have multiple variations which will be used to show different colors or surface structures. Duplicating or deleting a variation can be done with the buttons above the variation list. The material will use the properties in the selected variation. The last selected variation will become the default variation and is selected when starting the tour.
Name
Name of the variation.
Color
Set the main color for the material and tints the object with the given color.
Image
If the 3D model has UV mapping you can set an image for a material which is applied to such geometry.
Rendering

Render modes
Virtofy automatically determines if a material will be rendered opaque or transparent. Opaque rendering is used if the color alpha value is 100% and an image without alpha pixels is used (jpg or png with all pixels at 100% alpha). Otherwise, transparent rendering is used.
Double sided rendering
The double sided rendering feature of a material is automatically disabled if the following file formats are used: fbx, glb, gltf, dae. All other formats have this feature enabled as these file formats can have inverted geometry and this setting will help to display the 3D model in a correct way.
Double sided rendering will help to prevent “holes” in 3D models.
Lighting
If lighting is enabled, the material uses physical based rendering (PBR). Otherwise (unlit), only the image and color will be used without any shading.
Known issue: Due to technical limitations, shadow receiving is disabled for unlit materials which are using a transparent image.
Lightspot
If enabled, the material will be rendered with a light spot.
Reflections
If enabled, the material will be rendered with world reflections.
Workflow
Due to the diverse variety of 3D applications available today, there are two different workflows established regarding material composition. These are Metallic and Specular workflows.
Metallic workflow
This workflow uses the “metalness” setup for configuration.
Roughness:
Sets the roughness of the material.
Metallic:
Sets the metallic of the material.
Specular workflow
This workflow uses the “sepecularity” setup for configuration and has the most flexibility.
Specular color:
Set the specular color which will be added to the base color of the material.
Glossiness:
Sets the glossiness of the material.
Advanced
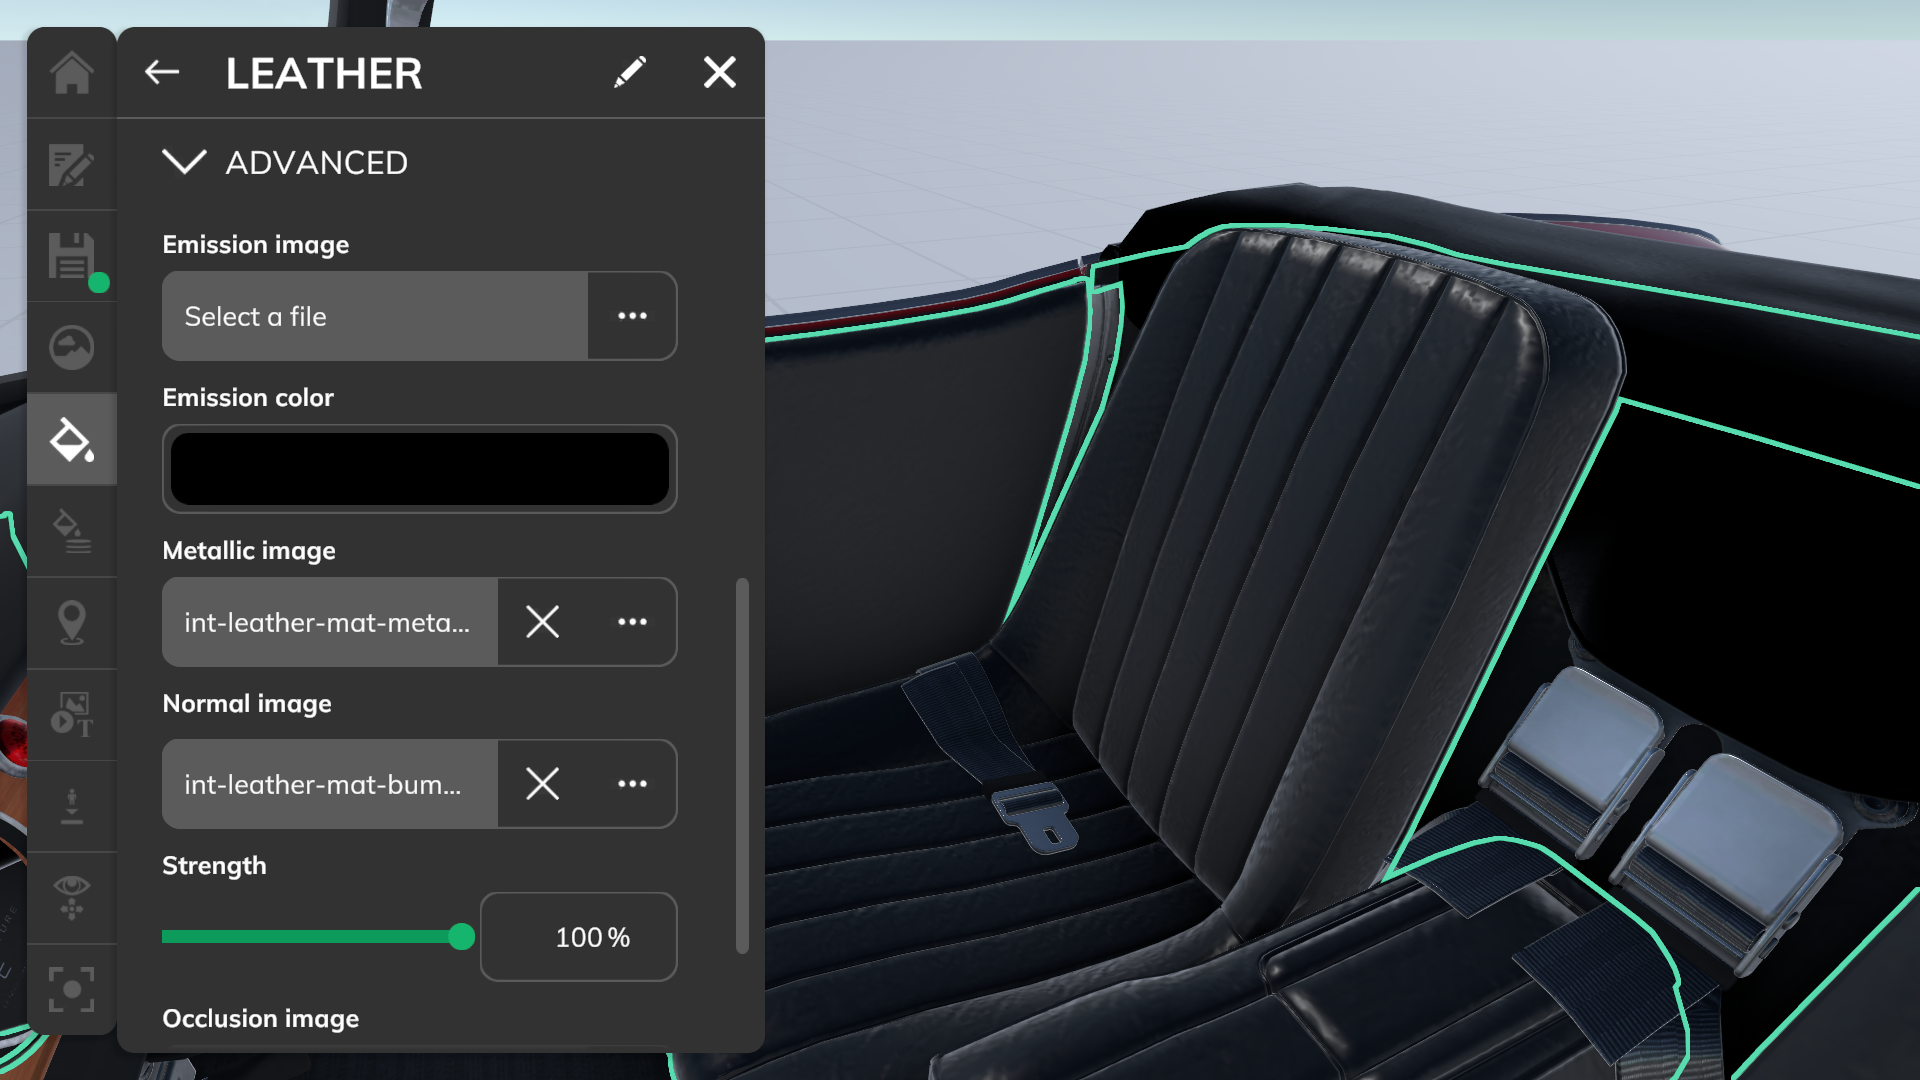
With advanced settings, you can bring the rendering details of a material to a very high level.
Important: Normal, occlusion and metallic images are loaded in linear color space. All other images are loaded in gamma space (sRGB). This is due to the GLTF 2.0 specification.
Emission image
Emits color at the given areas (0%=no emission, 100%=full emission).
Emission color
Emission color of the material will be multiplied with the emission image if set.
Metallic image
The metallic image definition is based on the GLTF 2.0 specification shown here. The red channel in the image contains the metallic-ness of the material and the green channel contains the roughness of the material. The blue and alpha channels are ignored.
CAUTION: Some programs (like unity) want to have the smoothness (roughness) value in the alpha channel of the image.
Normal image
Uses to fake structure of an object without using geometry via normal mapping (tangent space).
Occlusion
The red channel determines how to darken certain areas (0%=no occlusion, 100%=full occlusion).
Settings
Reset
This will reset all properties of the material to its initial value.
Material sets
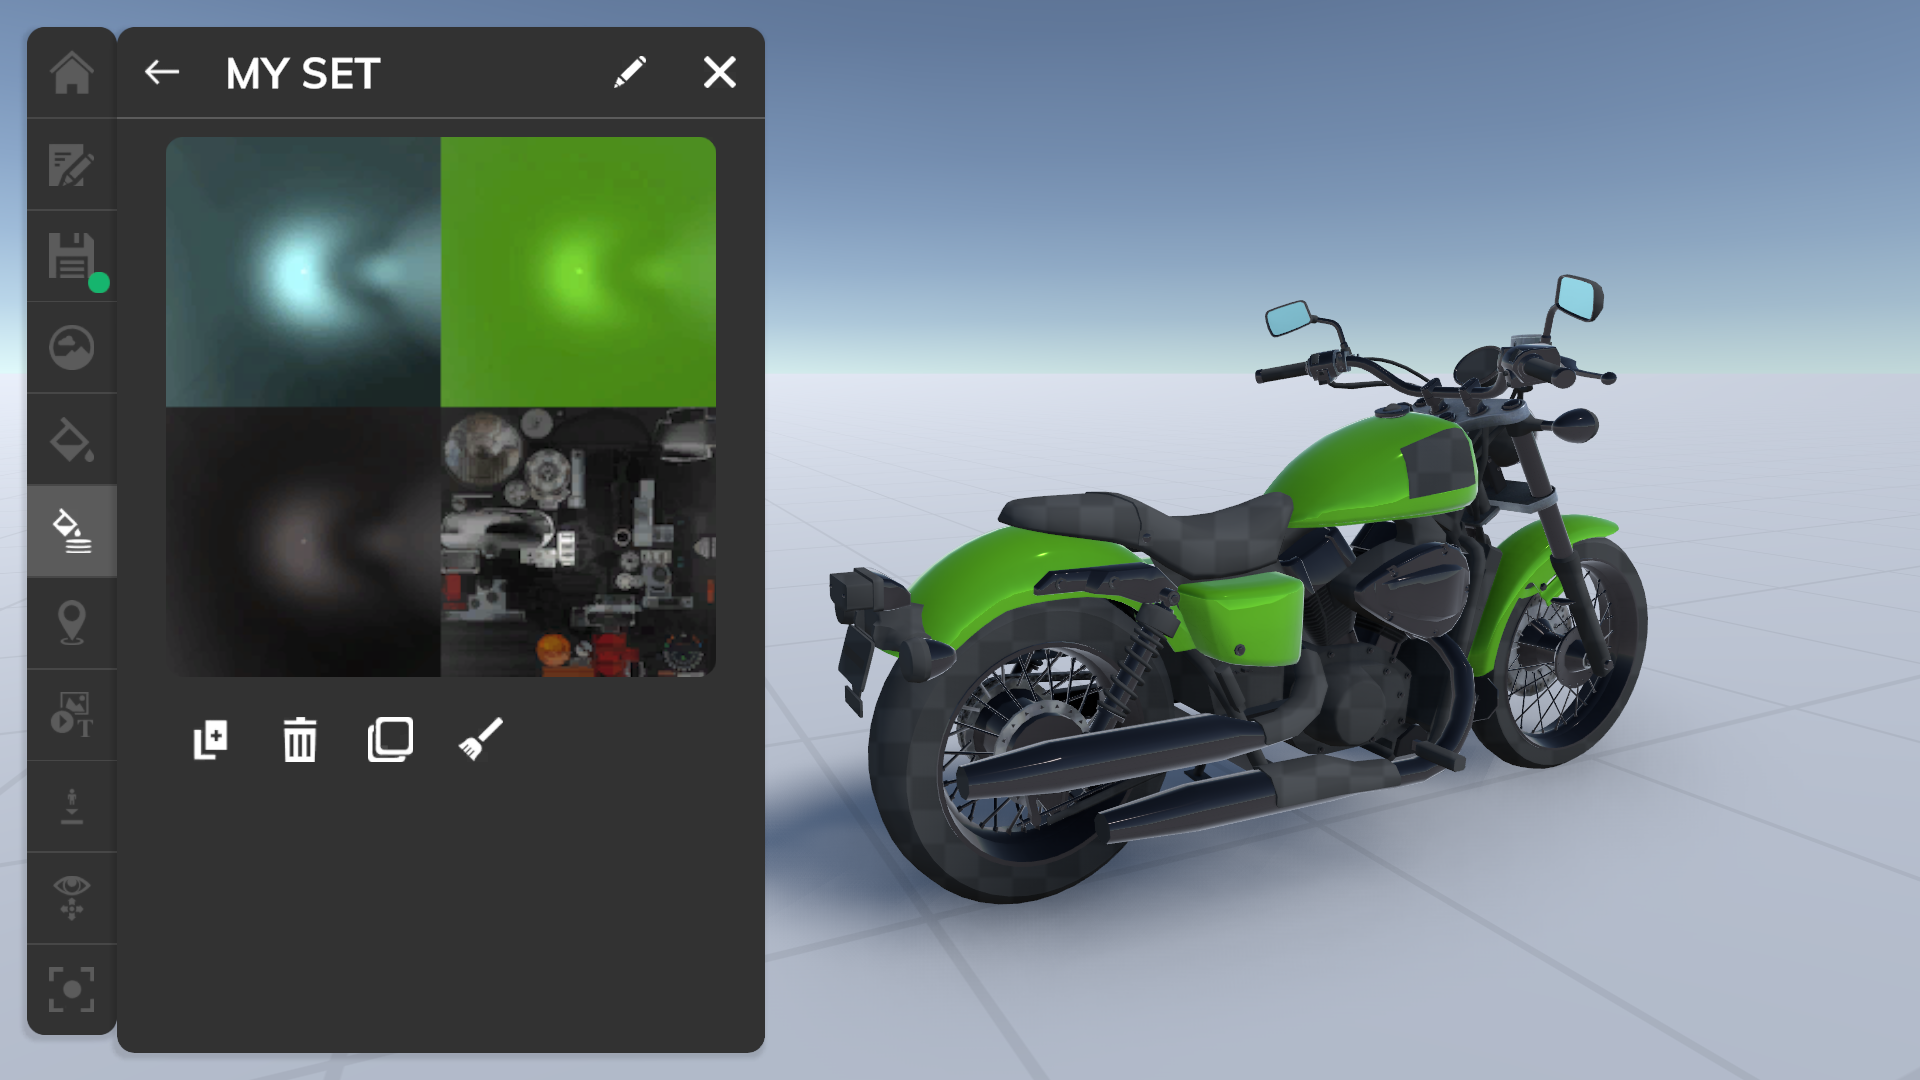
A material set is a selection of variations for some materials. When selecting a material set, all materials will use the marked variations in the material set. If no variation for a material was selected, this material keep its previous variation. With this feature you can preconfigure certain material variation combinations and can switch these easily.
Default set
The default set is a material set which cannot be removed or changed directly. It contains all materials with all its default variations.
Add a material set
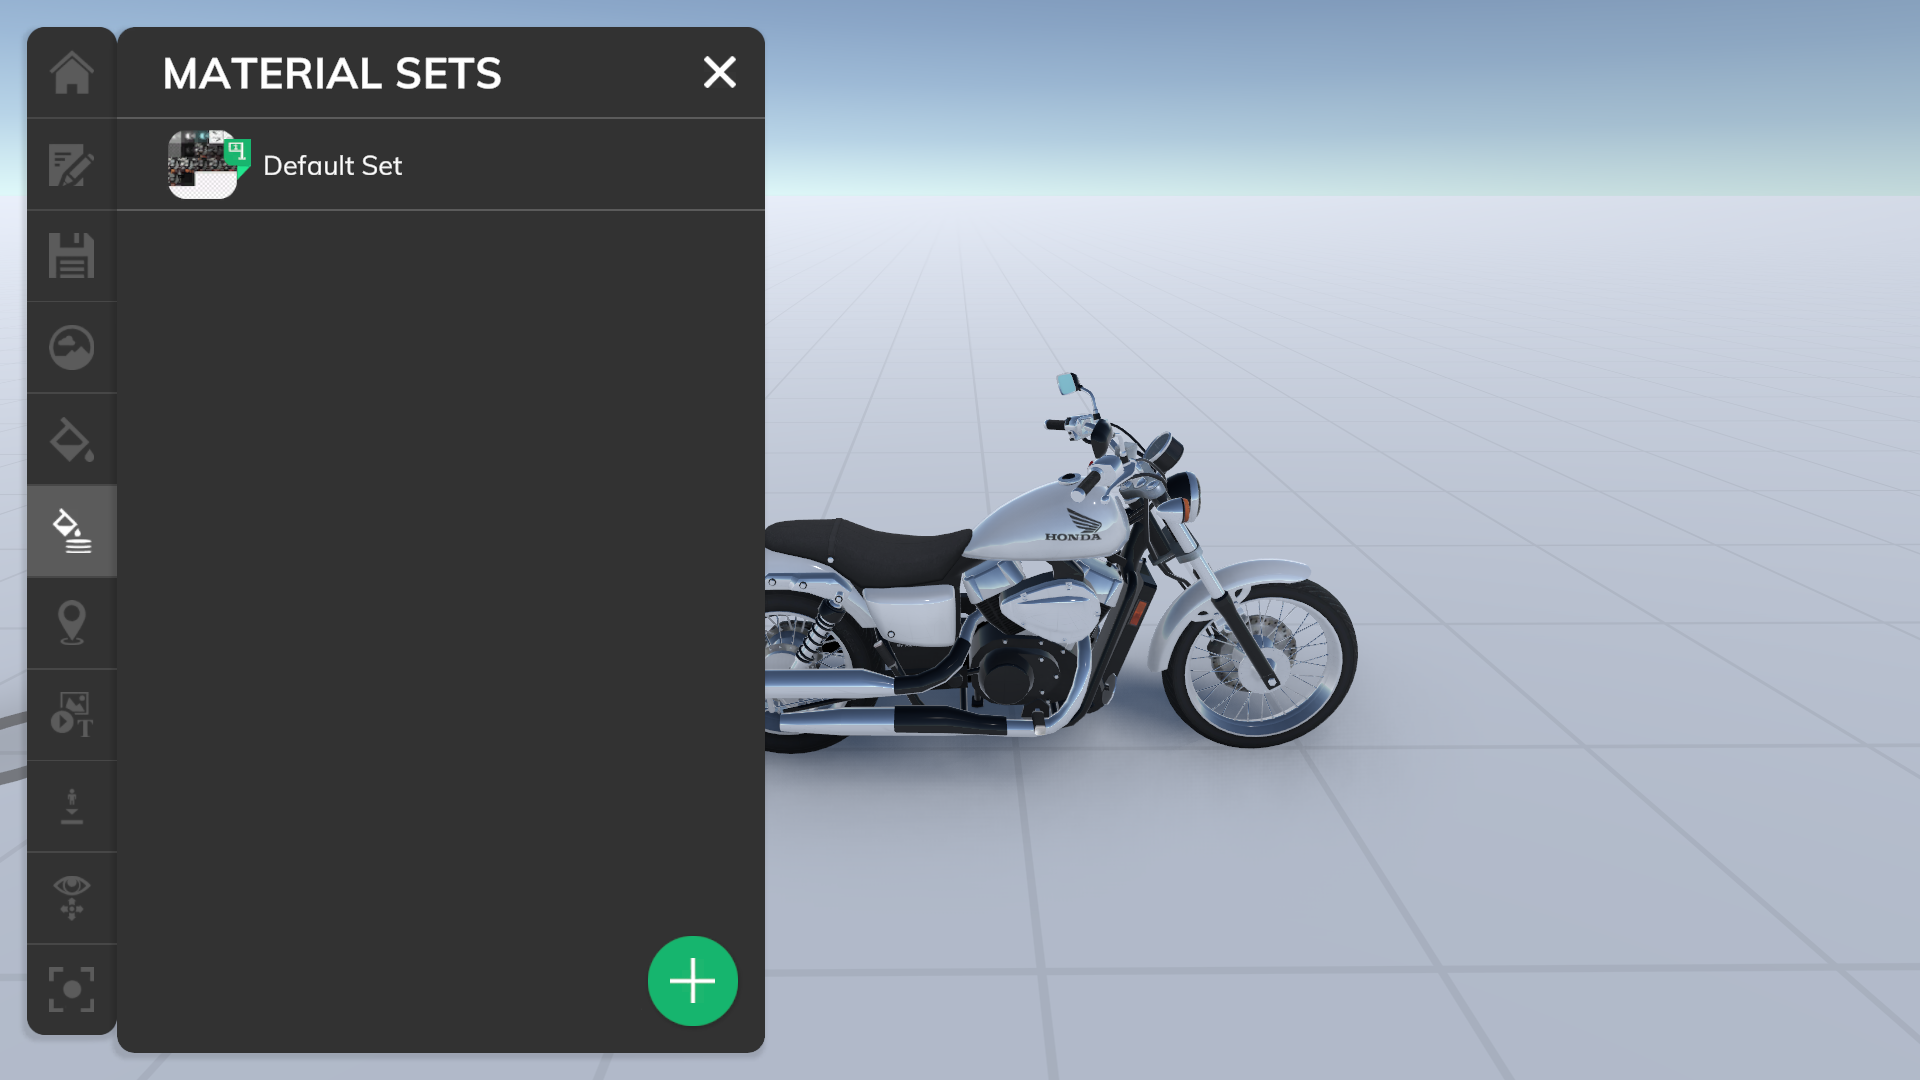
Use the plus button in the material set list to add a new material set.
Settings
When creating a new material set, no variations are selected. If a material has no selection variation, it will be displayed as a dark gray checkboard in the 3D view. A preview image with all selected variations will be created automatically when changing the variation selection.
Change name
Change the name of the material set (see: 1 in material set settings screenshot).
Duplicate
Duplicate the material set.
Delete
Delete the material set.
Select variations
Open the variation selection panel.
Clear variation selection
Clears all selected variations.
Variation selection
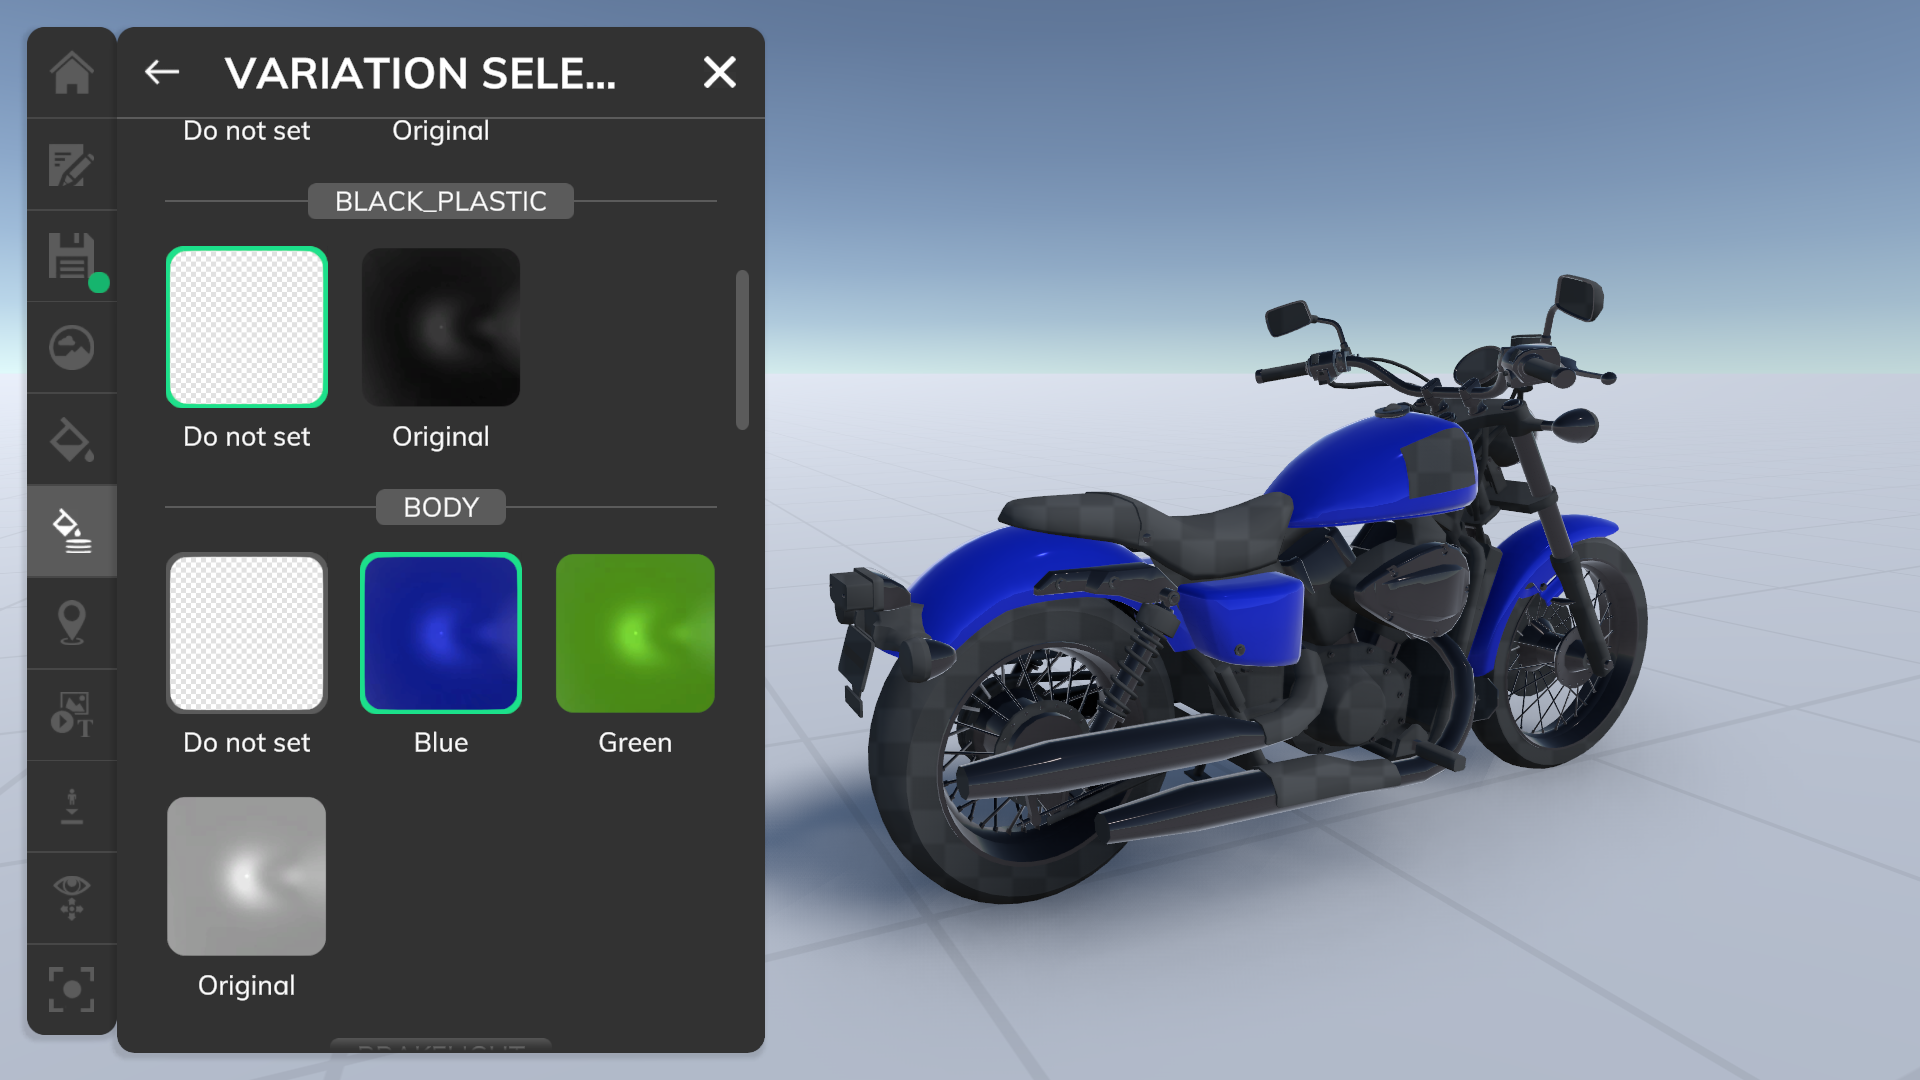
Clicking on the Do not set variation of any material will not set any variation for this material. It will be displayed as a dark checkboard in the 3D view. Click on another variation to use it in the current material set.
Tour settings
The tour settings are used to set all main properties of the tour.
General
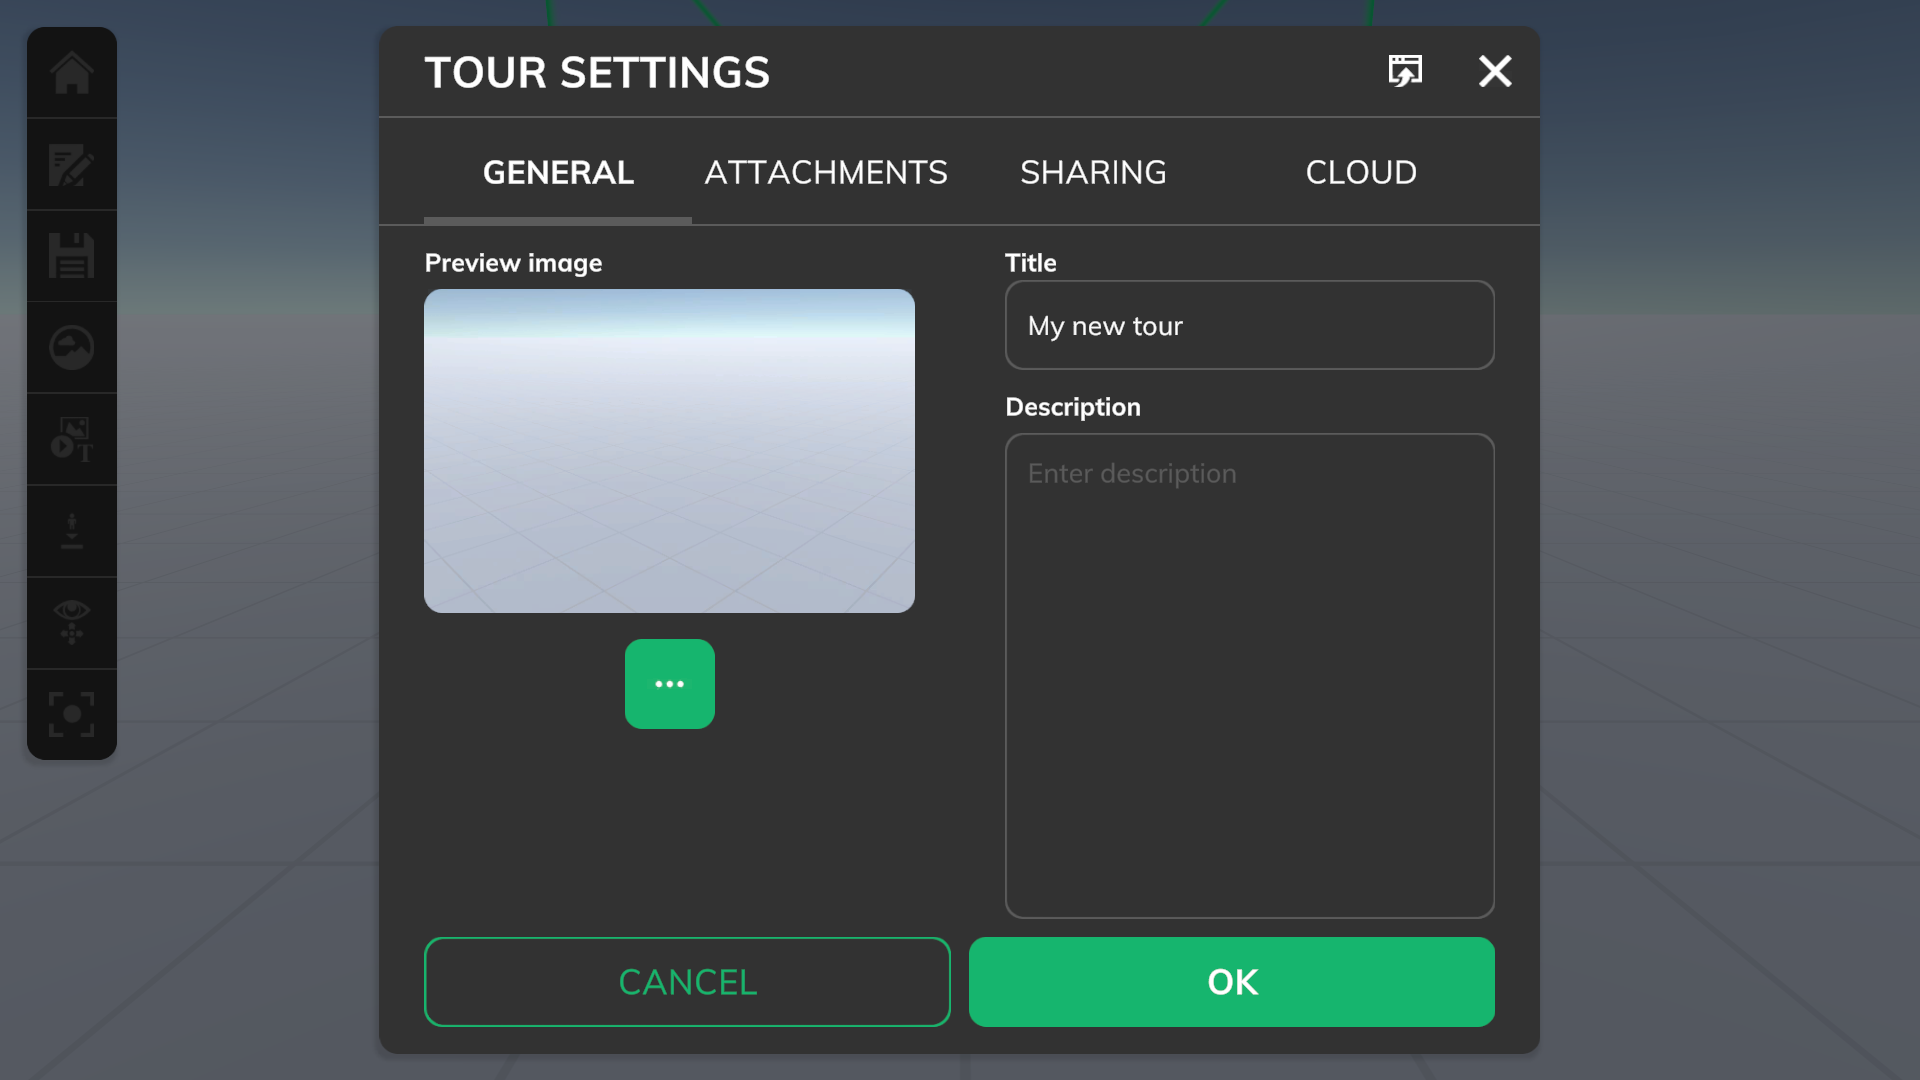
All visible meta data given here will be seen on the tour detail screen.
Preview image
The preview image will be used to show the tour on the manage tour overview screen. The start POV of the scene is used if no custom image is selected.
Title
The title of the tour.
Description
Description text of the tour. Will be shown on the tour detail screen.
Attachments
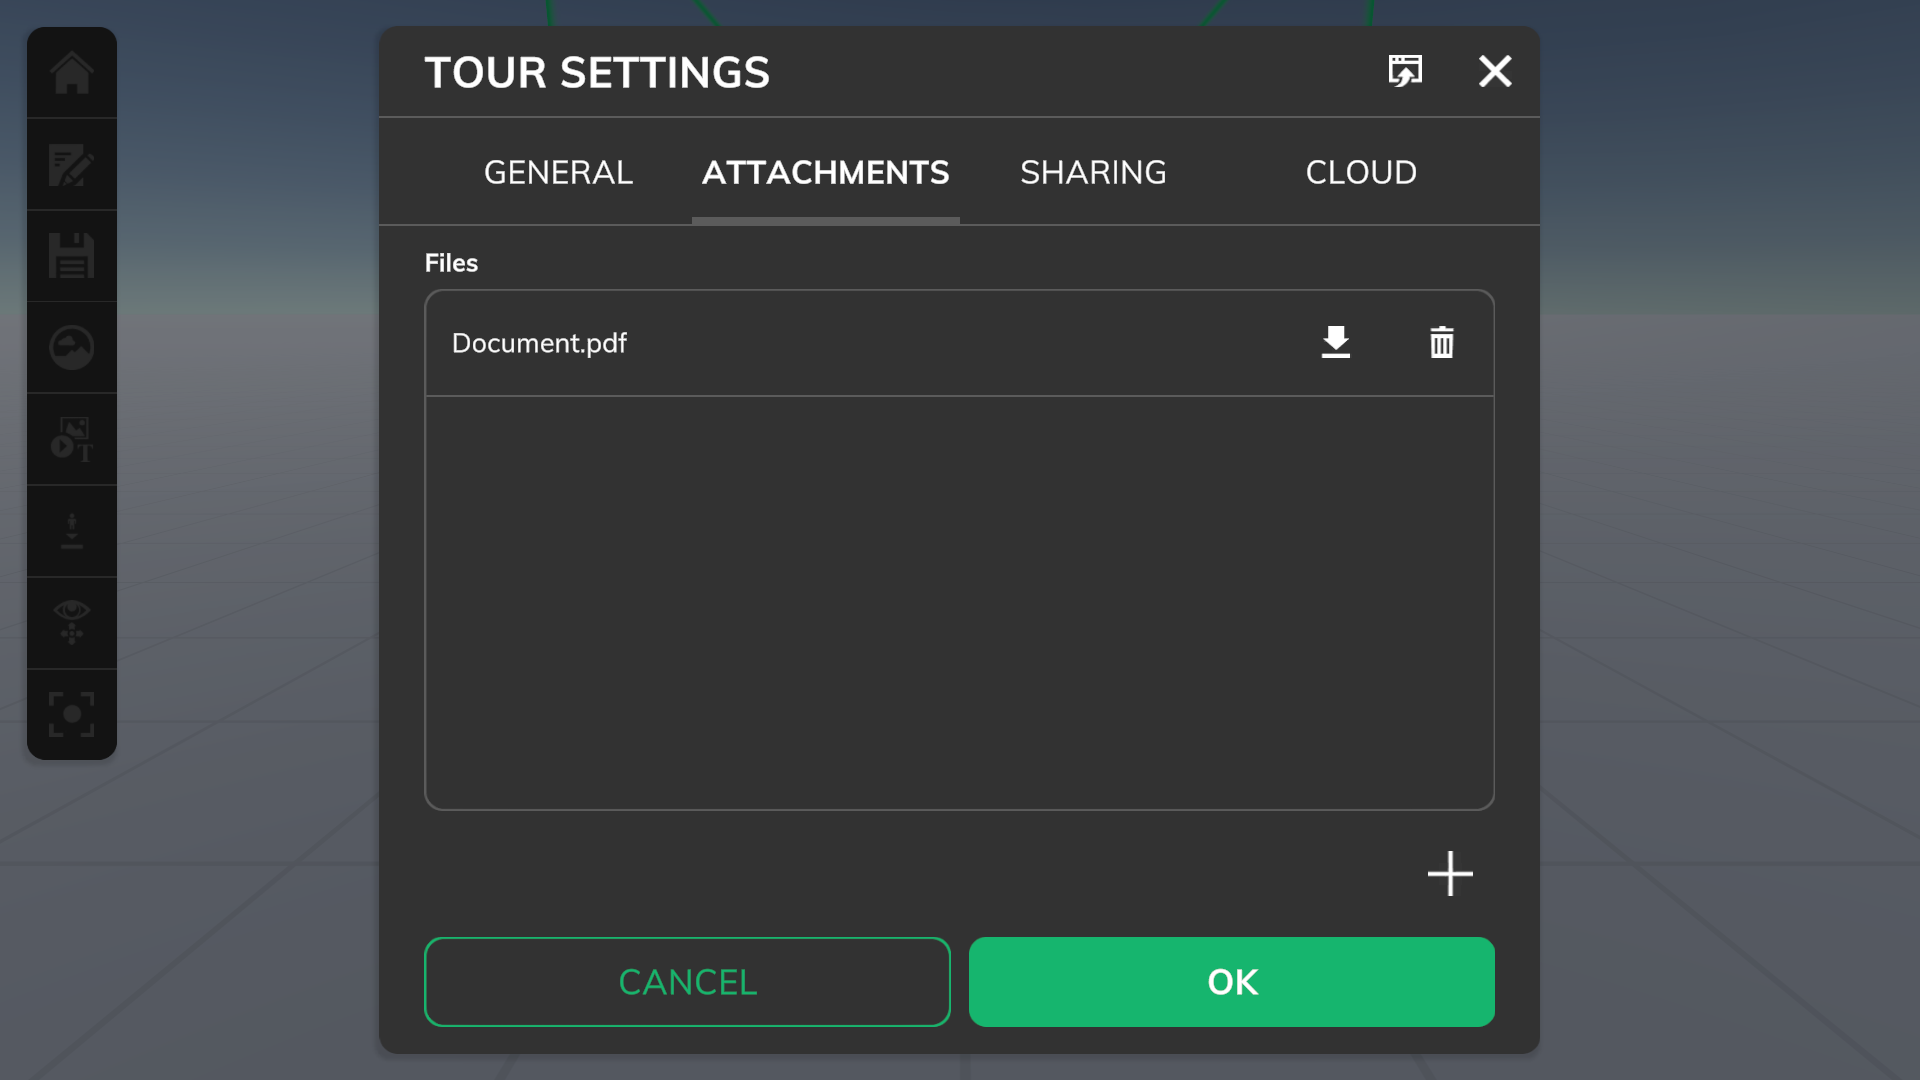
You can add attachments to a tour which can be downloaded by the users on the detail screen. The following file formats are allowed: .csv, .doc, .docx, .jpeg, .jpg, .json, .mov, .mp4, .ods, .odt, .pdf, .png, .txt, .xls, .xlsx, .xml, .zip,.
To delete an attachment, just click on the delete button next to the item.
Sharing

The tour sharing allows you to control which users are allowed to see your tour.
Sharing enabled:
If enabled, the sharing will be used, and all users mentioned in the sharing list, and all users which have used the current shar link can see the tour on their manage tour screen. All other settings, like the share link and notification, will be used based on their setup. If sharing is disabled, the tour will only be visible to the tour owner. This gives you a one click option to enable/disable the tour visibility for other users.
Sharing list:
You can add users to the list via the address book or by manually typing the email addresses into the list. If you want to paste multiple email addresses, the following separators for the emails are used: | ; , space new line.
Use the delete button to remove entries from the list.
There is a plan limit for the maximum read permissions you can use for your tour.
Share link
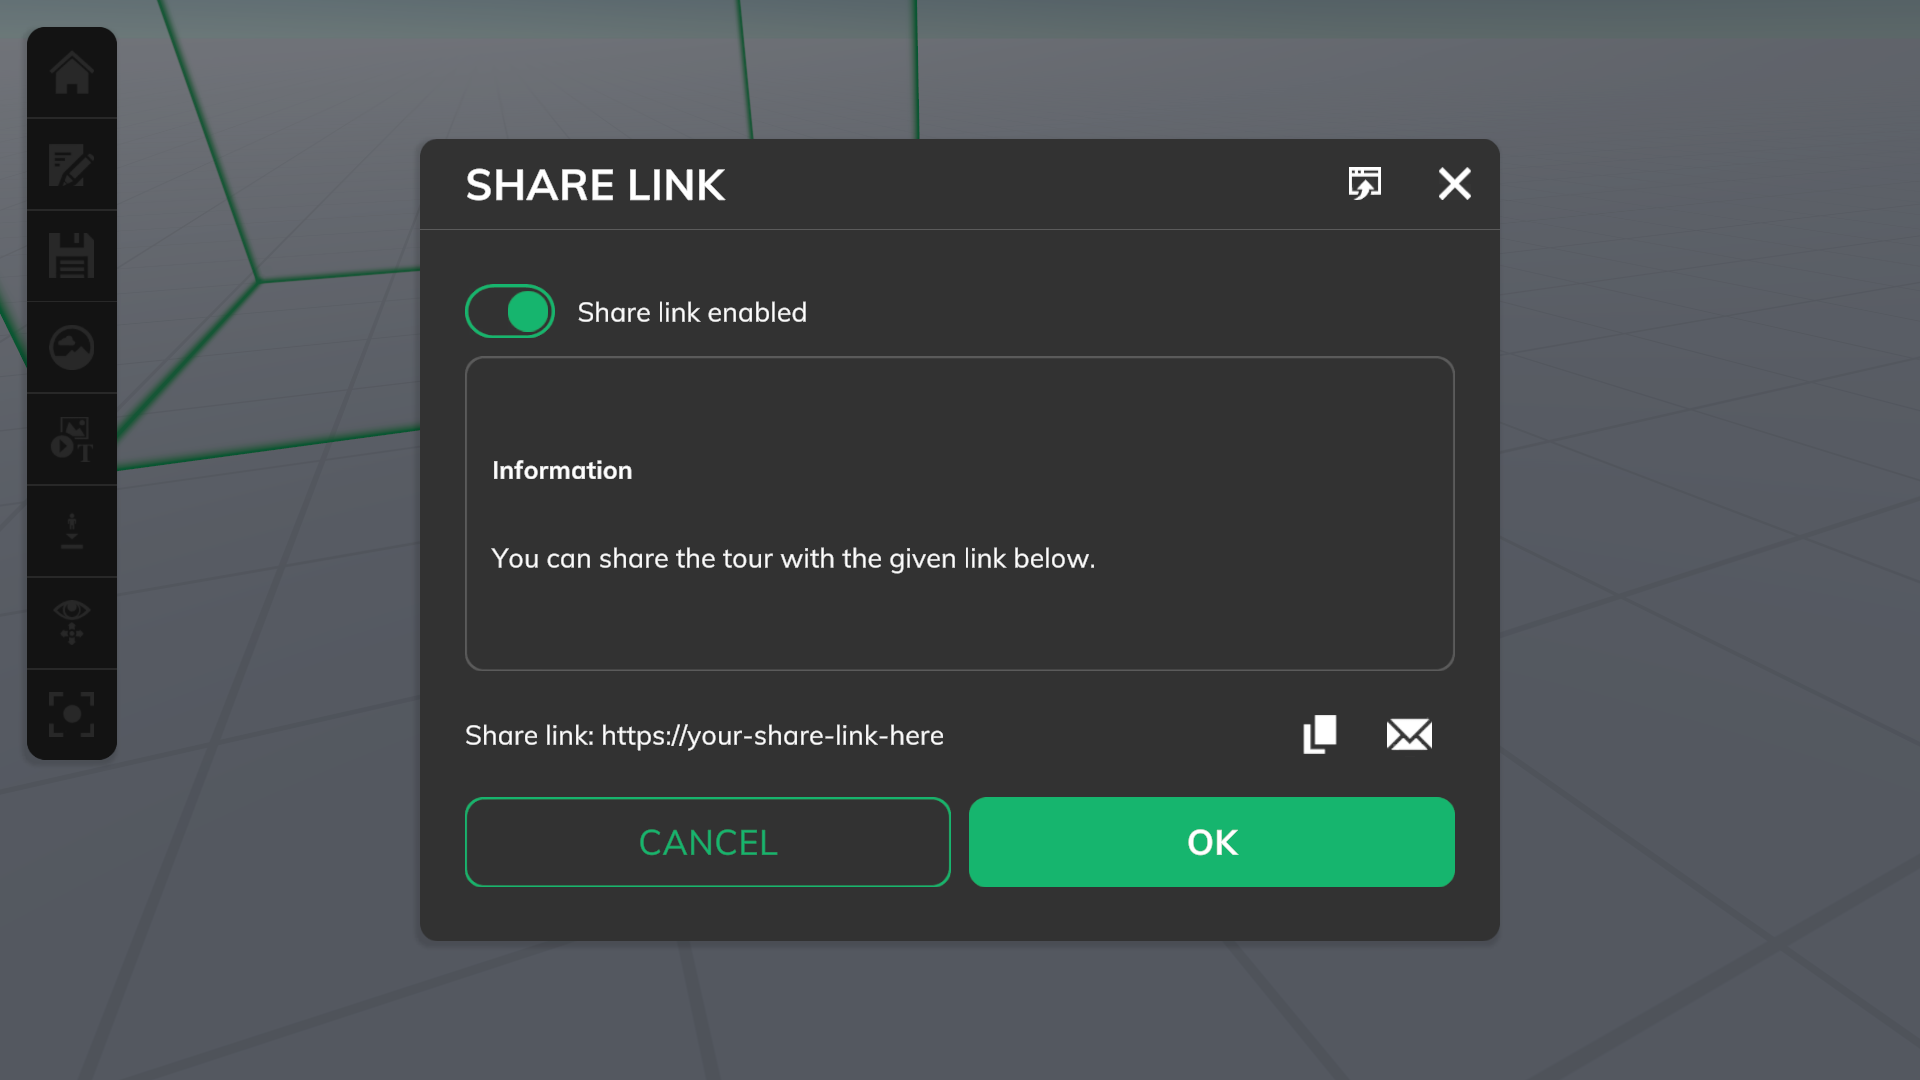
The share link is a link which you can send to other users. If clicked on that link, the user can see this tour on his manage tour screen. This gives great flexibility as you can easily send around the link for this tour.
Share link enabled
If enabled, you will get a share link for this tour. The in-app editor must save the tour first when enabling this. The share link will be removed and all users which have this tour on their manage tour screen will be removed when disabling the link. When enabling the share link again, a new share link will be generated and the old share links will no longer work.
Actions
You can copy the share link or open your mail program when clicking on the toolbar buttons.
Share link outside the in-app editor
If the share link support is enabled for a tour, you can share the link information on the detail screen of the tour. Click on more, and then on share link. This shows a share link information dialog.
Known issue: Share links do not work on meta quest compatible VR headsets, as the integrated web browser does not support opening an app via a link.
Extended sharing settings
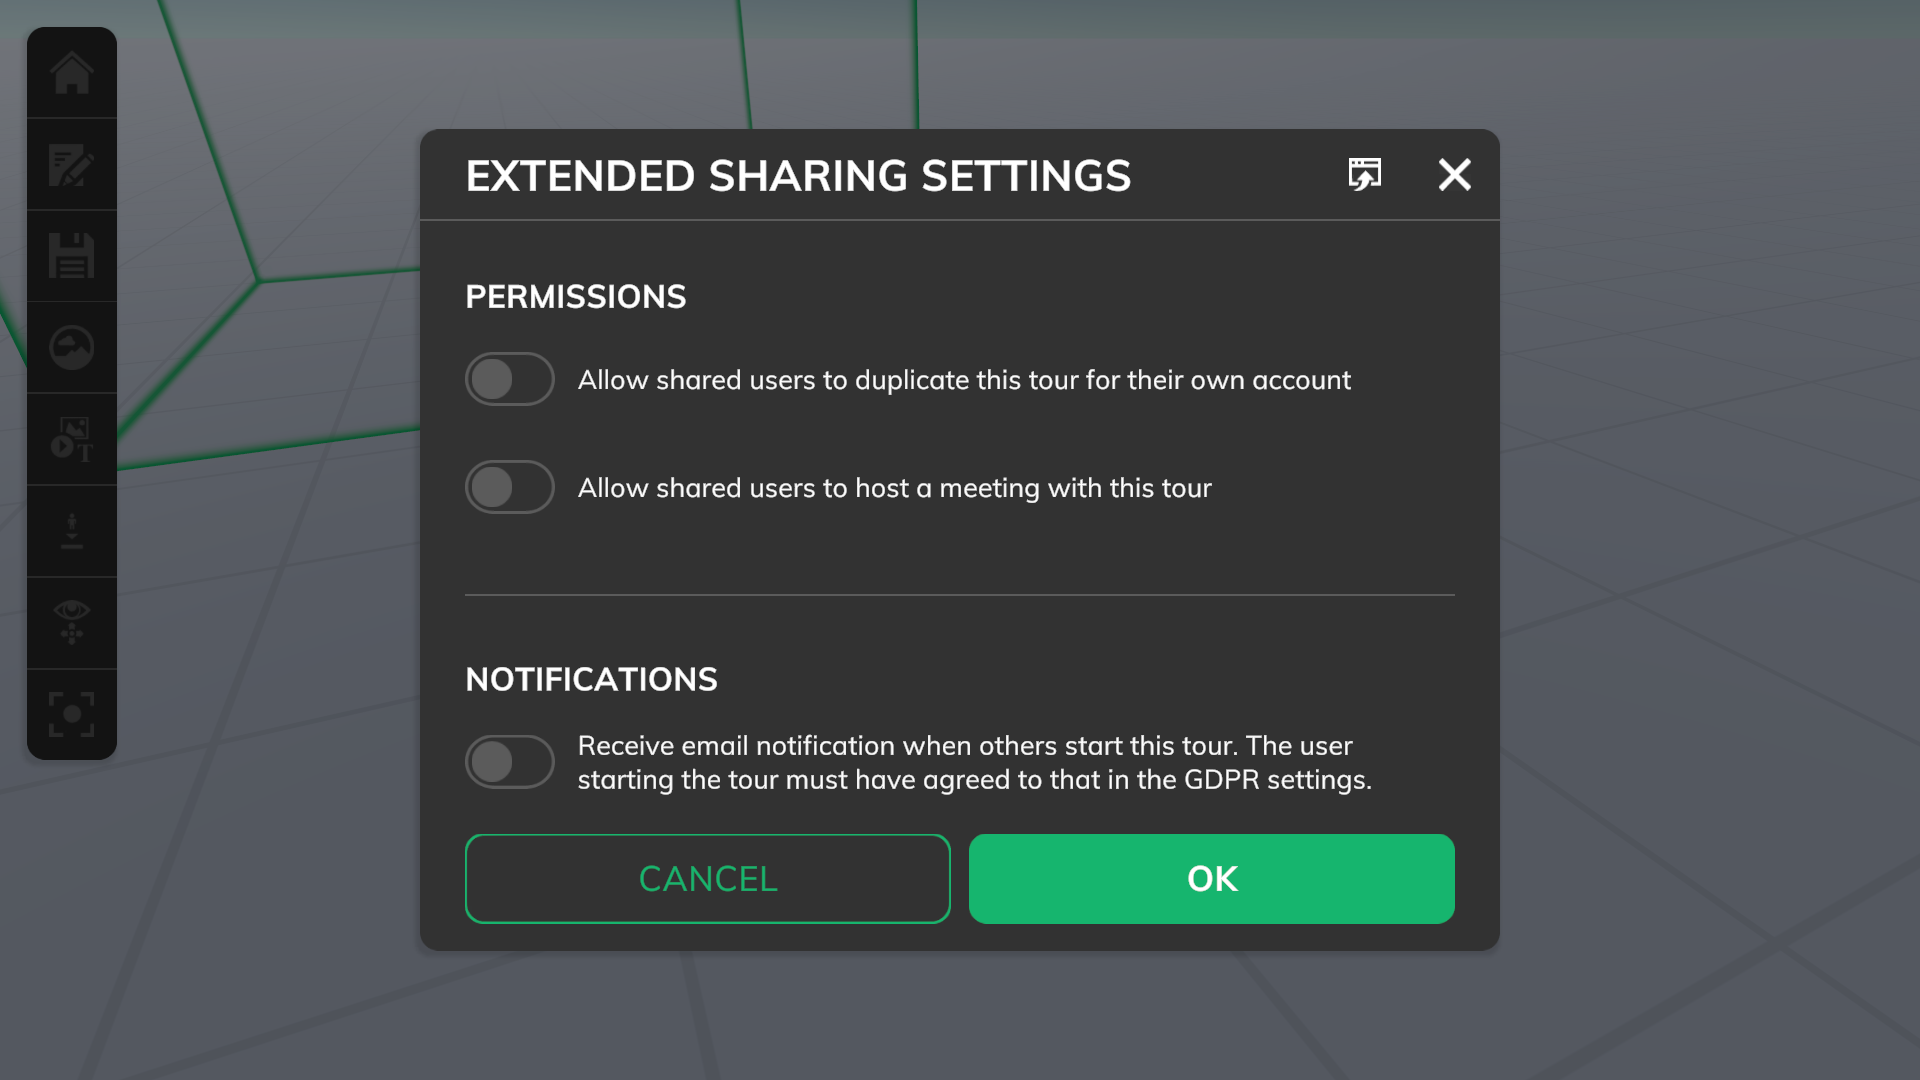
These settings give extra control over possible tour options for users who can see this tour.
Allow duplicate
If enabled, each user who can see the tour via a share link, or with the share list, is allowed to duplicate this tour. The user will be the owner of the duplicated tour. This can be useful if you want to share some tours which other users could change, like for education purposes.
Allow meeting
If enabled, each user who can see the tour via a share link, or with the share list, is allowed to start a meeting with this tour. This can be useful if you want your shared users to be able to present your tour to other clients and customers.
Notification on start
If enabled, you will get an email notification, if any shared users will start your shared tour. This user must have agreed on that in the GDPR settings.
Cloud
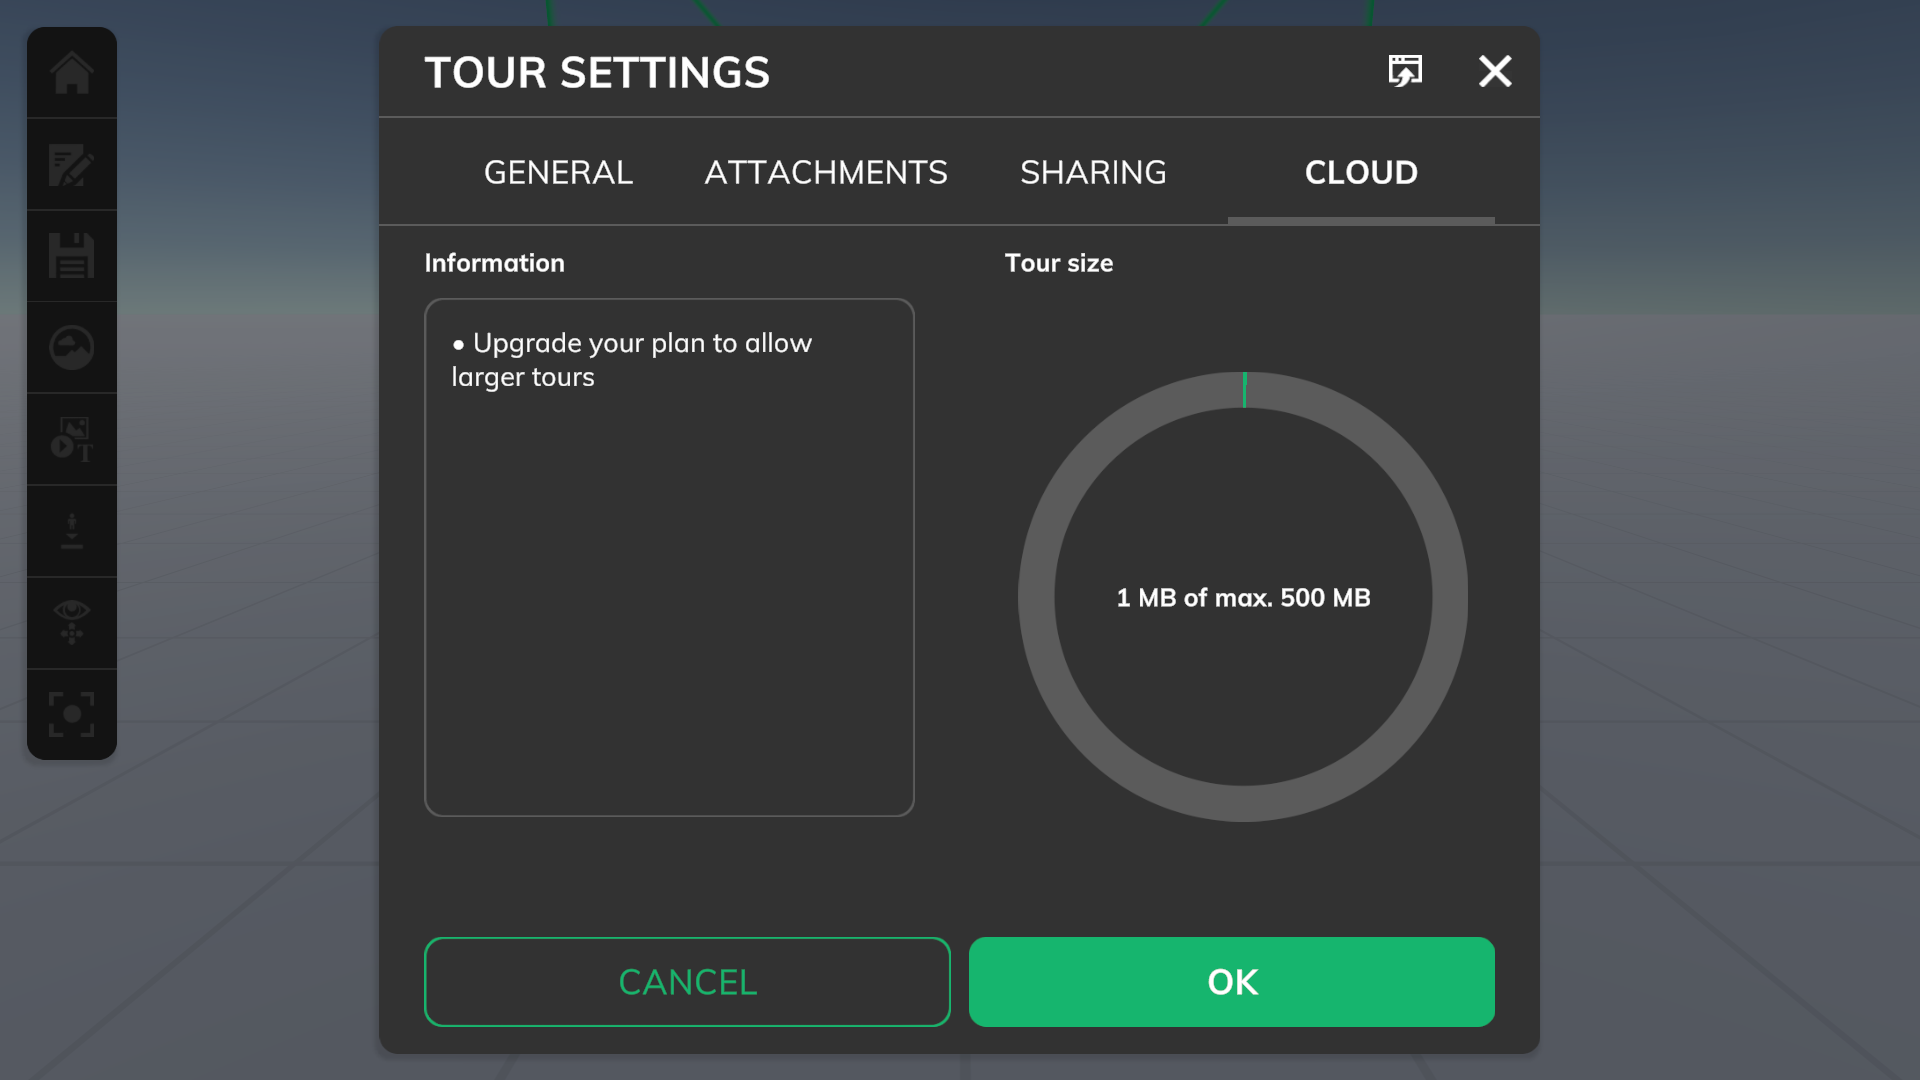
This shows an overview of the used and available space for the tour.
Tour preview
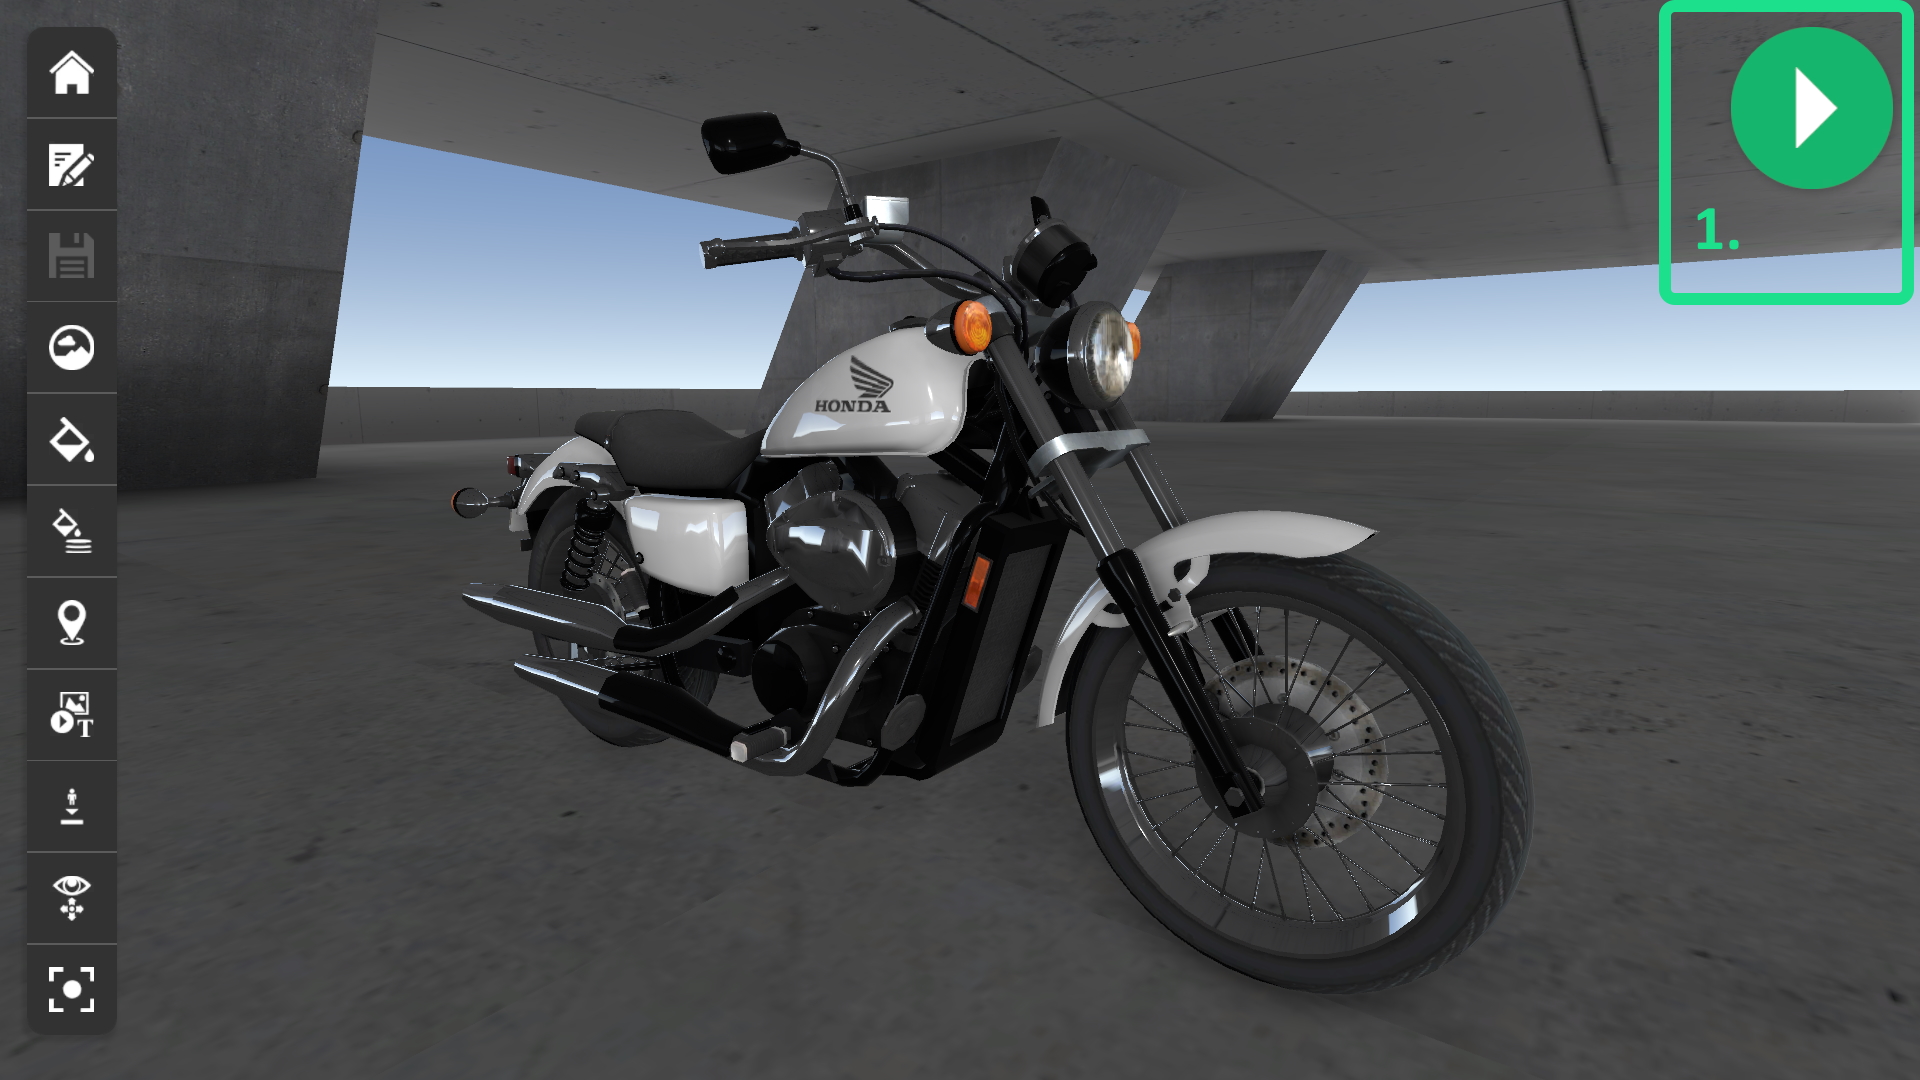
To preview the tour, just click on the play button (see: 1 in the preview screenshot) and the in-app editor will switch from the “editing”, to the “preview” mode. After pressing the “play” button, the button will be changed to a “stop” button and can be used to switch back to the “editing” mode. The “preview” mode simulates are normal tour where you can all regular stuff (expect meeting setup).
App settings
We are working on this documentation part. Please stay tuned.
Virtofy for Unity
We are working on this documentation part. Please stay tuned.
VR on Desktop PC
VR Desktop Setup:
- Only one VR headset can be connected to the PC at a time.
- Please close Steam/SteamVR on your PC before starting.
- If you want to use Steam/SteamVR on your PC, please install it beforehand and create an appropriate account (Download: Steam )
VR desktop setup Meta Quest link:
- Start the Meta Quest Link app on your PC (Download: Meta Quest Link ) and log in if necessary.
- Connect your Meta Quest headset to your PC via cable or Wi-Fi.
- Put on the Quest headset and confirm the “Quest Link Dialog” with “Activate”.
- You will then see a gray plane on the headset and a gray toolbar on the lower half of the screen.
- Launch Virtofy Viewer or Virtofy Studio on your PC (Download: Virtofy ).
- In Virtofy on the PC, click on the VR headset icon in the upper right corner to start VR mode.
- If a dialog box appears, select “Meta Quest Link”.
- You should now see Virtofy on your PC screen and on the Meta Quest VR headset via Meta Quest Link.
VR desktop Steam VR:
With Meta VR-Headset
- Start the Meta Quest Link app on your PC (Download: Meta Quest Link ) and log in if necessary.
- Connect your Meta Quest headset to your PC via cable or Wi-Fi.
- Put on the Quest headset and confirm the “Quest Link Dialog” with “Activate”.
- You will then see a gray landscape on the headset and a gray toolbar on the lower half of the screen.
- Launch Virtofy Viewer or Virtofy Studio on your PC (Download: Virtofy ).
- In Virtofy on the PC, click on the “Main Menu” icon in the upper right corner, then on “App Settings”.
- In the “VR” tab, set “Auto Select VR headset” to off.
- In Virtofy on the PC, click on the VR headset icon in the upper right corner to start VR mode.
- If a dialog box appears, select “Steam-VR”.
- You should now see Virtofy on your PC screen and on the Meta Quest VR headset via Steam-VR.
With Pico4 VR-Headset:
- Install and start the “Streaming Assistant” on your Pico VR headset.
- Install and start the Pico “Streaming Assistant” on your PC (Download: Pico Streaming Assistant ). Important: Note that you may need to start the “Streaming Assistant” as an administrator.
- Connect the Pico VR headset to your PC via cable or Wi-Fi.
- Your PC should now be listed in the “Streaming Assistant” app on your Pico VR headset, press “Connect” there.
- Steam and SteamVR will now start on your PC, log in there if necessary.
- Once SteamVR is started, you should see a notification at the bottom of the screen indicating that the Pico VR headset has been detected.
- Launch Virtofy Viewer or Virtofy Studio on your PC (Download: Virtofy ). Important: You must start Virtofy with the same user with which you started the “Streaming Assistant” on the PC (possibly as an administrator).
- In Virtofy on the PC, click on the VR headset icon in the upper right corner to start VR mode.
- If a dialog box appears, select “Meta Quest Link”.
- You should now see Virtofy on your PC screen and on the Meta Quest VR headset.
With HTC Vive or compatible VR headsets:
- Launch Virtofy Viewer or Virtofy Studio on your PC (Download: Virtofy ).
- In Virtofy on the PC, click on the VR headset icon in the upper right corner to start VR mode.
- If a dialog box appears, select “Steam-VR”.
- You should now see Virtofy on your PC screen and on the Meta Quest VR headset.
Troubleshooting
We are working on this documentation part. Please stay tuned.
Additional software
Visual cpp redistributable install
BETA
The Google Play Store app does not refresh the Virtofy Viewer app
Under some cirumstances the Google Play Store app does not refresh it’s cache to show you the update for the Virtofy Viewer app. You can fix this as follows (on your android device): “go to Device Settings -> Apps -> All” and click on the “Google Play Store App” entry. Scroll down and click on “Clear Cache”. Open the “Google Play Store App” again via the link from the Virtofy download section, you should see now an “Update” button now.
Networking
Proxy server
Ports
Frequently Asked Questions (FAQ)
Questions about VR
What is Virtual Reality?
VR is a computer generated environment, that can be experienced with a VR headset. To interact, you can use gestures and VR motion controllers. Applications of virtual reality can include entertainment, business and educational purposes. Other types of VR style technology include augmented reality and mixed reality.
Are there age restrictions?
We do not recommend to use VR for children younger than 12 years. The minimum distance between their eyes (interpupillary distance) is not developed enough yet to have an effective 3D depth effect.
Are there any safety precautions?
In case you have any health problems, please first consult your doctor regarding the safety of using VR with your condition. In case you feel dizziness or motion sickness during your VR experience, we recommend taking a little break.
Questions about Virtofy
What is Virtofy?
Virtofy is a Virtual Presentation System - flexible and easy to use for everybody.
Who is Virtofy for?
Agencies, Designers, Planners, Industry Clients, Educational institutions. Possibly also for you. Try our free version to find out!
Can anyone use Virtofy?
Yes. We created Virtofy as easy to use as possible to make it accessible for a wide range of users. It offers a seamless user experience, whether you are on desktop, a mobile device or in VR.
What do I need for a Virtofy account? Is it free?
You can use the trial version . After the trial period the account will be switched to the free version.
Does Virtofy work offline?
Virtofy needs an active internet connection. However, when you create your Virtofy tours in Unity 3D, you can also work offline.
Who created virtofy?
Virtofy is made by eachTick GmbH which has its headquarter in the wonderful city of Cologne in Germany. The core development team knows each other for over +10 years and has a lot of experience in app, game and VR development.
Content Creation
Which programs and file formats can I use to create contents?
Use the software you like, as long as you follow our guidelines for supported file-formats . The Virtofy tours themselves are created either with the Virtofy In-App Editor for quick & direct solutions or with our Unity 3D plugin for complex virtual presentations.
Can you create a Virtofy tour for us?
Yes, just drop us a line, what you want and we will create a special offer for you.
How long should a Virtofy tour in VR be approximately?
One Virtofy tour in VR should not be longer than 10-15 minutes. This duration we found to work best for presenting in VR, especially with people who are not used to the technology.
Are there things which are not allowed in Virtofy?
Virtofy is not allowed to be used for contents like pornography, violence, weapons, drugs, promoting violence or hate towards an existing group, race, nation or religion.
For more information on this, please read the license agreement on the license page .
How to Support the Developers
Why we need test data
You want to make sure your data works well with Virtofy? Then you can help us by providing test data! This allows us to provide a smooth workflow and user experience for you.
What data and further information we need
If you want to provide test data to us, please follow these guidelines:
- 3D file formats: FBX, DAE, GLTF, IFC (provide as many formats as possible)
- Image file formats: jpg, png
- Please tell us the name of the 3D program you used to create the data
- If possible, send us example pictures of how the 3D file looks in your program, so that we can compare and check if the data is displayed correctly in Virtofy
How to send the data
Please send us the required information including a link where we can download your test data. You can provide the data via your preferred way of uploading (Google Drive, Wetransfer, Dropbox, FTP).
Questions & Feedback
Thank you for your help! Our team will get personally in touch with you regarding your data. If you have any questions, please contact us .
Security
Who can access my Virtofy tour?
Only people that you add to the sharing list of your Virtofy tour can start the tour on their own. If you want to invite other users into an active online tour, you can do that directly from within the tour. The users you invite don’t need to be on your sharing list to participate.
Can other users access my uploaded source files?
No, only you as tour owner can access your original source files. When you import them, they are converted for a secure and performant experience. Everybody who starts your tour will only see the converted data. They will never have acess to the original source files. Only if you forward the actual tour ownership to another account, they would be able to acess the source files of your tour.
How is my data protected?
Our cloud service is hosted in Germany and Finland.
Plans and Payment
What is the difference between the free Virtofy version and the paid versions?
Find out more in our detailed comparison of features and plans .
Do you offer special plans, e.g. for schools, universities etc?
If you are a bigger company, a university or similar and need more than 10 seats, just contact us and and tell us what your requirements are.
Can I mix several plans for one account?
No, this is not possible.